Unleashing Fun and Learning: The Balloon Science Experiment
As an experienced crafter and a lover of all things experimental, I can’t help but share my enthusiasm for the Balloon Science Experiment. This classic activity captures the imagination of both children and adults alike. Whether you’re a teacher looking to liven up your classroom, a parent trying to instill a love for science and creativity in your kids, or simply someone who enjoys a good hands-on project, you’ll find immense joy in this experiment.
Not only is it a fantastic way to explore the principles of chemistry and physics, but it’s also incredibly popular because it’s simple, requires inexpensive materials, and can be done at home with ease! Plus, who doesn’t enjoy inflating balloons? So, let’s dive into the fascinating world of Balloon Science and explore how to make it happen.
What Is Balloon Science?
The Balloon Science Experiment uses a fascinating chemical reaction between a base and an acid to create carbon dioxide gas, which, in turn, inflates a balloon. It’s an engaging way to teach kids about chemical reactions, gas expansion, and even the scientific method.
I often use this experiment during science fairs or as a fun Saturday afternoon activity with my little ones; it’s a brilliant way to bond while learning something new. Plus, it provides instant gratification—the moment the balloon inflates is nothing short of magical!
Materials Needed
Before we get started, here’s a simple list of materials you’ll need:
- Baking soda (1–2 tablespoons): This acts as your base.
- Vinegar (approximately 1 cup): Your acid that reacts with baking soda.
- A balloon: The star of our experiment (any color will do!).
- A plastic bottle or jar: We’ll use this to contain our reaction.
- A funnel: Makes transferring baking soda into the balloon easier.
- Measuring cups and spoons: For accuracy in measurements.
- A funnel or a piece of paper rolled into a cone shape: To help pour the baking soda into the balloon.
- A watch or clock: To time your experiment and see how quickly the reaction occurs.
*Optional Materials:*
- Safety goggles: Always a good idea when doing experiments!
- Food coloring: This can add an interesting visual twist to your project.
Step-by-Step Instructions
Step 1: Prepare Your Balloon
First things first: we need to attach the balloon to the funnel. Stretch the opening of the balloon over the funnel, allowing it to rest securely. Before you start moving on to the baking soda, use this moment to reflect on how creating an airtight seal will be essential for our reaction (or else we risk losing that precious gas!).
Step 2: Measure the Baking Soda
Scoop out about 1–2 tablespoons of baking soda using your measuring spoon and pour it into the balloon (through the funnel). This step is crucial as the amount of baking soda will dictate how vigorously the reaction occurs. If you use too much baking soda, it might produce a rapid reaction that could explode (not literally, but you may have a mess), so err on the side of caution if you're trying this for the first time.
Common Mistakes: Underestimating the amount of baking soda. If the balloon doesn't inflate as expected, try adding a bit more in your next attempt!
Step 3: Add Vinegar to Your Bottle
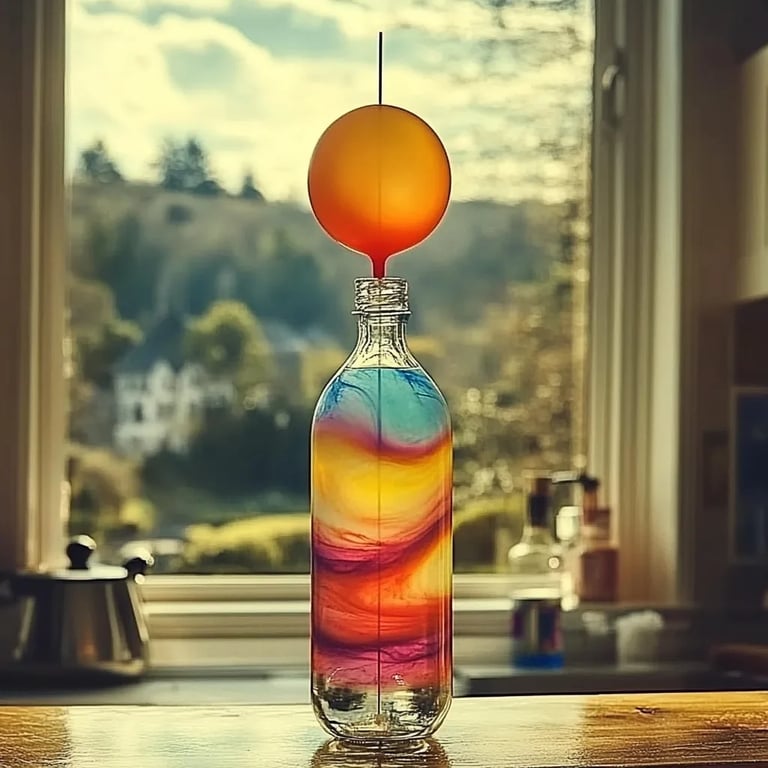
Pour approximately one cup of vinegar into your plastic bottle or jar. If you're using food coloring, now’s the time to add a few drops to the vinegar. This not only brightens up the vinegar but also makes the experiment visually exciting!
Step 4: Set Up the Experiment
Position the bottle or jar (which now contains vinegar) so that it’s stable and ready for action. Hold the neck of the balloon upward, ensuring the baking soda stays inside the balloon and does not touch the vinegar yet.
Step 5: Combine and Observe the Reaction
Now, the moment you’ve been waiting for! Carefully lift the balloon, allowing the baking soda to pour into the vinegar. Watch as the mixture begins to bubble and fizz, creating carbon dioxide gas that will inflate the balloon. This reaction is a classic demonstration of an acid-base interaction, where the baking soda (a base) neutralizes the vinegar (an acid), producing that delightful gas.
What Could Go Wrong: If your balloon doesn’t inflate after allowing the reaction to run its course, it could mean that the balloon wasn’t sealed properly around the bottle, or you didn’t use enough baking soda. Double-check everything and adjust your measurements accordingly.
Step 6: Celebrate Your Success!
Once the balloon is fully inflated, take a moment to celebrate your success! This is a great opportunity to discuss with your kids why the reaction worked and what they learned from it. It’s a triumph of science, and those moments of wonder are priceless.
Troubleshooting Common Issues
- The Balloon Doesn’t Inflate: If your balloon doesn't inflate, check your seal around the bottle. Also, ensure that you have enough baking soda in the balloon.
- Overflowing Reaction: Too much baking soda can cause an overflow. If you see this happening, quickly lift the balloon back to prevent a mess or prepare for a foamy eruption!
- Materials Not Available: If you're running low on ingredients, you can substitute baking soda for a mix of flour and water as a thicker base, but the reaction will be less vigorous.
Safety Tips
While this project is generally safe, ensure you supervise younger children closely. Vinegar can be irritating to the eyes and skin, so consider wearing safety goggles. Always conduct experiments in a well-ventilated area.
Creative Variations
To enhance the experiment further, consider the following ideas:
- Different Balloon Sizes: Experiment with different sizes of balloons to measure how much gas is produced with varying amounts of ingredients.
- Temperature Effects: Try using warm vs. cold vinegar and observe how the reaction changes. This can lead to discussions about how temperature affects chemical reactions.
- Add Fragrance: If you want to make the experiment more engaging, add a few drops of essential oils to the vinegar before the reaction. It’ll make your experiment smell lovely while you enjoy the reaction.
- Color Mixing: Instead of just using a single color of food coloring, experiment with mixing different colors to create unique mixtures of gas-filled balloons.
In Conclusion
The Balloon Science Experiment is more than just a simple activity; it’s a window into the exciting world of scientific exploration. I hope this detailed guide encourages you to try this experiment, whether you’re alone or with family. Remember, the beauty of crafting and science lies in the exploration of ideas—the joy in the unexpected results.
So gather your materials and unleash your inner scientist. Have fun, learn, and make memories while you watch the magic unfold in the form of an inflated balloon. Happy experimenting!