##Unleashing Creativity: How to Make Baking Soda Watercolors
As an experienced crafter, I’m excited to share one of my favorite projects: making homemade baking soda watercolors. This DIY activity is not only a fun way to explore your artistic side, but it also taps into kid-friendly, non-toxic materials that are safe for all ages. In a world where we frequently reach for expensive art supplies, baking soda watercolors provide an affordable and creative alternative that’s perfect for everything from casual painting sessions to teaching children about colors and mixing.
I've found that baking soda watercolors are particularly popular for their vibrant color potential and the unique texture they offer. Plus, the entire process—from creation to application—can be a joyous way to spend an afternoon. Whether you're an art educator, a parent looking for fun activities, or simply a nostalgic soul seeking a creative outlet, this project will surely delight your senses.
What You’ll Need:
Before diving in, let’s gather our supplies. The great thing about these watercolors is that they’re made from materials you likely already have at home!
- 4 tablespoons Baking Soda
- 2 tablespoons White Vinegar
- 1 tablespoon Corn Syrup (or an alternative sweetener, like agave syrup)
- Food Coloring or Liquid Watercolors (I'm partial to food coloring for ease)
- Mixing Bowls and Whisks (or spoons)
- Ice Cube Tray or Small Containers (for storing your paints)
- Paper (Watercolor or thick paper works best)
- Paintbrushes
Step-by-Step Tutorial
Step 1: Combine the Dry Ingredients
First, in a mixing bowl, measure out 4 tablespoons of baking soda and set it aside. This step is crucial since baking soda acts as a base for our paint, giving it that fun, textured quality. Make sure to level the measuring spoons for accuracy; too much baking soda may result in a gritty texture, while too little could yield a more watery paint.
Step 2: Add Vinegar
Next, add 2 tablespoons of white vinegar to the baking soda. You’ll notice some fizzing and bubbling as the vinegar reacts with the baking soda; this is normal and exciting! The chemical reaction creates carbon dioxide gas, which helps the paint to be lighter and easier to work with. It’s a fun visual for kids, too!
*Tip: Make sure to use a bowl large enough to contain the fizz. If you’re doing this with children, ensure they stand back to enjoy the show safely.*
Step 3: Sweeten It Up
Once the fizzing has stopped, stir in 1 tablespoon of corn syrup. This ingredient adds viscosity and a bit of shine to your watercolors. If you’re allergic or prefer not to use corn syrup, you can substitute with honey or agave syrup—just be aware that these options may alter the paint’s texture slightly.
Step 4: Divide and Color
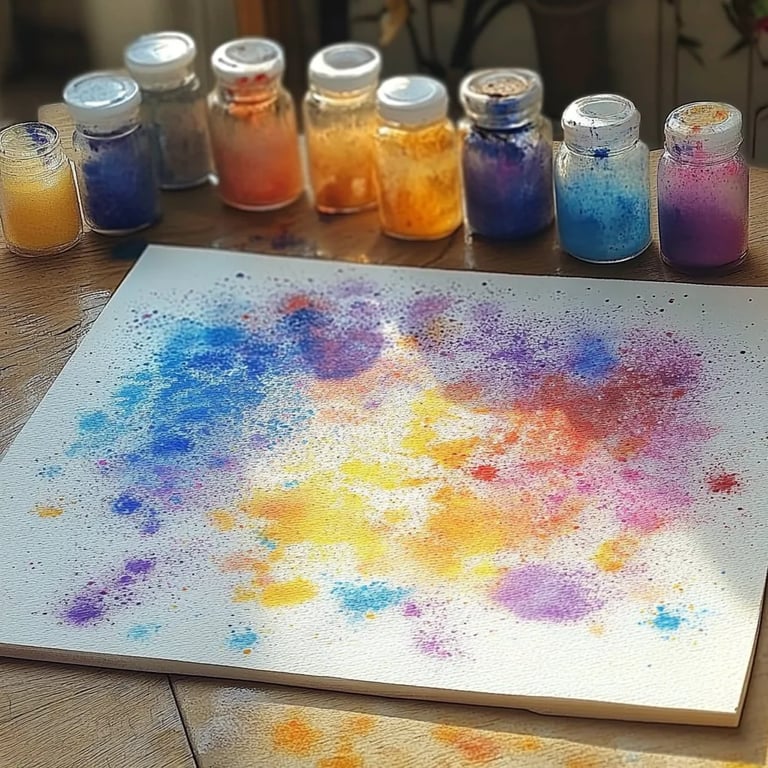
Now comes the fun part! Pour the paint mixture into an ice cube tray or small containers. Each compartment will be a different color, so think about the palette you want. Drop a few drops of food coloring into each section; you can mix primary colors to create secondary colors (like red and yellow to make orange). This step encourages exploration and teaches color theory, making it a fantastic educational experience.
*Tip: Don’t be afraid to experiment! I often mix unexpected colors together to see what vibrant shades I can create. Keep a notebook handy to jot them down.*
Step 5: Let It Dry
Now, it’s time to let your watercolors dry for at least 24 hours. The drying period can be hard to resist, as you might be eager to start painting right away. Patience, my friends! During this time, the paint will harden into solid blocks that will be ready for use. They should come out easily from the tray once dried, but if they stick, let them dry longer.
*Tip: I sometimes pop my tray in a well-ventilated area to speed up the process. Avoid placing them in direct sunlight, as this can cause them to crack.*
Using Your Baking Soda Watercolors
Once your paint is dry, it’s time to unleash your creativity! All you need to do is add water directly to the paint block and start painting. You’ll find that it activates quite easily, and the colors yield a vibrant quality that rivals store-bought paints.
Tips for Optimal Use:
- Water Control: Use a small amount of water to begin with—too much can make the paint too runny.
- Maintaining Color Vibrancy: Add slightly less water if you want deeper colors.
- Experiment with Brushes: Different sizes of brushes yield unique textures and strokes—try them all!
Common Pitfalls and Fixes:
- Clumping: If you notice clumps of baking soda in your paint, mix it more thoroughly before adding the vinegar.
- Colors Not Bright Enough: Add more food coloring for a richer color palette; don't be shy!
- Too Sticky: If your paint feels sticky after it dries, it might be due to the corn syrup. A quick sprinkle of baking soda can help absorb the excess moisture.
Creative Variations
Once you get the hang of basic baking soda watercolors, experiment with additives! Some of my favorites include:
- Salt Crystals: Sprinkle salt on your wet paint to create interesting textures.
- Essential Oils: Add a drop of essential oils to the paint for a light fragrance.
- Glimmer Effect: Incorporate a pinch of glitter into your mixtures for some sparkle!
Personal Anecdotes
I remember the first time I introduced baking soda watercolors to my niece and nephew. Their initial skepticism quickly transformed into joy as we created vibrant paintings side by side. They loved mixing colors and were amazed by how easy it was to clean up afterwards—just soap and water!
Safety and Cleanup
All materials in this project are safe for children, but it's always best to supervise younger artists when using any art supplies. If spills happen, just clean with soap and water immediately. For ambitious crafters, this can also be a great outdoor activity—just lay out some newspaper and enjoy painting under the sun!
Final Thoughts
Baking soda watercolors are a delightful way to engage in creative expression while utilizing safe and accessible materials. Whether you're crafting with kids, hosting an art night with friends, or simply looking to unwind yourself, this satisfying process will leave you with not just beautiful paintings but cherished memories.
So, gather your baking soda and get to mixing! Your next masterpiece awaits. Happy crafting!