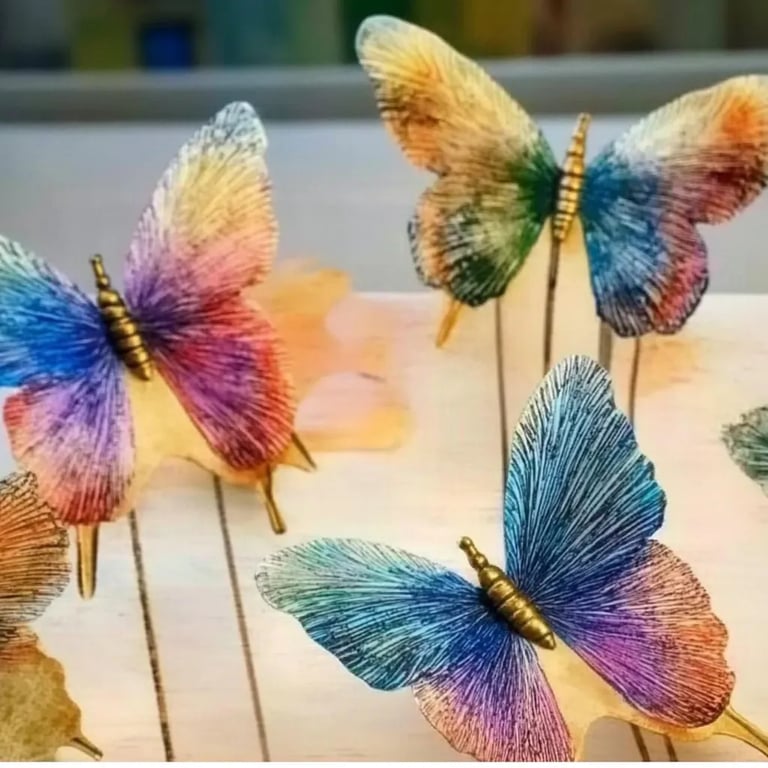
The Art of Creating Chromatography Coffee Filter Butterflies: A Step-by-Step Guide
Hello, fellow crafters! Today, I’m excited to share with you a delightful project that combines art, science, and a bit of whimsy: Chromatography Coffee Filter Butterflies. I’ve been crafting for years, and this particular activity never fails to evoke smiles—not just from my family and friends, but from the many young crafters I’ve guided through the process.
What Are Chromatography Coffee Filter Butterflies?
So, what exactly are these charming creations? Chromatography Coffee Filter Butterflies are vibrant, colorful butterflies made using simple materials that vividly demonstrate the science of chromatography—a method used to separate mixtures. These butterflies are not only stunning decorations but also a fantastic way to teach kids about colors, art, and science simultaneously.
These butterflies are perfect for various occasions! Whether you’re looking to brighten up a room, decorate for a party, or engage kids in a fun science project, they are an excellent choice. Plus, this project stands out as a fun activity for classrooms, craft groups, or rainy-day projects at home.
Why Is This Craft Popular?
The appeal of Chromatography Butterflies lies in their beauty and the thrill of watching colors mingle and transform right before your eyes. They serve as an educational tool to spark curiosity about science while allowing the creativity of design. Parents and teachers love these butterflies because they are inexpensive, quick to create, and provide excellent opportunities for discussion about both art and science.
Materials You Will Need
Before we jump into the step-by-step tutorial, let’s gather our materials. You won’t need much to embark on this creative journey—just some basic supplies that are easily accessible.
- Coffee Filters (preferably white or plain)
- Washable Markers (assorted colors)
- Water (in a spray bottle or shallow dish)
- Pencil or Pipe Cleaner (for the butterfly’s body)
- Scissors
- Paper Towels (for drying)
- Plastic Tray or Plate (to catch excess water)
- Optional: Glitter or Stickers (for extra embellishments)
Step-By-Step Tutorial
Now, let’s get started! Follow these steps, and I promise you’ll end up with a lovely flock of butterflies that you’ll be proud to display.
Step 1: Prepare Your Workspace
Choose a flat surface where you can work comfortably without disturbing your surroundings. It’s best to lay down some old newspapers or a plastic tablecloth to keep your area mess-free, especially since food coloring can stain surfaces.
Step 2: Color Your Coffee Filters
- Choose Your Colors: Start by selecting your favorite colors of washable markers. Bright colors work best, but feel free to experiment with different shades for more vibrant results.
- Draw Your Design: Lay a coffee filter flat and begin drawing designs on it. I love using circular patterns, lines, and swirls. Encourage kids to get creative—there are no wrong ways to color!
Tip: To create stunning variations, don’t be afraid to layer your colors. This adds depth and interest to your butterflies.
What Could Go Wrong: If you find the colors seem too muted, you may not be using enough ink. Additional layers of coloring can enhance the result!
Step 3: Transform the Coffee Filters with Water
- Spray or Dip: Once you’re happy with your design, it's time to bring those colors to life! If you have a spray bottle, lightly mist the coffee filter with water. Alternatively, you can dip the edges in a shallow dish of water.
Why This Matters: Spraying or dipping triggers the chromatography process, causing the colors to bleed and spread beautifully, creating lovely patterns.
- Watch the Magic: As the water reacts with the ink, you’ll see the colors start to mix and blend. This transformation is the most enchanting part of the process.
What Could Go Wrong: If you use too much water, the colors will become muddy and unrecognizable. Don’t worry, though! If this happens, simply set the filter aside to dry, grab another, and start fresh.
Step 4: Dry the Butterflies
- Lay Flat: Once you’re satisfied with the colors, carefully place the coffee filter on a paper towel to absorb excess water. Lay them flat to dry; this usually takes about 10-15 minutes.
- Tip: If you’re in a rush, you can gently blot them with a paper towel to speed up the drying process.
Step 5: Shaping the Butterflies
- Accordion Fold: Once dry, take your coffee filter and pinch the center. Next, accordion-fold it, creating pleats.
- Secure: Use a pipe cleaner or pencil to twist around the center, securing your folds. This will form the body of your butterfly. If you're using a pencil, you can leave it in place for a whimsical touch.
Step 6: Fluff and Display
- Fluff the Wings: Adjust the paper filter's wings by gently pulling them apart and fluffing them up.
- Decorate: For extra sparkle, feel free to add glitter or stickers on the wings.
Creative Variations
- Different Shapes: While we’re focusing on butterflies, you can easily adapt this method to create other insects or flowers. Just change the folding technique!
- Color Themes: Celebrate holidays or seasons by using a color scheme—pastels for spring, warm colors for autumn, etc.
- Mixed Media: Use colored pencils for finer details after the marker bleeding process. This can add a different texture and dimension to your butterflies.
Safety Warnings
Although this project is safe for children, be cautious with younger ones around scissors and avoid using permanent markers, as they can create difficult-to-remove stains. Always supervise to ensure safety and enjoyment.
Troubleshooting and Tips
- Ink Not Spreading: Ensure you are using washable markers—permanent ink won't spread effectively with water.
- Butterflies Falling Apart: If your butterfly doesn’t hold together, simply double the pipe cleaner or pencil to reinforce its body.
A Personal Anecdote
I’ll never forget the first time I created these butterflies with my niece Lily. At first, she was hesitant, but once the colors started to bloom, her eyes widened in awe. We began decorating the yard for a summer party, and soon after, we hung those butterflies everywhere! The joy they brought to our family gathering was unparalleled—a moment I cherish and hope to recreate with you!
Conclusion
Creating Chromatography Coffee Filter Butterflies is an engaging, educational, and beautifully crafty activity that brings joy to everyone involved. With just a few materials and a bit of creativity, you can foster a love for art and science in children and adults alike.
I hope you feel inspired to give this project a try! Remember, craft with joy, embrace the mess, and always let your creativity take flight. Happy crafting! 🦋