Rainbow Pour-Paint Pumpkins: An Amazing Ultimate Guide
Rainbow Pour-Paint Pumpkins is an incredible way to bring vibrant color to your fall décor. Using a unique pouring technique, you can create whimsical pumpkins that are perfect for Halloween or autumn-themed decorations. This activity transcends traditional pumpkin carving and offers a fun, creative outlet for all ages.
Imagine stepping into your home and being greeted by beautifully painted, multi-colored pumpkins that instantly brighten up your space. Not only can they capture the spirit of the season, but they also make for engaging family projects. Whether you’re an experienced crafter or a novice, the colorful cascading layers will reignite your creativity. You'll appreciate how easy and fun it is to transform ordinary pumpkins into extraordinary masterpieces.
In this article, you’ll discover why this Rainbow Pour-Paint Pumpkins technique is a must-try, what items you'll need to get started, and detailed instructions on how to create your stunning designs. Get ready to unleash your artistic side and make this fall unforgettable!
Why You'll Love This Technique
Rainbow Pour-Paint Pumpkins presents a delightful fusion of art and seasonal cheer. Here are some compelling reasons why you’ll fall for this creative project:
- Endless Creativity – You can experiment with different colors, patterns, and pouring techniques to make each pumpkin unique.
- Fun for Everyone – Kids and adults can join in, making it a fantastic group activity for families or friends.
- No Carving Required – Say goodbye to the mess and stress of carving. This method is cleaner and safer for younger children.
- Display Versatility – These painted pumpkins can adorn your home from September through Thanksgiving, making them a versatile decorative choice.
- Great Gift Idea – Share the joy of creativity! Gift your painted pumpkins to friends and family as a delightful surprise.
- Boosts Mental Health – Engaging in arts and crafts can provide stress relief and improve your mood.
These captivating elements make Rainbow Pour-Paint Pumpkins an excellent choice for unleashing your creativity this fall!
Preparation and Cooking Time
Creating your Rainbow Pour-Paint Pumpkins takes about 1.5 to 2 hours. Here’s a quick rundown of the time involved:
- Preparation Time: 20-30 minutes (setting up your work area and gathering materials)
- Painting Time: 1-1.5 hours (depending on the complexity of your designs)
- Drying Time: 24 hours (to allow the pumpkins to dry completely)
Plan accordingly, and enjoy the process!
Ingredients
- White or orange pumpkins (varied sizes)
- Acrylic paint (vibrant colors of your choice)
- Pouring medium (optional, for improved flow)
- Plastic cups (for mixing paints)
- Disposable tablecloth or newspaper (to protect your work surface)
- Paintbrushes or foam brushes (for detailing)
- Plastic gloves (to keep your hands clean)
- Containers for drainage (to catch excess paint)
- Water (for diluting paint, if necessary)
Step-by-Step Instructions
Follow these steps to create stunning Rainbow Pour-Paint Pumpkins:
- Prepare Your Workspace: Lay down a disposable tablecloth or newspaper to protect your surfaces.
- Gather Materials: Organize all your supplies and make sure you have everything within reach.
- Choose Your Pumpkins: Select the size and shape of pumpkins you want to paint.
- Mix Paints: In plastic cups, mix your chosen acrylic paints. You can add pouring medium or water to achieve a better flow.
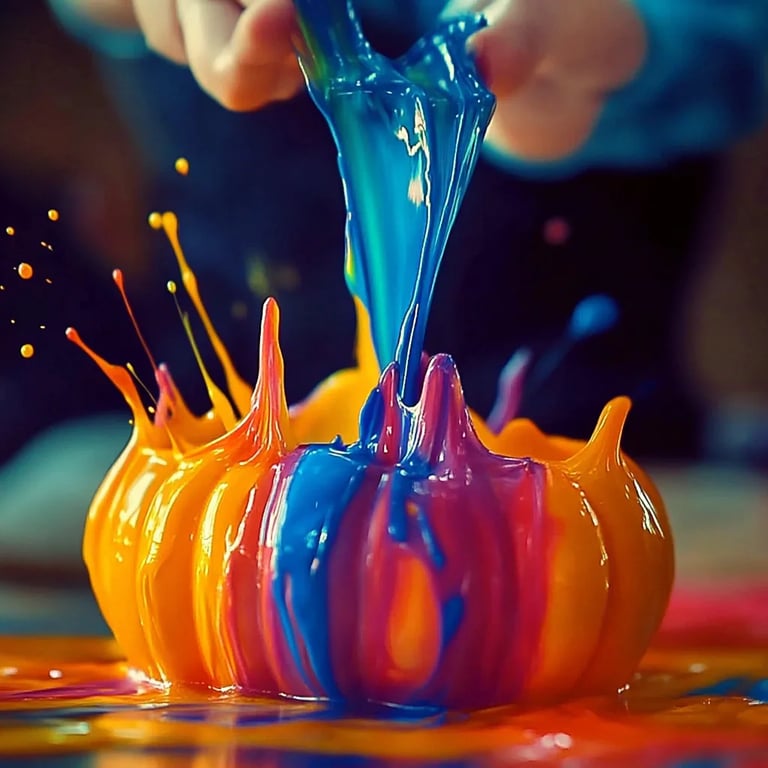
- Start Pouring:
- Begin with a base color. Pour a small amount of it onto the pumpkin.
- Tilt the pumpkin to help the paint spread evenly.
- Layer Colors: Continue pouring additional colors in a different spot. Allow them to blend and flow naturally down the pumpkin.
- Use a Brush: If desired, use a paintbrush to blend colors or add details.
- Allow Excess Paint to Drain: Place the pumpkin on a container to catch excess paint as it drips off.
- Dry Completely: Let the pumpkin dry for 24 hours to ensure the paint sets properly.
- Seal Your Design (Optional): Once dry, consider applying a spray sealant to protect your design from weather if displaying outdoors.
By following these simple steps, you'll create beautiful Rainbow Pour-Paint Pumpkins that are sure to be the talk of the season.
How to Serve
Once your Rainbow Pour-Paint Pumpkins are complete, consider these ideas for showcasing them:
- Display at Entryways: Line them up at your front porch or entryway for a warm, inviting atmosphere.
- Table Centerpieces: Use them as colorful centerpieces for your dining room table or seasonal gatherings.
- Mix and Match: Combine them with traditional autumn décor, such as hay bales, gourds, or fall leaves for a festive, layered look.
- Involve Kids: Set up a craft corner at family gatherings, letting kids select their favorite painted pumpkins.
- Take Photos: Capture the moment! Photograph your colorful creations as part of your fall festivities.
By thoughtfully showcasing your Rainbow Pour-Paint Pumpkins, you'll create an engaging and colorful display that embodies the spirit of the season. Enjoy your crafting adventure!
Additional Tips
- Choose the Right Pumpkins: Opt for pumpkins with smooth surfaces for better paint adhesion. Look for larger ones if you want a more dramatic effect.
- Experiment with Colors: Mixing different shades can create a stunning visual effect. Try neon colors for a modern twist or pastels for a softer look.
- Protect Your Work Area: Pouring paint can be messy, so make sure to cover any surfaces that might get splattered.
- Use Different Pouring Techniques: Explore techniques like the “dirty pour” or “flip cup” for unique results. Each method can yield distinct patterns.
- Create a Community Craft Day: Invite friends or family for a craft day. It’s a great way to bond and share ideas while getting creative together.
Recipe Variation
You can personalize your Rainbow Pour-Paint Pumpkins with these fun variations:
- Textured Designs: Use a sponge or textured brush to create interesting patterns after pouring.
- Glitter Finish: Add a sprinkle of glitter after the paint has dried for a sparkling touch.
- Themed Colors: Tailor your color scheme to match a specific theme, like a spooky Halloween palette or Thanksgiving hues.
- Glowy Paints: Use glow-in-the-dark paints for a surprising effect during nighttime displays.
- Inspirational Words: Write or paint inspiring words or quotes on the pumpkins after the pour has dried.
Freezing and Storage
- Freezing: While freezing isn’t recommended for painted pumpkins, you can preserve the raw pumpkins for use in other projects or food.
Special Equipment
Here are some tools that can enhance your pour-painting experience:
- Pouring Containers: Use small cups or pitchers for better control over pouring.
- Heat Gun or Hair Dryer: Helps with speeding up drying times slightly; however, use cautiously.
- Paint Squeegees: For easy manipulation of paint if you want to spread it more evenly.
- Mixing Sticks: A variety of stirrers will help with creating custom paint blends.
- Sealing Spray: A protective sealant is ideal to protect the design from the elements if displayed outdoors.
Frequently Asked Questions
Can I use real pumpkins and carve them later?
Yes, but the carving should be done after the paint dries. However, keep in mind that painting will change how the pumpkin rots over time.
What if my paint isn’t flowing well?
Consider adding more pouring medium or water to improve its viscosity for better flow.
Are there any other surfaces I can paint?
Absolutely! You can also use this pour painting technique on wood, canvas, or glass surfaces.
How do I clean up after the project?
Cleaning up involves quickly discarding any excess paint and washing brushes and cups with soap and water.
Is there a specific paint type I should use?
Acrylic paint works best for this project as it adheres well and comes in various colors.
Conclusion
Rainbow Pour-Paint Pumpkins offer a unique and creative alternative to traditional pumpkin decoration, allowing individuals of all ages to express their artistic flair. With this guide, not only can you create stunning fall decorations, but you can also engage in a fun, effective bonding activity with family and friends. As autumn draws near, there’s no better way to celebrate the season than by letting your imagination run wild with color and creativity. Embrace the joy of crafting and enjoy beautiful decorations that reflect the spirit of fall!