Painted Log Garden Seats: The Ultimate Amazing Guide for 7 Stunning Designs
Painted log garden seats are the perfect addition to any outdoor space. These unique and eye-catching pieces bring a touch of nature into your garden while giving you a comfortable spot to relax. Whether you're enjoying a sunny afternoon with a book or hosting a garden party with friends, painted log garden seats offer both functionality and style. This guide will take you through the many reasons you’ll love these garden seats, along with practical tips for creating and incorporating them into your garden design.
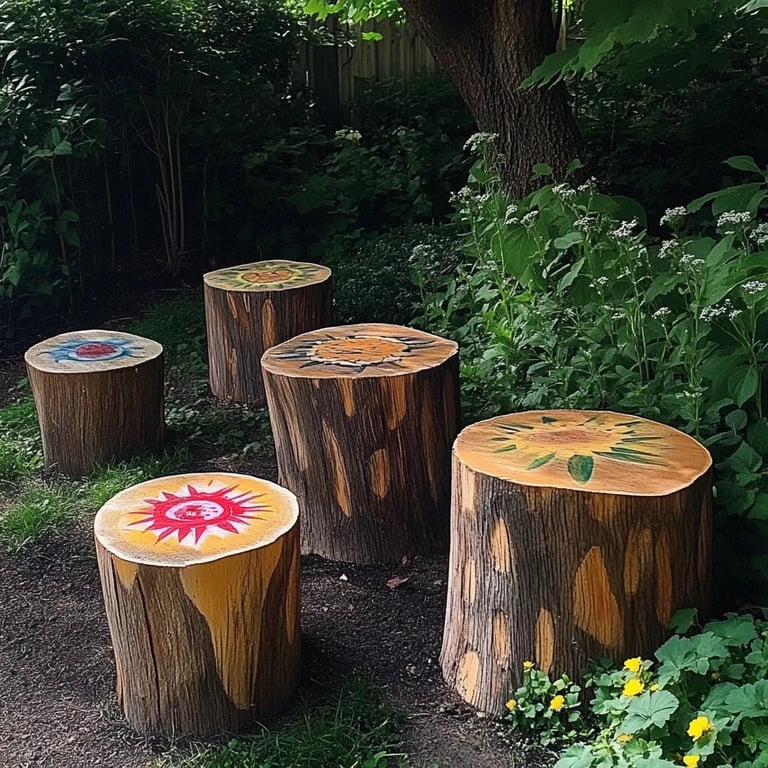
Imagine a piece of furniture that not only complements your garden's natural beauty but also adds a splash of color and personality. The creative potential with painted log seats is almost limitless. You can explore various colors, patterns, and finishes, making each piece uniquely yours. As you delve into this guide, you'll discover some amazing designs, useful tips for maintenance, and how to best serve these charming seating options in your garden.
Why You’ll Love Painted Log Garden Seats
There are countless reasons why painted log garden seats stand out in outdoor decor. Here are some compelling elements to consider:
- Eco-Friendly Material: By using logs, you are repurposing natural resources, making these seats a sustainable choice.
- Unique Aesthetic: Each log has its own character, and when painted, they can showcase vibrant colors that enhance your garden's overall appeal.
- Comfortable Seating: With soft cushions or a little weatherproof finishing, these seats can be quite comfortable for long lounging hours.
- Easy DIY Projects: Creating your painted log garden seat can be a fun and fulfilling project, perfect for garden enthusiasts or crafty individuals.
- Adaptable Style: They can fit various garden themes, from rustic to modern, depending on your painting style and finish.
- Durability: With proper treatment, painted log garden seats can withstand the outdoor elements, ensuring they last for many seasons.
- Conversation Starter: The uniqueness of painted log seats often draws attention and is a fantastic icebreaker in social gatherings.
Incorporating painted log garden seats into your outdoor space will not only enhance your garden's beauty but also provide a cozy retreat for everyone to enjoy.
Preparation and Painting Techniques
Getting your painted log garden seats ready is a delightful process. Here’s a breakdown of steps you might consider:
- Selecting Quality Logs: Ensure your logs are dry and free from pests. Softwoods like cedar and redwood are excellent choices due to their naturally resistant qualities.
- Cutting for Size: Logs can be cut to various lengths, depending on their intended use as seats or tables.
- Sanding: Sand the logs thoroughly to avoid any splinters. This step is crucial for a polished final product.
- Priming: Apply a base coat or primer to ensure the paint adheres well and increases durability.
- Choosing Your Colors: Decide on paint colors and patterns that align with your garden's palette. Bright hues can add whimsy, while muted tones provide elegance.
- Applying Paint: Use outdoor paint to resist weather conditions. A brush can give a detailed finish, while a spray can cover larger areas faster.
- Finishing Touches: After the paint dries, seal your painted log seats with a weatherproof sealant to provide longer-lasting protection against the elements.
With these steps, you can prepare and paint stunning garden seats that not only fit your personal style but also stand the test of time.
Ingredients for Painted Log Garden Seats
While you're not actually cooking, putting together your painted log garden seats requires a specific set of materials. Here’s what you’ll need:
- Quality logs (dry and pest-free)
- Outdoor primer
- Outdoor paint (various colors)
- Brush or spray nozzle for paint application
- Sandpaper (medium and fine grit)
- Weatherproof sealant
- Soft cushions (optional for comfort)
- Protective gear (gloves, mask)
These ingredients will help you create stunning and functional garden seats that will be the envy of your neighbors.
Step-by-Step Instructions for Creating Painted Log Garden Seats
Creating your painted log garden seats can be a fun project. Here’s a step-by-step guide to accomplishing this:
- Choose Logs: Select logs based on desired length and thickness for your seats.
- Cut and Sand: Use a saw to cut the logs to the desired height. Sand all surfaces smooth to prevent splinters.
- Wash Logs: Clean the logs thoroughly to remove any dirt or debris.
- Prime Logs: Apply a coat of outdoor primer and let it dry completely.
- Paint Base Color: Choose a base color for your logs and apply it evenly. Allow this coat to dry.
- Design the Pattern: Add layers or patterns using additional colors, if desired. Be creative!
- Seal the Paint: Once dry, apply a weatherproof sealant to protect your artwork from the elements.
- Add Cushions: Place soft cushions on top of your logs for added comfort, especially if you plan to use them frequently.
- Arrange in Your Garden: Position your painted log garden seats in your preferred outdoor location.
With these steps, you'll have attractive and practical seating in your outdoor space!
How to Serve Your Painted Log Garden Seats
Serving painted log garden seats in your outdoor space can create an inviting atmosphere. Here are some tips on how to make the most of them:
- Create a Cozy Setup: Arrange your painted logs in a circle or semi-circle to encourage conversation among guests.
- Add Comfort Elements: Incorporate colorful cushions or blankets to make the seating more inviting.
- Use Side Tables: Pair your log seats with small tables made from similar materials for drinks and snacks.
- Integrate with Nature: Position the seats near flower beds or under trees to create a natural, serene environment.
- Lighting: Use string lights or lanterns nearby to add a magical ambiance during evenings.
- Plant Accents: Surround your seating area with potted plants or fairy gardens to enhance the aesthetic.
By considering these ideas, you'll transform your painted log garden seats into a focal point that everyone will enjoy while adding to your garden’s beauty.
Now, take your inspiration and transform your outdoor area into something remarkable with painted log garden seats!
Additional Tips
- Choose Outdoor-Friendly Paint: Always opt for paint designed for outdoor use. This ensures a longer-lasting finish that withstands various weather conditions.
- Use Non-Toxic Sealants: If you have pets or kids, select sealants that are safe for the environment. This keeps your space healthy and worry-free.
- Rotate Seating Annually: To avoid uneven fading caused by sun exposure, rotate your painted log garden seats each season. This ensures a uniform look for your garden.
- Regular Maintenance: Inspect your painted log garden seats for signs of wear and tear. Touch up paint or sealant as needed to keep them looking fresh.
- Personalization: Consider adding your name, quotes, or garden motifs to your painted log seats for a personal touch.
Recipe Variation
You can easily customize your painted log garden seats to suit your garden theme. Here are a few ideas:
- Mixed Media Versions: Combine paint with decoupage techniques. Use colorful fabric or paper to create unique designs.
- Seasonal Themes: Switch up your designs seasonally. Bright colors for summer, earthy tones for fall, and pale shades for winter create a diverse garden ambiance.
- Texture Play: Experiment with different textures by incorporating rough and smooth areas in your painting, giving a more dynamic look.
Freezing and Storage
While you cannot technically freeze painted log garden seats, you must take proper precautions for their upkeep to ensure longevity.
Special Equipment
To create your painted log garden seats successfully, you will need specific tools and equipment:
- Circular saw (for cutting logs)
- Sanding block or power sander
- Paintbrushes (various sizes for detailed work)
- Paint sprayer (optional for larger areas)
- Cleaning cloths (for thorough cleaning before painting)
- Weatherproof sealant applicator (brush or spray can)
Frequently Asked Questions
How long will my painted log garden seats last?
With proper maintenance and care, your painted log garden seats can last for many years, even decades.
Can I use any type of log for this project?
While many types of logs are suitable, hardwoods tend to be more durable. However, softwoods like cedar and redwood work well too, as they naturally resist rot.
How often should I repaint or reseal my log seats?
It depends on environmental exposure, but generally, every 2-3 years is a good rule of thumb. Inspect regularly for wear.
Is it safe to paint over old paint?
Yes, but it's advisable to sand down any rough or flaking areas first. This helps the new paint adhere better.
Can children participate in painting the logs?
Absolutely! Engaging kids in this creative project can make it a fun family activity, just ensure they have supervision and safe materials.
Conclusion
Painted log garden seats beautifully merge aesthetics with function in any outdoor space. Their eco-friendly nature, unique appeal, and ease of customization make them the perfect project for garden enthusiasts. By following the guidelines and incorporating various designs and colors, you can create stunning seating that not only enhances your garden but also provides comfort for all who visit. Dive into this charming DIY project, and watch your outdoor oasis transform!