Illuminate Your Space: A Step-by-Step Guide to Crafting Pressed Flower Lanterns
There's something incredibly magical about bringing nature indoors, and one of my favorite ways to do so is by creating pressed flower lanterns. These enchanting pieces meld art and nature, allowing light to shine through beautifully preserved blooms, creating a soft, diffused glow that transforms any space into a haven of warmth. Whether you’re preparing for a cozy evening at home, decorating for a special occasion, or even searching for that perfect handmade gift, pressed flower lanterns are an expressive, personalized project sure to impress.
In this guide, I will take you through my comprehensive, step-by-step process for crafting these stunning lanterns, sharing tips and tricks that I've learned over the years to help you achieve beautiful results. So, grab a cup of tea, roll up your sleeves, and let’s dive into the world of pressed flower lanternmaking!
Why Pressed Flower Lanterns?
Pressed flower lanterns have surged in popularity for their aesthetic appeal and simplicity. They bring a touch of natural beauty into our everyday lives and work wonderfully as conversation starters or simple decor pieces. You can use them for mood lighting during a cozy dinner, garden parties, or as chic nightlights for kids who aren’t quite ready to sleep in complete darkness.
Materials You’ll Need
Before you get started, it’s essential to gather all the materials needed for this project. Having everything at hand will make the crafting process smoother. Here’s what you’ll need:
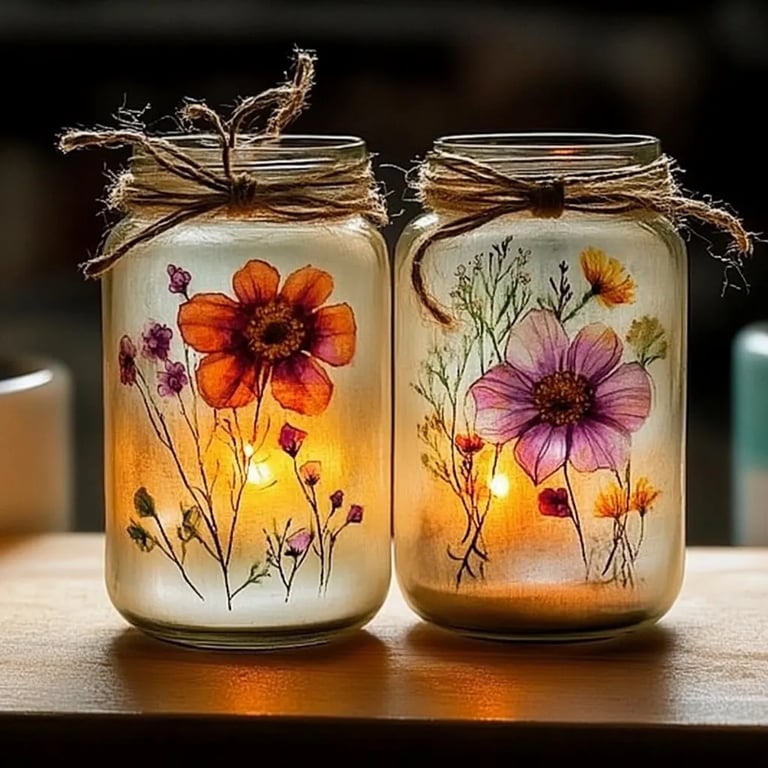
- Glass jars or lantern bases: Mason jars, candle holders, or any transparent containers work great.
- Pressed flowers: You can use flowers from your garden, wildflowers, or dried flowers from craft stores. Opt for flat flowers like pansies, daisies, or even leaves.
- Mod Podge or clear-drying craft glue: This will act as a sealant and adhesive.
- Paintbrush or sponge brush: For applying the glue evenly without damaging the petals.
- Battery-operated tea lights: Safety first! Regular candles can lead to fire hazards when placed near flammable materials.
- Clear acrylic spray sealer (optional): This helps to protect your lantern and enhance the longevity of the flowers.
- Scissors: For trimming the flowers or making adjustments as needed.
- Paper towel or absorbent cloth: To clean up any spills.
Step-by-Step Tutorial
Step 1: Gather and Prepare Your Flowers
Start by collecting flowers that appeal to you. I often take walks in my garden or around my neighborhood and collect small blooms that catch my eye. If you want to ensure your flowers are flat, you can press them before moving on to the next step. Place flowers between sheets of wax paper or in a flower press, then place heavy books on top. Leave them for at least a week.
Tip: Look for flowers at their peak bloom for vibrant colors. If you notice any wilting, it’s best to avoid them.
Step 2: Clean Your Jars
Next, take your glass jars and clean them thoroughly with hot soap and water. Remove any labels and residues, as this will help your lanterns look polished.
Tip: Make sure the jars are completely dry before moving on. Any moisture could ruin the adhesion of your pressed flowers.
Step 3: Arrange Your Flowers
Before gluing, lay your pressed flowers against the outside of the jar to visualize your design. This step is important as you want to make sure that the arrangement is pleasing and balanced.
Common Mistake: People can get carried away and overcrowd the lantern. Less is often more when it comes to floral designs.
Step 4: Adhere the Flowers
Using your paintbrush, apply a thin layer of Mod Podge or craft glue onto the back of each flower and press them firmly onto the jar. Hold each flower in place for a few moments to ensure it sticks properly.
What Could Go Wrong: If the glue is too thick, it might make the flowers opaque or unattractive. Apply sparingly!
Step 5: Seal the Design
Once you've arranged all your flowers, create a top layer of Mod Podge over your design to seal and protect the flowers. Try to use smooth, even strokes, and don’t fret if the flowers lift slightly; you can press and reposition them while the glue is still wet.
Pro Tip: This step adds a protective layer and ensures that the flowers don't get damaged over time.
Step 6: Let It Dry
Allow your lantern to dry completely. This can take a few hours, depending on your climate. If you want to speed things up, a sunny window can help.
Step 7: Apply the Sealer (Optional)
If you prefer added protection, lightly spray your lantern with a clear acrylic sealer once it’s dry. This helps to fortify the flowers and keep them looking fresh.
Step 8: Add Your Light Source
Carefully place a battery-operated tea light inside your lantern. I always prefer the warm glow of yellow LEDs, as they replicate candlelight better than harsh white lights.
Step 9: Enjoy!
Once everything is set, find a special spot in your home for your newly crafted lantern. Light it up during an evening gathering, or place it in a cozy corner for a serene touch.
Creative Variations
Feel free to expand your creativity beyond just flowers! Try incorporating leaves, herbs, or even feathers for a unique twist. You can also experiment with colored jars to create themed lanterns for different seasons or holidays.
Personal Anecdote: For a recent autumn gathering, I pressed vibrant maple leaves and combined them with dried lavender to create a rustic vibe. The guests loved how they drew in the colors of the season!
Safety Warnings
- Always use battery-operated lights: Real candles positioned too close to flammable materials can pose significant fire hazards.
- Ensure the lantern is stable: Before placing a lantern on a flat surface, double-check that it's secure and won’t tip over easily.
In Conclusion
Crafting pressed flower lanterns not only beautifies your space; it also connects you to the natural world, and the process itself becomes a delightful meditative experience. Don't rush! Enjoy every step, and don’t hesitate to experiment with different designs and colors.
Through this journey, let each lantern reflect your unique style. I hope that this guide inspires you to bring a little piece of nature indoors, lighting up your home with the warmth and glow of your creativity. Happy crafting!