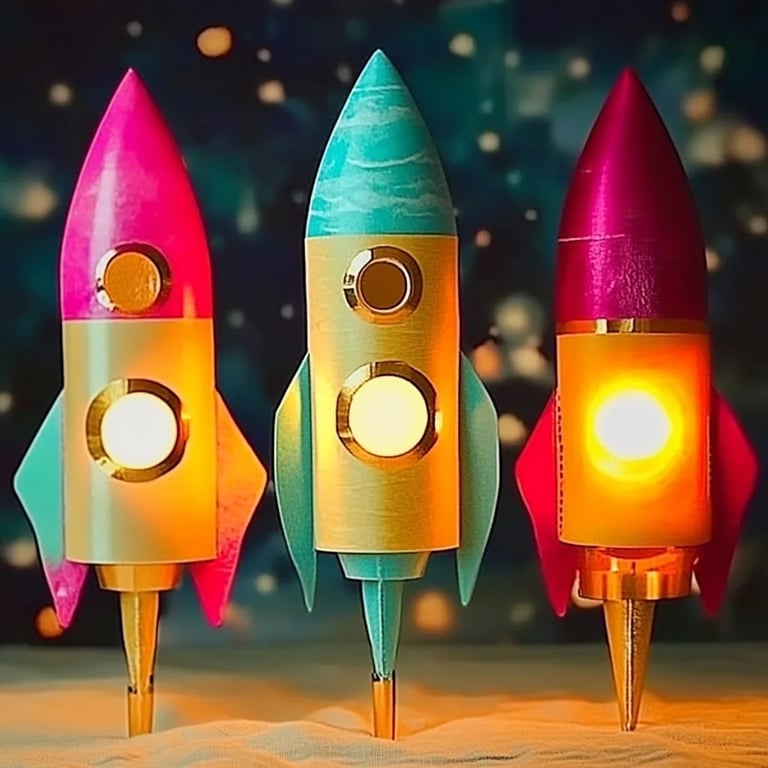
How to Make Toilet Roll Space Rocket Night Lights: A Step-by-Step Guide
Hello, crafty friends! Today, I'm thrilled to share with you a delightful DIY project that combines both creativity and functionality: Toilet Roll Space Rocket Night Lights. As a seasoned crafter, I’ve always believed that the most enjoyable projects are those that also serve a purpose. These enchanting little rocket lights are perfect for brightening up a child’s bedroom, adding a whimsical touch to any home décor, or igniting a love for space exploration in young minds.
These adorable night lights have gained popularity in recent years due to their eco-friendly materials, ease of crafting, and the joy they bring to children’s bedtime routines. Plus, they’re perfect for use during sleepovers, family movie nights, or as a unique gift for little astronauts in your life. I can’t wait to take you through this enjoyable crafting adventure!
Materials Needed
Before I dive into the step-by-step tutorial, let’s gather our materials. This project uses simple, accessible items that you likely already have at home. Here’s what you will need:
- Toilet paper rolls (one for each rocket)
- Acrylic paint in various colors (red, blue, silver, or any space-themed colors)
- Paintbrushes (flat for larger areas, detail brushes for intricate designs)
- LED tealight candles (these are safe, battery-operated lights that mimic a real flame)
- Craft foam or felt (for rocket fins)
- Scissors (for cutting shapes)
- Glue (hot glue for sturdiness or white craft glue)
- Markers or stickers (for decoration)
- Optional: Glitter spray (for a shimmering effect!)
Step-by-Step Tutorial
Step 1: Prepare the Toilet Paper Rolls
Start by gathering your toilet paper rolls. If you want a more uniform appearance, you can cut them to your desired height. Each roll can be anywhere from 4 to 6 inches tall, depending on how dramatic you want your rocket’s height to be.
Why this matters: A consistent size helps ensure the overall aesthetic of the rockets. Variations can be exciting, but it's important for them to feel coherent as a set.
Tip: If you find the edges rough, just use some sandpaper to smooth them down.
Step 2: Paint the Rockets
This is where the real fun begins! Grab your acrylic paints and start giving your toilet rolls a brilliant coat of color. Make sure to apply a base coat first, and allow it to dry thoroughly. You can create patterns or use a solid paint job—whatever inspires you!
Things to watch for: Make sure to apply enough paint so that no cardboard peeks through. A thin layer may lead to a watercolor-like finish that isn’t as vibrant.
Solution: If you accidentally paint an area you didn't intend to, don't worry! Just wait for it to dry slightly and carefully touch it up with a different color.
Step 3: Create Rocket Fins
While your base coat is drying, it’s time to make the fins that will stabilize your rocket. Use craft foam or felt to cut out triangle shapes, approximately 2 to 3 inches in size. You’ll need four fins per rocket.
Tip: To give the fins some personality, you can paint them or add glitter for sparkle. Just remember to avoid overdoing it—glitter can be messy!
Why is this important: The fins not only make the rocket look impressive, but they also help it stand upright when finished.
Step 4: Assemble the Rockets
Once your paint is dry, it’s time to glue on the fins. I typically use a hot glue gun for this step as it provides a quick, strong hold. Attach each fin at an angle on the lower section of the rocket.
Caution: Be careful while using hot glue, as it can cause burns. Use a fine-tipped glue applicator if you have one, as it allows for better precision.
Common mistakes: Ensure that the fins are evenly spaced; otherwise, your rocket might tip over. If this happens, simply remove the fin and reapply it correctly.
Step 5: Add the Light Source
Now comes the magical part! Take your LED tealight candle and place it inside the rocket. You can also cut a small hole at the bottom of the roll to make everything tidy. When you turn the light on, your rocket will glow beautifully!
Alternative method: If you want to showcase a more ambient design, consider placing the tee-light inside the roll but leaving the top open. This mimics the look of a real rocket launch.
Step 6: Final Touches and Decoration
Now it’s time to get creative! Use markers or stickers to decorate your rocket. Draw stars, add a name, or create fun graphics that would make a child excited to look at it.
Tip: Personal touches make the rockets memorable. Encourage children to help in this process—it fosters their creativity and can enhance their connection to the nightlight.
Step 7: Light It Up!
Once everything is assembled, arrange your dreamy little rocket night lights in your kids' room, a hallway, or even create a stunning display on a shelf! The warm glow will create a soothing atmosphere, making it a perfect companion as the little ones drift off to sleep.
Final Thoughts and Tips
Creating toilet roll space rocket night lights can be an incredibly rewarding project. Not only is it a great use of recyclable materials, but crafting can also be therapeutic. I've spent countless evenings pouring my creativity into similar projects, and it always brightens my day—literally and figuratively!
Safety Reminder: Always supervise young children during the crafting process, especially when using scissors and hot glue.
Encouraging Variations: Here are some fun ways to customize your rockets:
- Paint them to look like a rocket from your favorite sci-fi movie or your child’s imagination.
- Create a series of rockets with different themes, like animals or planets, painted to match their characteristics.
In conclusion, these toilet roll space rocket night lights are not just an art project; they’re a pathway for creativity and innovation at home. I hope my tips help you navigate any hiccups along the way, and I can’t wait to hear about your adventures in crafting! Happy crafting, and may your dreams be filled with stars!