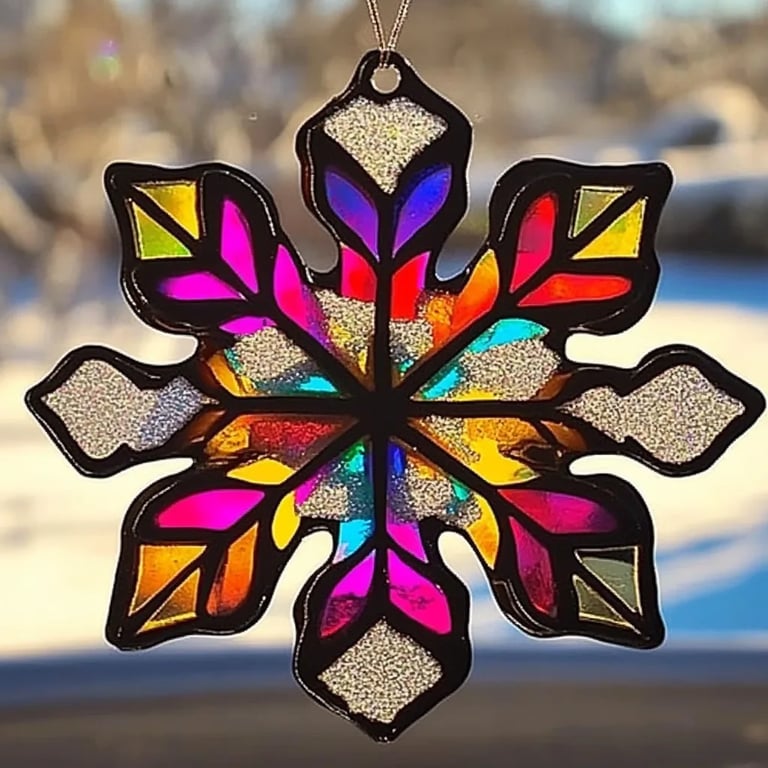
#How to Make Stained Glass Snowflake Suncatcher: A Step-by-Step Guide
Introduction
There's something truly magical about the beauty of stained glass, especially during the winter months when the snow gently blankets the world outside. As a seasoned crafter, I adore creating stained glass suncatchers, particularly snowflake designs that catch the sunlight and dance in a rainbow of colors across my walls. Not only do these stunning pieces brighten up a dreary winter day, but they also add a hint of festive spirit to any home.
Creating a stained glass snowflake suncatcher is a popular project that appeals to crafters of all skill levels. Whether you hang it in your window during the holidays or give it as a heartfelt gift, this DIY project is perfect for showcasing your creativity. Plus, it's a wonderful way to spend quality time with family or friends while exploring your artistic side.
In this comprehensive tutorial, I will guide you through the process of crafting your very own stained glass snowflake suncatcher, utilizing simple and affordable materials that are easy to come by. I'm excited to share my insights, tips, and tricks to ensure your crafting journey is smooth and enjoyable. Let’s get started!
What You'll Need
Materials:
- Acrylic Craft Paint or Transparent Glass Paint (in various shades of blue, white, and clear)
- Clear Plastic Sheet or Transparency Film (for the base)
- Paintbrushes (various sizes, for different details)
- Pencil and Ruler (for measuring and marking)
- Adhesive Stencils or Craft Cutting Machine (optional, for precision)
- Black Outline Paint or Permanent Marker (for the lines)
- Sheer Nylon String or Fishing Line (for hanging)
- Scissors
- Pencil or Sharpie (for design)
- Sealer (optional) (to protect your completed artwork)
Safety Gear:
- Safety goggles (if using glass or sharp materials)
- Gloves (optional, for handling paint)
Step-by-Step Tutorial
Step 1: Choose Your Design
Before diving into the painting, I recommend sketching out your snowflake design on a piece of paper. Snowflakes can take on many forms—some are intricate, while others are simple. This is your chance to get creative! I often reference real snowflakes or create abstract designs. Don’t hesitate to mix and match elements.
*Tip:* If you're nervous about drawing your design freehand, consider using adhesive stencils or a craft cutting machine. This can add a professional touch to your suncatcher!
Step 2: Prepare Your Work Area
Grab your materials and set up a clean, well-lit workspace. A flat surface covered with old newspaper will protect your table and make cleanup easier.
*Why it’s important:* A tidy workspace prevents paint spills and keeps you organized, minimizing stress while crafting.
Step 3: Transfer the Design
Use your ruler and pencil to lightly draw the outline of your snowflake on the clear plastic sheet or transparency film. The transparency will allow the light to pass through beautifully.
*What could go wrong:* If you make mistakes, don’t sweat it! You can easily wipe clean small pencil marks with a damp cloth before the paint dries.
Step 4: Paint the Base Layer
Using your chosen acrylic craft paint or transparent glass paint, begin painting the larger sections of your snowflake. For a wintery feel, I recommend using different shades of blue paired with white.
*Tip:* Apply thin layers to prevent clumping and allow each section to dry between coats, which will enhance the vibrancy of the colors.
*What could go wrong:* If your paint runs, use a small brush to touch up the edges while it’s still wet.
Step 5: Add Accents and Details
Once your base layer has dried, it’s time to add detail! Using a smaller brush, incorporate contrasting colors to highlight sections of your snowflake. You can even sprinkle in some glitter paint for extra sparkle.
*Personal Anecdote:* I once experimented with transparent glitter paint—this made my snowflakes shimmer like the ice crystals they mimic!
Step 6: Outline Your Design
With your black outline paint or a permanent marker, carefully outline the snowflake design. This step is crucial because it adds definition and contrast, making the colors pop!
*What could go wrong:* Take your time—rushing can lead to uneven lines. If you accidentally smudge the outline, wait for the paint to dry completely, then use a damp cloth to carefully remove the paint before it sets.
Step 7: Seal Your Artwork (Optional)
If you've used regular acrylic paint, consider sealing your suncatcher with a clear acrylic sealer to protect your hard work from dust and fading.
Step 8: Prepare for Hanging
Once everything is dry, assess the best method for hanging your suncatcher. I prefer to use sheer nylon string or fishing line because it’s nearly invisible, allowing your creation to shine. Cut a piece about 12 inches long and tie it at the top of the suncatcher.
*Tip:* If you want additional design elements, you can attach faux crystals or beads to the string for an extra splash of color.
Creative Variations
- Different Shapes: Try crafting snowflakes of various shapes or even create a whole winter scene—a gingerbread house with snowflakes fluttering around!
- Layering Colors: Instead of simply painting flat colors, experiment with layering shades to create depth and complexity in your design.
- Themed Suncatchers: Create suncatchers that reflect other seasons or holidays, like flowers for spring or leaves for fall.
Final Thoughts
Crafting stained glass snowflake suncatchers is a delightful way to express your creativity and bring a bit of joy into your home. I hope this guide has inspired you to embark on your crafting adventure. Remember, every snowflake is unique—just like your creativity!
Feel free to share your creations and experiences. I would love to hear how your suncatchers turned out, and don’t hesitate to ask questions along the way. Happy crafting!