How to Make Stained Glass Glue Art: A Step-by-Step Guide to Your Next Crafting Adventure
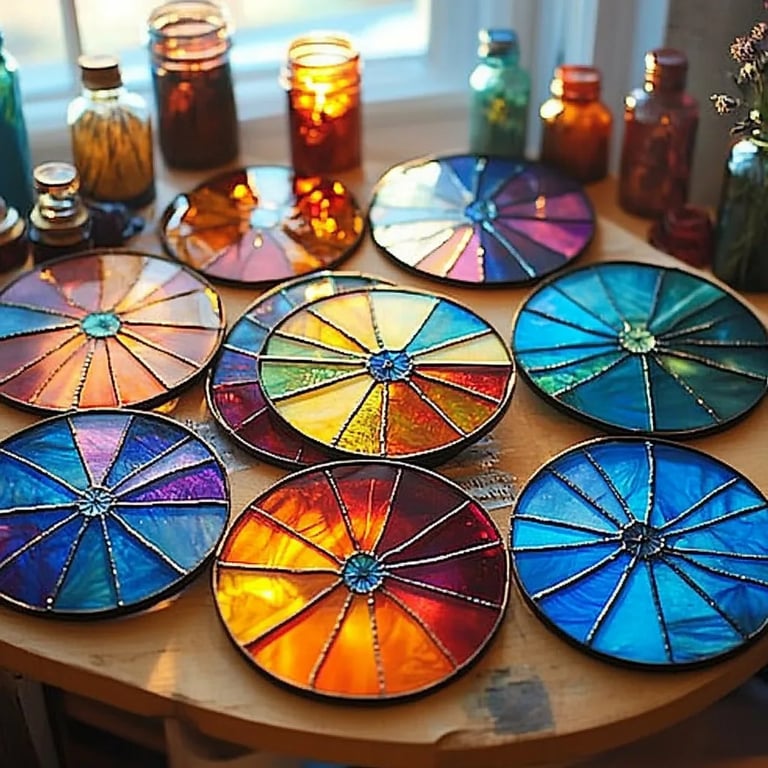
Hello, fellow crafters! Today, I'm thrilled to share one of my absolute favorite crafting projects: stained glass glue art. This charming and versatile art form has taken the crafting world by storm, and for good reason. Not only is it visually stunning and reminiscent of the beautiful stained glass windows found in grand cathedrals, but it also offers a platform for endless creativity—all from the comfort of your home.
Whether you're looking to create vibrant pieces for your home, make thoughtful gifts, or start a new passion project, stained glass glue art is a fantastic way to express yourself. It's a popular choice because it's relatively easy to master and the results can be breathtaking. I often find that these vibrant pieces bring warmth and color into my space, making them perfect for brightening up a room or even for special occasions like weddings or holidays.
In this comprehensive guide, I'll walk you through the entire process, sharing detailed steps, insider tips, and some common pitfalls to avoid. So grab your supplies and let’s dive into the amazing world of stained glass glue art!
What You Will Need
Materials
- Clear Glue – I recommend using a clear tacky glue or a specialty stained glass glue, as it provides a strong bond and dries clear.
- Food Coloring or Liquid Watercolors – For pigmenting your creations, I often use food coloring because it’s readily available and inexpensive. Liquid watercolors are another great option for a vibrant finish.
- Wax Paper or Parchment Paper – A non-stick surface to work on; this ensures your creation won’t stick to the surface once you’re ready to peel it off.
- Plastic Squeeze Bottles or Piping Bags – These make it easy to create fine lines and shapes.
- Toothpicks or Small Brushes – Useful for spreading the glue and adjusting details.
- Optional: Glitter, beads, or other embellishments – To add extra flair to your design.
Safety Supplies
- Apron or Old Clothes – It can get a bit messy, so I always wear something I don’t mind staining.
- Gloves – If you’re sensitive to the adhesive, consider using gloves to protect your skin.
The Process
Step 1: Gather Inspiration and Sketch Your Design
Before you get started, take some time to gather inspiration. Look through art books, browse online galleries, or perhaps even take a stroll around your neighborhood to admire actual stained glass windows. Sketch out your design on a piece of paper first.
Why This Matters: Planning your design helps you visualize the final piece and ensures you have an idea of how to lay out your colors and shapes before diving into the glue.
Step 2: Prepare Your Workspace
Set up your workspace with all your materials within reach. Lay down wax or parchment paper as your working surface, ensuring it’s flat and clean.
Tips: Keep paper towels or baby wipes handy for any spills and accidents.
Step 3: Mix Your Colors
In separate containers, mix your glue with food coloring or liquid watercolors to reach your desired shades. If you aim for an opaque finish, you may want to add a bit more color.
Common Mistake: Avoid using too much food coloring as it may affect the glue’s ability to adhere properly. Start with a few drops and add more as needed!
Step 4: Outline Your Design
Using a squeeze bottle or piping bag, carefully trace the outline of your design onto the wax paper. This will serve as the lead to hold your colors in.
Why It’s Important: The outline keeps your colors contained, much like the lead lines in traditional stained glass. Take your time to ensure these lines are smooth and connected; any gaps could lead to color bleeding.
Tip: If your outline isn’t perfect, you can either fix it with glue or use a toothpick to make adjustments. Just work quickly before it dries!
Step 5: Fill in the Colors
Now it’s time for the fun part—filling in your colored sections! Squeeze the colored glue into the areas defined by your outlines.
Why This Matters: This step is crucial for achieving that "stained glass" effect, so be mindful of your color choices. Blend colors if desired; I often experiment with ombre effects or swirling two colors together.
Tips to Remember:
- If you’re layering colors, let each layer dry a bit before adding the next to avoid muddiness.
- Avoid overfilling; it’s better to come back for a second layer than to make a mess.
Step 6: Add Embellishments (Optional)
While the colored glue is still wet, feel free to sprinkle glitter, place beads, or add any other embellishments to your piece. This adds unique detail and a special touch.
Step 7: Allow to Dry
Patience is key! Allow your stained glass glue art to dry completely. Depending on the thickness, this might take anywhere from a few hours to overnight.
What Could Go Wrong: If you attempt to peel it off too soon, it might tear or not come off the wax paper cleanly. So, resist the temptation to rush!
Step 8: Peel Off and Enjoy!
Once fully dry, gently peel your artwork off the wax paper. It should come off easily, revealing a beautiful stained glass piece you can display!
Troubleshooting
- If the glue is still too sticky or tears: It may need more drying time. Place it in a warmer area to speed up the process.
- If colors bleed: This can happen if your outline was not strong enough. For future projects, ensure your outlines are connected and solid for better color containment.
Creative Variations
- Use colored glass pieces or gemstones instead of just glue and color for a more traditional look!
- Create sun catchers by hanging your finished pieces in a window to maximize light exposure.
- Combine multiple small designs into a larger piece to create a collage effect.
Final Thoughts
Stained glass glue art is not just a craft; it’s an opportunity to express your unique vision and artistry. I find it incredibly fulfilling to see my ideas come to life, and I hope you will too. Whether you're gifting your creations or keeping them for your own home, I guarantee you will enjoy every moment of this creative pursuit.
So roll up your sleeves, gather your materials, and start creating your very own stained glass glue art today. Remember, crafting is about enjoying the journey, learning from each experience, and most importantly, having fun. Happy crafting!