How to Make Spooky Tissue Paper Jars: A Step-by-Step Guide to Crafting Halloween Decor
As the days grow shorter and the nights grow longer, I often find myself diving into a whimsical world of crafts perfect for Halloween. One of my favorite projects to share with friends and family is creating Spooky Tissue Paper Jars. These hauntingly beautiful decor pieces not only serve as eerie lighting options but also lend a cozy, homemade touch to any Halloween gathering or fall celebration. Plus, they are straightforward to create, making them perfect for crafters of all skill levels!
Why Spooky Tissue Paper Jars?
Spooky Tissue Paper Jars have gained popularity for several reasons. They are inexpensive, using just a few basic materials, and they bring a warm glow to any environment with minimal effort. These jars can serve various functions: as spooky lanterns for your porch, charming table centerpieces, or even as fun party favors when filled with candy. With Halloween knocking on our doors, it's the ideal time to bring a bit of crafty magic into our homes.
Materials You'll Need
Before diving into the hands-on work, let's gather our materials. You may already have most of these items in your home or local craft store!
- Clean Glass Jars: Mason jars or any jar with a wide mouth will work. Glass jars give a polished look and are reusable.
- Tissue Paper: Orange and black are traditional, but feel free to explore other colors or patterns that reflect your unique style.
- Mod Podge or White School Glue: These will help adhere the tissue paper to the jars and create a beautiful, translucent effect.
- Water: If using school glue, it’s helpful to dilute it a bit.
- Brushes: A flat brush is ideal for applying glue smoothly.
- LED Tea Lights: For safe illumination, especially if you’re using flammable materials.
- Scissors: For cutting the tissue paper.
- Black Marker or Paint: For spooky faces or designs.
- Optional Decorations: Ribbons, washi tape, or other embellishments to make your jar unique.
Safety Warning:
Remember, if using regular candles instead of LED tea lights, never leave them unattended, and be cautious with flammable materials.
Step-by-Step Tutorial
Now that we have our materials ready, let’s jump into the fun part! Here’s how I craft my Spooky Tissue Paper Jars, step by step.
Step 1: Prepare Your Jars
Start by cleaning your glass jars thoroughly. Any leftover residue can prevent the tissue paper from adhering properly and may affect the final look. Make sure they are dry before moving on.
Tip: If you’re using recycled jars and there’s stubborn goo from labels, soak them in warm soapy water to help remove it.
Step 2: Cut Tissue Paper
Here’s where the fun begins! Cut your tissue paper into manageable pieces—roughly 2×2 inches works great, but you can also create shapes or strips if they suit your design better.
Personal Anecdote: My daughters love to help with this part. We enjoy cutting different shapes and letting our imaginations run wild. Their creativity often inspires new designs that I might not have thought of!
Step 3: Mix the Glue
If you're using school glue, mix it with a bit of water (1:1 ratio) to create a spreadable paste. This helps the glue go on more smoothly and allows for better absorption by the tissue paper.
Why This Matters: A smoother application allows for fewer wrinkles and bubbles, leading to a better end product.
Step 4: Adhere the Tissue Paper
Using your flat brush, apply a thin layer of glue onto the jar. Start with a small section and place the tissue paper pieces flat against the jar before brushing another layer of glue on top. Ensure you’re gentle to avoid tearing the delicate tissue paper.
Common Pitfall: Wrinkles may form if you press down too hard. If this happens, gently lift the paper, smooth it out, and replace it. Remember, crafting is about experimenting!
Step 5: Create Your Design
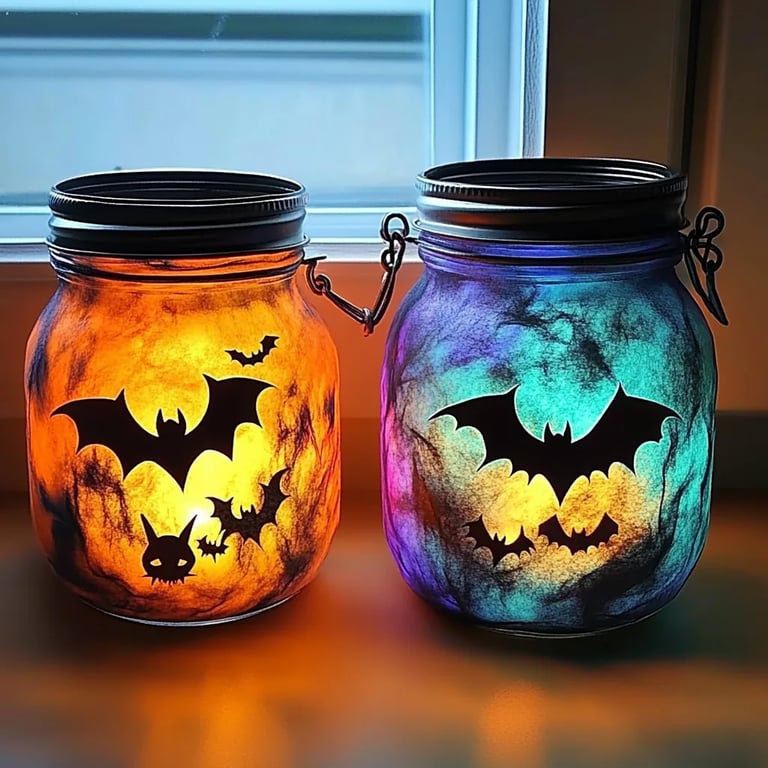
Continue layering tissue paper until the entire jar is covered. For a spooky effect, use black tissue paper and apply pieces in different orientations, allowing for a bit of the glass to peek through for added depth.
Creative Variation: For some added fun, consider cutting out spooky shapes (like bats, ghosts, or pumpkins) from black construction paper and gluing them on top of the tissue paper for added dimension.
Step 6: Let it Dry
Now comes the most challenging part: patience! Allow your jars to dry completely—about an hour or two is perfect.
Tip: Place them on a newspaper to catch any excess glue drips.
Step 7: Add Faces or Art
Once your jars are dry, it’s time to get creative! Using a black marker or paint, draw spooky faces or designs on the surface. This can be as simple or intricate as you like.
Personal Insight: I love taking inspiration from classic Halloween characters! My favorite is an oversized grin, which seems to delight everyone who sees it.
Step 8: Place Your LED Lights Inside
Pop an LED tealight in each jar. If you’re making several, consider clustering them together for a darker, more dramatic effect.
Tip: Experiment with different sizes and types of jars. Mixing heights can create visual interest!
Troubleshooting Common Issues
Throughout my crafting journey, I've encountered a few challenges. Here’s how to solve some common problems:
- Uneven Coverage: If some areas are missing tissue paper, simply apply more glue and place new pieces on top.
- Tear in Paper: Don’t worry! I simply glue down a new piece on top of the tear and add more glue to blend it in.
Alternative Methods & Ingredient Substitutions
If you don't have Mod Podge or school glue handy, you can easily make your own by mixing equal parts of white glue and water combined with a tiny bit of corn syrup for smooth application.
Final Thoughts & Creative Variations
Once your Spooky Tissue Paper Jars are complete, the fun doesn’t have to stop there! Consider adding extra embellishments, such as twinkling fairy lights inside, or wrapping the jar neck with jute twine for a rustic touch. You could also paint the jars with glow-in-the-dark paint to create an even more enchanting atmosphere at night!
These jars are not just for Halloween; think about using them as seasonal decor throughout fall, adapting their designs for Thanksgiving by swapping out colors or motifs.
—
By sharing this journey from the materials list to a stunning finished product, I hope I’ve ignited your passion for crafting! These Spooky Tissue Paper Jars reflect not just seasonal charm but also the warmth of creativity shared among family and friends. So grab your supplies and experience the joy of making something uniquely yours! Happy crafting!