How to Make Rainbow Swirl Bouncy Balls: A Comprehensive Guide for Crafting Enthusiasts
Hello fellow crafters! I'm excited to share one of my absolute favorite DIY projects with you: making Rainbow Swirl Bouncy Balls. These vibrant, colorful spheres are not only a delightful sight but also provide endless fun and a satisfying tactile experience. Whether you’re looking for a creative activity to do with your kids, a unique party favor, or just a cool project to showcase your crafting skills, these bouncy balls fit the bill perfectly.
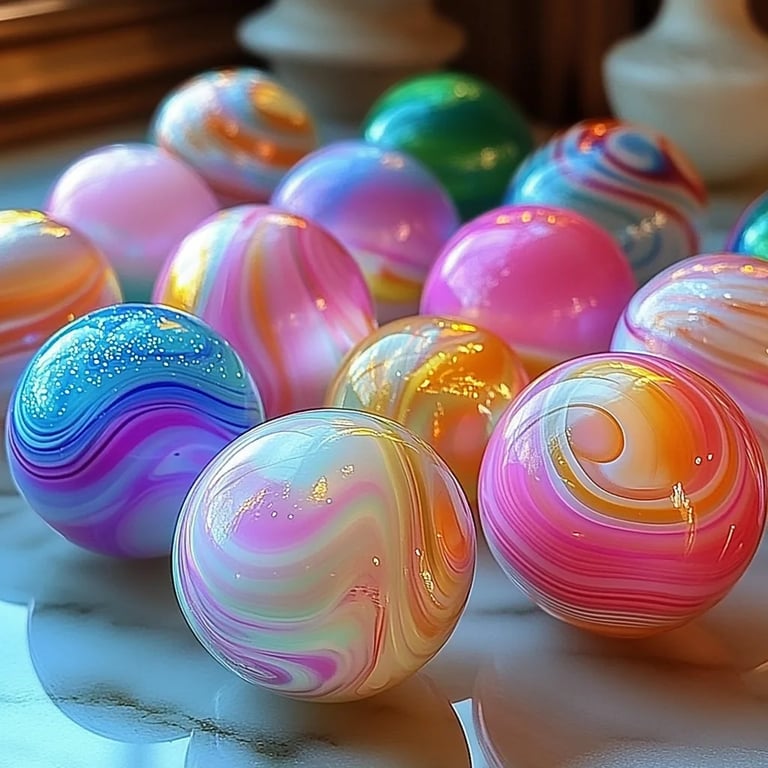
Why Are Rainbow Swirl Bouncy Balls So Popular?
The allure of Rainbow Swirl Bouncy Balls lies in their cheerful, striking colors and the joy they bring when they bounce. They're perfect for playtime, stress relief, or even decorative purposes. Plus, the crafting process is incredibly satisfying—transforming simple materials into something vibrant and delightful. On a more practical note, they make fantastic gifts and party favors due to their eye-catching appearance and the fun involved in making them.
What You'll Need
Before diving into the crafting process, gather the following materials. You may find most of these items at your local craft store or around your home:
Essential Materials:
- White school glue (PVA glue) – 1 cup
- Liquid starch – 1 cup
- Water – 1/2 cup
- Food coloring – Neon or regular gel food colorings in assorted colors
- A mixing bowl – for mixing the glue and starch
- Rubber gloves – to avoid staining your hands
- Craft sticks or spoons – for stirring
- Plastic wrap or wax paper – for the drying surface
Optional Materials:
- Glitter – to add some sparkle
- Essential oils – to give the balls a nice scent
- Silicon molds – for more decorative shapes
Step-by-Step Tutorial
Step 1: Prepare Your Workstation
First things first: prepare your work area. Lay down a protective covering, such as plastic wrap or wax paper. This will not only keep your surface clean but also make cleanup a breeze once you’re done. Trust me, you'll thank yourself later!
Step 2: Mix the Glue and Water
In your mixing bowl, combine 1 cup of white school glue with 1/2 cup of water. This mixture is the base of your bouncy ball. Stir thoroughly until you achieve a uniform consistency.
Why This Step Matters:
Using the right ratio of glue to water is crucial. Too much water will dilute the glue, leading to a weak structure, while too little may result in a ball that's hard to mold.
Potential Pitfall: If you notice clumps of glue in your mixture, take your time stirring. A smooth mix is key to ensuring even consistency when forming the balls.
Step 3: Add Liquid Starch
Now comes the magic! Gradually stir in 1 cup of liquid starch. You’ll notice the mixture thickening almost immediately. Keep mixing until the starch is fully incorporated.
Why This Is Important:
The starch reacts with the glue and begins to form a non-Newtonian fluid, which is essential for the ‘bouncy’ quality of your balls.
Common Mistake: If your mixture becomes too sticky, don’t panic! You can always adjust by adding a little more starch to achieve the right consistency. Just be cautious not to add too much—better to go slowly.
Step 4: Divide and Color
Once your mixture is ready, divide it into several smaller bowls, depending on how many colors you want. I usually go for four or five colors. Add drops of food coloring into each bowl, mixing until you achieve your desired shades.
Tip:
Start with a few drops of color and adjust as needed. If you’re feeling adventurous, add a pinch of glitter for added flair!
Step 5: Forming the Balls
Now it’s time to get your hands a bit messy—put on those rubber gloves! Take small portions of each color mixture and roll them into balls. The fun part is to swirl them together to create that rainbow effect.
Creative Variation:
Try layering the colors instead of swirling. You can form a larger ball by wrapping one color around another—just be mindful to keep the colors from mixing too much if you want distinct layers.
Potential Issue: If the mixture sticks to your hands and becomes unmanageable, just add a tiny bit more liquid starch to your hands.
Step 6: Let Them Dry
Once you’ve formed your colorful bouncy ball, place it on your wax paper or plastic wrap to dry. Allow it to cure for about 24 hours. The final drying time may vary based on humidity and temperature, so check them periodically.
Safety Warning:
Ensure that your workspace is free of items that could get sticky or stained. Always wash your hands after handling the mixtures, just in case any residue is left!
Step 7: The Grand Reveal
Once your bouncy balls have thoroughly dried, gently squeeze them to check their bounciness. If they feel a bit too soft, let them dry for a few more hours. Trust me, it's worth the wait for that satisfying bounce!
Troubleshooting Common Issues
- Balls Coming Apart: If your balls seem to fall apart, they might not have enough glue or starch. For the next batch, increase the glue portion.
- Lack of Bounce: If your balls don’t bounce, they may be too wet. Ensure they've dried thoroughly before use.
- Too Sticky: If your hands are too sticky while rolling, always remember to apply some liquid starch to your gloves.
Personal Anecdotes
I first stumbled upon making bouncy balls while searching for DIY projects to entertain my kids during a rainy weekend. We had a blast mixing colors and making our own creations! The joy on their faces, combined with a few friendly competitions on who could bounce them higher, made for such a memorable experience.
Final Thoughts
Creating Rainbow Swirl Bouncy Balls is a rewarding project that combines creativity and science. It's an excellent way to engage your senses and allow your imagination to run wild. The next time you’re looking for a fun activity—or a unique gift—remember this guide and the colorful little treasures you can craft.
I hope this tutorial inspires you to unleash your inner crafter! Don’t forget to share your creations on social media or with friends and family. Crafting is more joyous when shared! Happy crafting, and may your bouncy balls bring a smile to your face!