How to Make Rainbow Soap Foam: A Step-by-Step Guide for Crafting Enthusiasts
Hello, fellow crafters! Today, I’m excited to share with you one of my favorite DIY projects: making Rainbow Soap Foam! As an experienced crafter, I can assure you that this delightful concoction not only looks mesmerizing but is also incredibly fun to create and use. Kids adore it, which makes it a fantastic activity for playdates or birthday parties. Plus, it’s an excellent way to introduce young ones to the joys of science and colors.
Whether you’re looking to spice up a bath time, host a rainbow-themed party, or simply create something fun for the kids, rainbow soap foam fits perfectly in your creative toolkit. So, let’s dive in!
Why Rainbow Soap Foam is So Popular
Rainbow soap foam is popular for a plethora of reasons! The vibrant colors create an eye-catching spectacle, making it a favorite for children. It’s also a sensory-rich experience, allowing kids to explore textures and colors. And let’s not forget the joy of bubbles! They can spark curiosity and creativity in any child or even an adult at heart. It’s a fantastic way for the family to bond over crafting.
When You Can Use Rainbow Soap Foam
- Bath Time: Turns an ordinary bath into a rainbow explosion.
- Sensory Play: Great for kids who love to get their hands messy.
- Birthday Parties: Perfect for entertaining guests and creating a joyful atmosphere.
- Outdoor Play: Use it on a sunny day to create colorful foam fun!
- Science Experiments: Introduce concepts of density and color mixing.
Materials You’ll Need
Before we jump into the steps, let’s gather our materials. Don’t worry; they are all easy to find and most likely already in your home!
- Liquid dish soap (preferably clear, about 1 cup)
- Water (about 1 cup)
- Sugar (2 tablespoons; this will help stabilize the foam)
- Food coloring (different colors like red, blue, yellow, green, and purple)
- A large mixing bowl
- A whisk or hand mixer
- A shallow tray or cookie sheet (to catch the foam)
- An optional spray bottle or pump foam dispenser (for easy application)
Step-by-Step Tutorial
Step 1: Combine the Liquid Ingredients
Why this step matters: This is the foundation of your soap foam! The right proportions will lead to a light and fluffy foam.
- In a large mixing bowl, combine 1 cup of liquid dish soap with 1 cup of water.
- Add 2 tablespoons of sugar to the mixture — this will help stabilize the foam, making it last longer.
Tip: Make sure to use a gentle mixing motion to avoid creating too many bubbles while combining the ingredients.
Common mistake: Whipping too vigorously can create immediate bubbles! If this happens, let the mix sit for a few minutes, then retry mixing gently.
Step 2: Color It Up!
Why this step matters: This is where the magic happens! The food coloring is what will give your foam its beautiful rainbow hues.
- Once the mixture is well combined, separate it into several smaller bowls (about five or six).
- Add a few drops of food coloring to each bowl, creating different colors. You can mix colors in some bowls if you like! For example, mix yellow and blue to make green.
Tip: Start with a small amount of food coloring; you can always add more if you want a bolder shade.
Step 3: Whip It Up
Why this step matters: This step creates the foam we will play with! How you whip will affect the texture of your foam.
- Using a whisk or a hand mixer, whip each colored mixture separately until it’s light and fluffy. You’re aiming for a texture that’s airy and frothy!
Tip: If using a hand mixer, try to keep it on a low speed to prevent splatters.
What could go wrong: If you over-whip, you may end up with a dense paste. If this happens, you can dilute the mixture with more water (a tablespoon at a time), mixing until it reaches your desired foaminess.
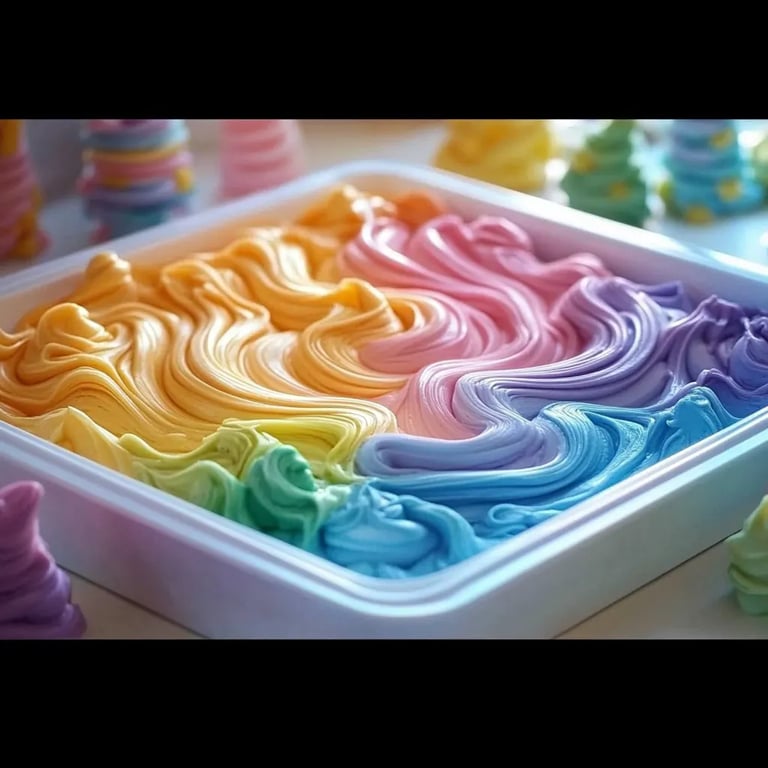
Step 4: Combine Your Colors
- Gently spoon the different colors of foam onto a shallow tray or cookie sheet. Let them overlap a bit to create beautiful color blends.
Tip: You can create swirls and patterns by swirling the colors together with a spatula or your fingers!
Step 5: Play Time!
Why this step matters: This is ultimately why we’ve made the foam, right? Enjoying and using it is the most rewarding part of the process.
- Now it’s time to play! You can use your hands to mold the foam, create shapes, or even use props like cookie cutters or small cups to build foam sculptures.
Safety Warnings
- Always monitor young children during foam play, as it can get slippery.
- Ensure that no one ingests the foam, even though the ingredients are generally safe—consumption should always be avoided.
Alternative Methods and Ingredient Substitutions
- Soap Alternatives: If you’re concerned about using dish soap, you can substitute with organic or natural soap options.
- Eco-Friendly Dyes: Consider using natural coloring agents, such as beet juice or turmeric for safe coloring.
- Vegan Substitute: If you’re looking for a vegan option, any plant-based soap will work just as well.
Personal Anecdote
I remember the first time I made this soap foam with my niece during a family gathering. We were not only creating foam; we were creating memories. Watching her face light up as she dove her hands into the colorful mix made every ounce of effort worth it! It became a beloved tradition, turning regular weekends into mini foam parties where we would experiment with more colors and larger batches!
Creative Variations
- Add glitter or biodegradable confetti for a sparkling touch.
- Incorporate scents using essential oils for an aromatic experience — just a drop goes a long way!
- Create themed colors based on holidays — orange and black for Halloween, pastel shades for Easter!
Final Thoughts
Creating Rainbow Soap Foam is such an engaging and delightful project that you’ll want to do it again and again! Watching colors blend and foam take shape is rewarding for everyone involved. Plus, it’s a chance to bond, learn, and experiment! I hope this guide inspires you to dive into your own colorful crafting adventure. Don’t hesitate to share your creations and any personal touches you’ve added! Happy crafting, friends!