How to Make Puffy Painted Fireworks: A Step-by-Step Guide
Hello fellow craft enthusiasts! I’m thrilled to share with you one of my favorite art projects—creating beautiful puffy painted fireworks. If you've ever wanted to capture the dazzling splendor of a fireworks display on canvas, this is your chance! Not only is this craft vibrant and engaging, but it also invites creativity and is perfect for all ages. Whether you’re decorating for a patriotic holiday, a festive celebration, or simply looking to add some flair to your home, puffy painted fireworks are an excellent choice.
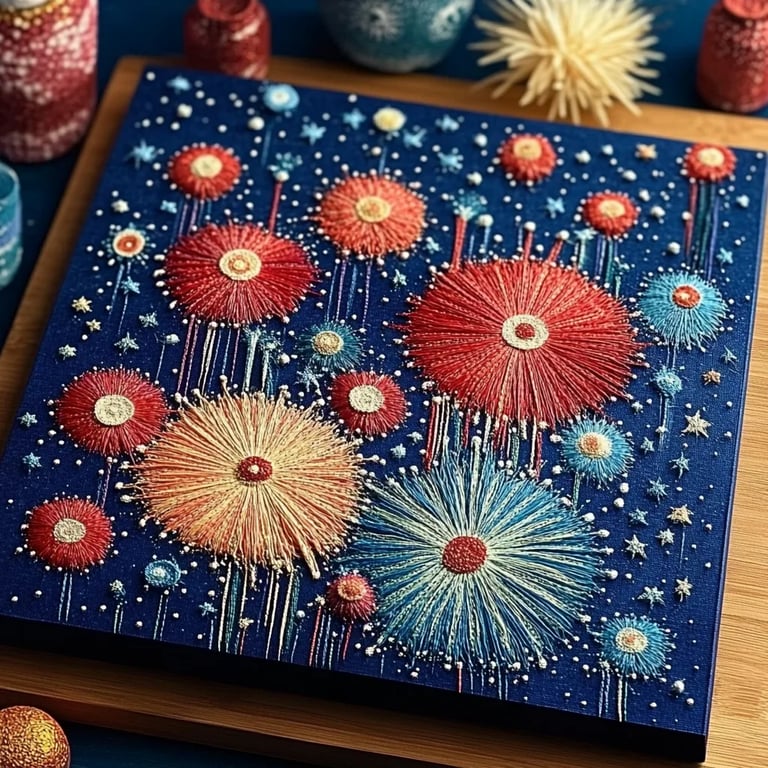
What are Puffy Painted Fireworks?
Puffy painted fireworks are art creations that mimic the explosive beauty of fireworks using puffy paint—an amazing product that raises and creates a textured effect when dried. The project typically involves using bold colors and various techniques to achieve that vibrant, popping impression. These can be made on canvas, wood, or even fabric and are a fun way to celebrate special occasions or simply enhance your artistic skills.
Why Are They Popular?
Puffy painted fireworks have gained popularity for a few reasons:
- Visual Appeal: The dynamic textures and colors truly stand out in any setting.
- Creative Freedom: Each piece is uniquely your own, allowing for a plethora of designs and patterns.
- Accessibility: The materials are simple and can be found in most crafting stores or online.
When is This Craft Ideal?
This craft is perfect for:
- Fourth of July Celebrations: Bright red, white, and blue fireworks add a festive touch.
- New Year’s Eve Parties: Sparkling colors can liven up any countdown celebration.
- Birthday Parties: Personalize a gift or decor with this joyful and eye-catching design.
Crafting Materials You'll Need
Before we jump into the project, let's gather our materials. This guide is designed so that you can make puffy painted fireworks with simple, accessible items:
- Canvas or Cardstock: This will be your base. I recommend a sturdy canvas for the best effect, but cardstock works well too.
- Puffy Paint in Various Colors: Look for a variety of colors—traditional firework colors like red, blue, green, yellow, and purple.
- White Glue: Elmer's glue is perfect; you'll be mixing it to create the puffy paint.
- Water: Simple tap water to mix with the glue.
- Paintbrushes: A mix of wide and fine brushes will help you achieve different effects.
- Toothbrush or Spray Bottle (Optional): For additional exciting effects.
- Newspaper or Plastic Sheet: To protect your workspace from paint spills.
Step-by-Step Tutorial
Step 1: Prepare Your Canvas
Start by laying down some newspapers or a plastic sheet to protect your workspace. It’s very easy to get carried away with paint, and trust me; you don't want to ruin your table!
Why this matters: Protecting your workspace allows for easier clean-up and gives you the freedom to work without worry.
Step 2: Mix Your Puffy Paint
In a small bowl, mix equal parts of white glue and water until you have a smooth, consistent texture. You want it to resemble a thick paint. Once mixed, you can separate it into smaller bowls and add different colors of food coloring or puffy paint to each bowl to create your desired shades.
Baking Tip: If your mixture is too thin, it won't puff up properly when dried. If this happens, simply add a touch more glue until the desired consistency is achieved.
Step 3: Design Your Fireworks
With paintbrushes in hand, dip into your paint mixture and begin to lay down your fireworks design on the canvas. Use quick, upward strokes from a central point to create the burst pattern typical of fireworks. Don’t be afraid to layer colors or mix them directly on your canvas for added dimension.
Personal Anecdote: I often find it meditative to let my hand move freely, almost like dancing the brush across the canvas, and I encourage you to embrace that feeling too!
Step 4: Add Texture
Now comes the exciting part! If you want to enhance the texture, after putting your paint down, you can take a toothbrush, dip it in some paint, and flick your thumb across the bristles to splatter little dots on your canvas. This can simulate the sparkles and small bursts associated with fireworks.
Safety Note: Be cautious when flicking the toothbrush to avoid splattering paint on surfaces you don’t want stained.
Step 5: Let It Dry
After you’ve finished layering on your paint, allow your artwork to dry completely. This will take anywhere from a few hours to overnight depending on the humidity and thickness of the paint.
A Warning: If you rush this step and do not let it dry sufficiently, the puffs will collapse and your beautiful artwork will lose dimension.
Step 6: Enjoy!
Once your canvas is dry, you can hang or display it in your home. Alternatively, if you’re sending this as a gift, ensure it has dried completely before packaging.
Troubleshooting Common Issues
- Paint Not Puffing Up: If your finished product is flat, it could be due to a too-thin mixture of glue and water. Remember to achieve the right ratio when mixing.
- Color Bleeding: Sometimes colors can run into each other while drying. To combat this, ensure your layers are thick enough and let each color dry before applying another adjacent color.
- Canvas Buckling: If you notice the canvas warp while drying, it can be too wet or heavy in certain areas. Try to distribute the paint evenly next time to prevent this issue.
Tips for Success
- Practice Makes Perfect: Don't worry about making a perfect design—each attempt teaches you something new.
- Explore Variations: Try using different canvas sizes, or even create puffy fireworks on fabric for t-shirts or bags!
- Involve Family and Friends: This is a great project to do with kids or at a gathering. You’ll create lasting memories with each masterpiece.
Creative Variations
Once you've mastered the basics, get creative! Try:
- Mixed Media: Add some glitter or sequins for an extra sparkle effect.
- Layering Rescues: If you’re not pleased with your initial design, once it dries, consider painting over sections and starting anew.
- Thematic Colors: Use specific color schemes to fit occasions (e.g., pastel colors for spring).
Final Thoughts
Creating puffy painted fireworks is not only a fun activity but a meaningful way to express joy and celebration through art. With this step-by-step guide, you’re armed with all the tools you need to make a stunning masterpiece that captures the magic of fireworks.
I hope you find this crafting journey as rewarding as I do, and I can’t wait to hear about your colorful creations! Remember, the key to success in crafting is patience and passion. Happy crafting!