How to Make Peeps Slime: A Step-by-Step Guide for Crafty Creators
Hello, fellow crafters! Today, I'm thrilled to share a delightful project that’s just in time for spring—Peeps Slime! It’s not only easy to make but is also a wonderful way to embrace the playful spirit of Easter with a colorful and squishy slime that resembles everyone's favorite marshmallow treat. Whether you're crafting with kids, hosting a party, or looking for a fun rainy-day activity, making Peeps Slime is sure to bring smiles and laughter.
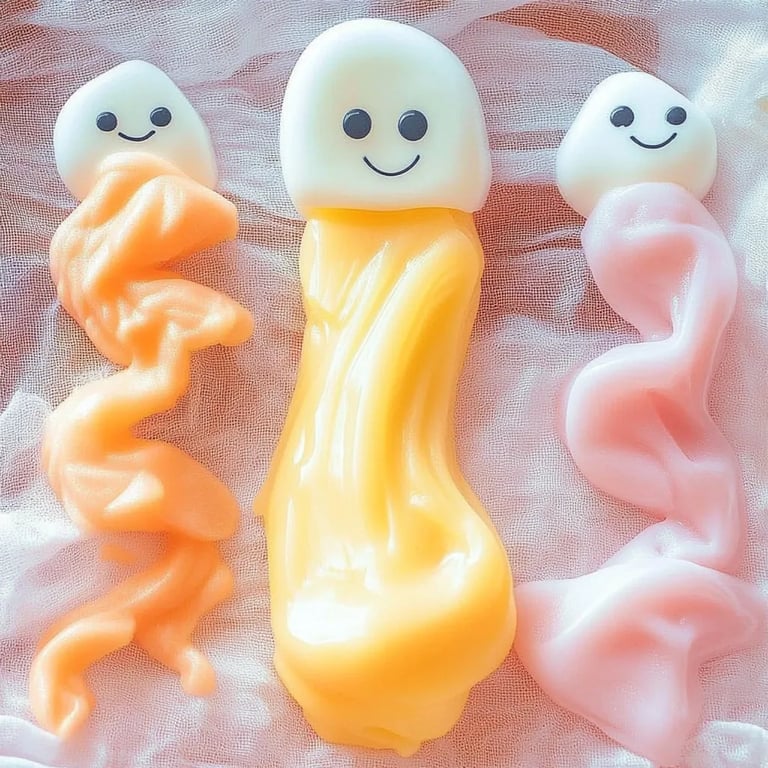
What is Peeps Slime?
Peeps Slime is a whimsical, stretchy, and squishy substance that mimics the colors and textures of Peeps—the iconic marshmallow candies that are seriously adored. This slime is not just fun to play with; it’s also a unique sensory experience that engages the senses and sparks creativity. I often use it for crafts, gifts, or simply to enjoy squishing and stretching it out. It’s perfect for school projects or as a fun, tactile experience to share with children during family gatherings.
Why is Peeps Slime So Popular?
The popularity of Peeps Slime can be attributed to its vibrant colors, versatile playability, and the nostalgia associated with those tiny marshmallow creatures. Plus, with the rise of DIY craft trends, making slime has transitioned from a simple activity to an iconic staple in many households. The best part? You can customize it in numerous ways to watch the creativity flow!
Materials Needed
Before rolling up my sleeves and diving into the creation of this delightful slime, let's gather our materials. Here’s a comprehensive list of what you need:
Basic Ingredients:
- 1 cup of white glue (like PVA glue or Elmer's glue): Forms the base of your slime.
- 1 cup of warm water: Helps to dissolve and mix the ingredients properly.
- 1 teaspoon of baking soda: This helps the slime achieve the desired texture.
- 1 tablespoon of contact lens solution: Contains boric acid that activates the slime.
- Food coloring (colors of your choice): To achieve those vibrant Peeps-like hues.
Optional Add-ins:
- Glitter: To give your slime a sparkly effect, just like Peeps.
- Scented oil: For adding a delightful aroma to your slime.
- Cornstarch: In case your slime is too sticky, this will help to firm it up.
Step-by-Step Tutorial
Now that we have everything ready, let's jump into the glorious process of making Peeps Slime!
Step 1: Prepare the Base
Why This Matters: The base of your slime is crucial for its final texture. Starting with the right consistency is key to avoiding a sticky mess.
- In a large mixing bowl, combine 1 cup of white glue with 1 cup of warm water. Stir well until it's mixed thoroughly. This creates a smooth, consistent base.
- Tip: Use a whisk or spatula for better mixing. A thorough mix helps avoid clumps later.
Step 2: Add Baking Soda
Why This Matters: Baking soda plays a significant role in creating a stretchy texture. If omitted, your slime may not have the right consistency.
- Stir in 1 teaspoon of baking soda until it is completely dissolved.
- Tip: Ensure there are no lumps in the mixture; they can create uneven textures once the slime forms.
Step 3: Color It Up!
Why This Matters: Coloring the slime is the fun part, and it brings the Peeps theme alive!
- Add several drops of your chosen food coloring. I love using pastel colors reminiscent of Peeps, like soft pink, yellow, or blue.
- Tip: Start with a few drops and mix; you can always adjust if you want a deeper shade. Get creative here!
Step 4: Activate the Slime
Why This Matters: The activation process is where your slime truly begins to take shape!
- Slowly add 1 tablespoon of contact lens solution while continuously mixing. You’ll notice the mixture transitioning into slime as it starts to pull away from the sides of the bowl.
- Tip: If the slime is too sticky, gradually add more contact solution, a little at a time until it reaches your desired texture.
Step 5: Knead and Play!
Why This Matters: Kneading is critical for ensuring the slime is fully activated and has the right consistency.
- Once you can handle the slime (it may be a bit sticky at first), take it out of the bowl and start kneading it with your hands. This not only improves the texture but also adds a fun tactile experience.
- If you find your slime is still too sticky, incorporate a bit of cornstarch during the kneading process until it feels just right.
Step 6: Add More Fun
- For those who love a little sparkle, sprinkle some glitter into your slime and knead again. Or, add a few drops of scented oil for a delightful aroma!
- Caution: Always do a small test with scents or glitter to ensure you don’t create allergies or irritations.
Personal Touch: A Little Story
I remember the first time I made slime with my niece, Lily. We got all sorts of colors mixed together, and she was fascinated by the process. She named her creation “Rainbow Peeps,” and it became an annual tradition for us to make it around Easter. The joy of crafting together always leaves me with good memories, and I hope you create some unforgettable moments too!
Troubleshooting Common Issues
- Slime is too sticky: Add more contact solution and knead thoroughly. A little cornstarch can help, too.
- Slime is too firm: Add a dash of warm water and knead it until soft.
- Not stretchy enough: Ensure you mixed it well and activated it properly. If it’s still an issue, knead in some lotion or hand cream.
Creative Variations
- Peeps Candy Jar: Use smaller containers and create layers of different colored slimes that resemble Peeps!
- Textured Peeps: Add in mini marshmallows to give a fun texture and make it resemble a Peeps treat.
- Sensory Play: Add essential oils for calming scents for therapeutic play sessions.
Safety Warnings
- Always supervise children during the slime-making process, especially with the use of contact lens solution.
- Ensure materials are non-toxic if young children are involved.
- Store the slime in an airtight container to keep it fresh.
Conclusion
Making Peeps Slime is not just about crafting; it’s about creating memories, exploring creativity, and enjoying a tactile experience that can be shared—much like the joy of sharing Peeps during the holiday season. I hope this guide has inspired you to dive into the world of DIY slime, and I can’t wait to hear about your colorful creations! Happy crafting! 🌟