How to Make Paint with Bubbles: A Fun, Creative Craft Guide
Welcome to my colorful corner of the crafting world! Today, I am excited to share with you one of my favorite projects that has always intrigued both kids and adults alike: making paint with bubbles! This playful twist on traditional paint has become increasingly popular in recent years, especially for those looking to explore vibrant and whimsical art forms. Whether you’re planning a family art day, hosting a birthday party for your little ones, or want to add a unique flair to your art supplies, bubble paint is the perfect solution.
Not only does it create stunning, ethereal designs that are sure to spark joy, but it also encourages creativity in a hands-on, engaging manner. So, let’s dive in and transform simple ingredients into a bubbly masterpiece!
Why Bubble Paint?
You might be wondering, “What exactly is bubble paint?” In essence, bubble paint is paint that incorporates bubbles to create a textured or layered design. You can use it for all sorts of projects—your canvas artwork, paper crafts, or even fun decorations for special occasions.
Using bubble paint allows you to explore color mixing and blending as the bubbling process unfolds in delightful, unpredictable ways. Plus, it’s incredibly easy to clean up! Let me walk you through the materials you need and the steps to create your bubble paint masterpiece.
Materials You Will Need
Before we get started, let’s gather our supplies. Here’s what you will need:
Common Ingredients:
- Dish soap: This creates the bubbles. (Make sure to use a gentle dish soap to avoid harsh chemicals.)
- Water: Distilled or tap water works well for creating your mixtures.
- Food coloring or liquid watercolor: This adds color to your paint. Choose colors that resonate with your project theme!
- Containers: You’ll need small bowls or cups for mixing your ingredients.
- Straws: Regular or reusable straws are essential for blowing bubbles.
- Paper or canvas: This will be your painting surface.
- Spoon or whisk: For mixing.
Optional Add-Ons:
- Cornstarch or flour: To thicken the paint, if you prefer a more textured outcome.
- Glitter: For a sparkling, magical finish.
- Essential oils: For a pleasant scent (just remember to check for allergies!).
Step-by-Step Tutorial
Step 1: Prepare Your Work Area
Before we start mixing ingredients, let me remind you that creating art can get messy! Lay down newspaper or a crafting mat to protect your surfaces. Gather your materials close by and have clean-up supplies handy—trust me, it’ll save you some stress later!
Step 2: Create Your Bubbly Mixture
In a bowl, combine the following:
- 1 part dish soap
- 1 part water
- Food coloring or liquid watercolor (a few drops at a time, depending on your desired saturation)
Why It Matters:
The dish soap acts as a stabilizer for the bubbles, while the water provides the right consistency. Using the right ratio can make all the difference in achieving a frothy, airy texture perfect for painting.
Potential Issues:
If your mixture isn’t bubbling well, it might be because your soap is too thick, or the water isn’t mixed enough. Simply adjust by adding more water or soap and whisking until well combined.
Step 3: Whisk It Up!
Using your spoon or whisk, gently stir the mixture. You’re looking to create bubbles without bursting them, so be gentle! You want to incorporate air but avoid over-mixing, as that can destroy those lovely bubbles that will give your paint its charm.
Step 4: Transfer to Your Bubble-Blowing Tool
Now, dip your straw into the mixture and place one end in your mouth. Blow gently into the straw—do not suck; we’re making bubbles, not a smoothie! Continue until the bubbles rise over the rim of the bowl.
Tips:
Keep an eye on the food coloring; you may want to add a few different colors to your mixture and create a rainbow of bubble paints!
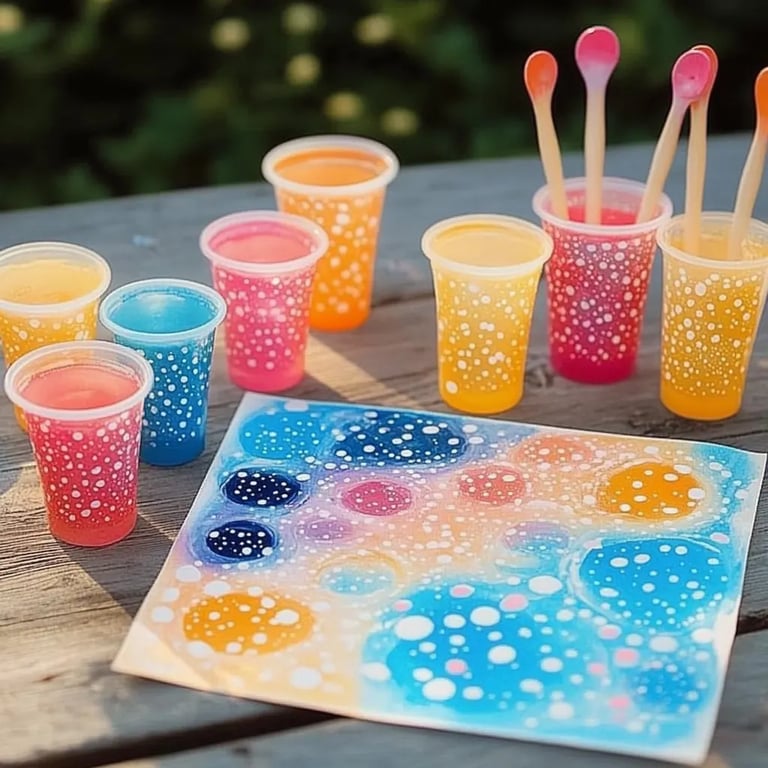
Step 5: Apply the Bubbles to Your Canvas
Once you see those beautiful bubbles ready to overflow, it’s time to paint! Carefully place your canvas or paper over the bowl and gently touch it against the bubbles. When the bubbles burst, they will leave behind stunning, vivid dots of paint.
Safety Warning:
Ensure you supervise younger crafters closely, especially when using straws. Avoid any accidents like choking.
Step 6: Experiment and Let Dry
Here’s where your creativity can really shine! Repeat the bubble-blowing and painting process with different colors, layering them as you go. You can smash, swirl, or blow more bubbles just for fun! Don’t hesitate to try different types of paper or even canvas!
Once you’re satisfied with your design, lay the artwork flat to dry. Depending on the thickness of the paint, it may take several hours.
Alternative Methods or Ingredient Substitutions
If you want a little more viscosity or texture in your bubble paint, you can add cornstarch or flour to thicken your mixture. Use about 1 tablespoon for every cup of your soap-water mixture. Mix this in before adding the food coloring.
You can also use natural dyes from fruits or vegetables if you want a non-toxic alternative to food coloring. Beet juice, matcha powder, or turmeric work well!
Personal Anecdotes & Creative Variations
I remember the first time I experimented with bubble paint during a hot summer afternoon with my niece. We made a whole “bubbly” series of abstract art, covering every corner of the dining table with an explosion of colors. It became one of the most cherished memories of our bonding time!
You can get inspired by nature, create landscapes, or even abstract designs with this technique. Try layering different colors for a sunset effect or even create a bubble paint mural outside on an easel—just be sure to clean up any mess before it dries!
Final Thoughts
Making paint with bubbles is not only an enjoyable activity but also a unique way to express creativity. It’s accessible, fun, and full of surprises! Remember, crafting is about experimentation and joy, so feel free to adjust the ingredients based on what you love most—or even try inviting a few friends over for a crafting party!
Whether you’re creating a solo masterpiece or joining the little ones in art, there’s something magical about crafting together. So gather your materials and start blowing those bubbles; the creativity awaits!
Happy crafting! 🌈