How to Make Outdoor Foam Sidewalk Paint: A Complete Guide from an Experienced Crafter
As an avid DIY enthusiast and professional crafter, I often find myself exploring innovative ways to spark creativity, especially when it comes to crafting with my little ones. One of our favorite projects is making Outdoor Foam Sidewalk Paint. Not only is it a fun weekend activity, but it’s also a fantastic way to brighten up sidewalks, patios, or driveways with beautiful, temporary designs. In this article, I’ll share everything I've learned through trial and error, including the best tips, techniques, and safety measures to help you create your very own sidewalk paint that is sure to inspire creativity in children and adults alike!
What is Outdoor Foam Sidewalk Paint?
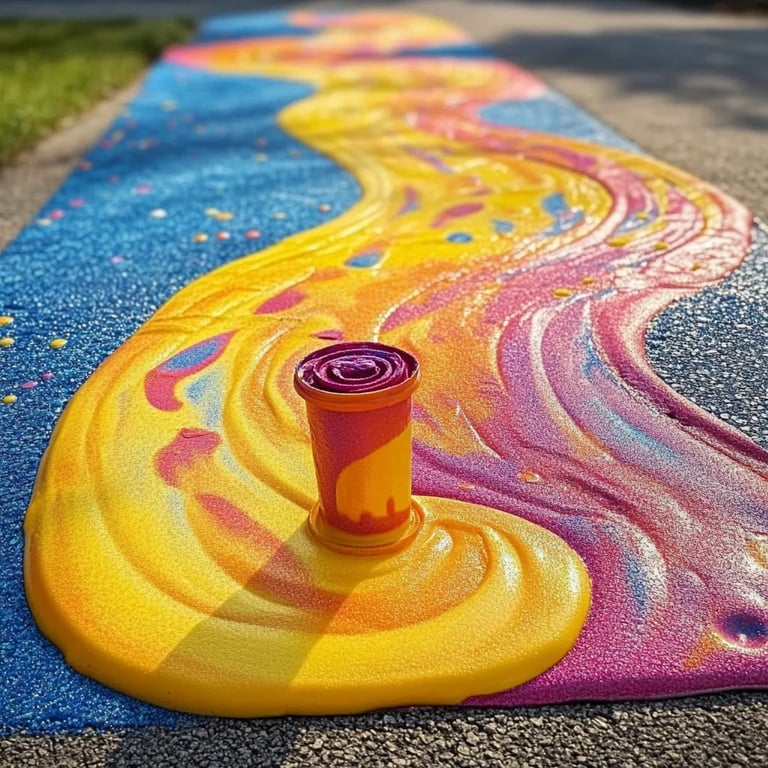
Outdoor Foam Sidewalk Paint is a vibrant, easy-to-make paint that dries into a soft, foam-like texture. It's perfect for outdoor art projects, and what’s fantastic is that it’s safe for kids and biodegradable, making it an environmentally friendly option for summer fun. The product is loved because it's versatile; you can use it to create amazing artwork, showcase your kids' imaginations, or even organize outdoor games like hopscotch or murals. Plus, it easily washes off with water—no permanent markings!
Materials You Will Need
Before we delve into the crafting process, let’s gather our supplies. Rest assured, these ingredients are simple, affordable, and usually already in your pantry. Here’s what you’ll need:
- Cornstarch: This is the primary ingredient that gives the paint its thick, foam-like consistency.
- Water: A crucial component for mixing and adjusting the paint's texture.
- Dish Soap: This helps to create the foamy effect, making the paint easier to spread and play with.
- Food Coloring: This is what will give your paint its vibrant hues. I recommend using gel food coloring for a bolder result!
- Containers: You’ll need small bowls or cups to mix the ingredients. Plastic squeeze bottles work wonderfully for application.
- Whisk or Spoon: For stirring the mixture until it’s smooth.
- Drop Cloth or Old Sheets: To protect your workspace from any accidental spills.
Step-by-Step Process to Make Outdoor Foam Sidewalk Paint
Step 1: Gather Your Materials
Begin by assembling all your materials in a clean, open area. Creating a comfortable crafting environment sets the stage for creativity! Lay down your drop cloth to catch any spills and protect your working surface.
Step 2: Mix Cornstarch and Water
Add 1 cup of cornstarch to a bowl (or multiple bowls if making different colors). Gradually mix in 1 cup of water using your whisk or spoon. Mixing the dry and wet ingredients slowly helps prevent clumps from forming.
Why This Matters: Achieving the correct ratio is crucial. Too much water can result in a runny paint that doesn't stick to surfaces, while too little water will make it too thick.
What Could Go Wrong: If you'd accidentally added too much water, simply add more cornstarch to balance it out.
Step 3: Add Dish Soap
Once you have a smooth consistency, add in about 2 tablespoons of dish soap. This ingredient is integral to achieving that fluffy texture, as it helps create bubbles.
Pro Tip: If you're feeling adventurous, you can use scented dish soap for a delightful sensory experience!
Step 4: Color Time!
Now for the fun part! Divide your mixture into separate bowls if you're making different colors. Add a few drops of food coloring to each bowl, then mix until you reach your desired shades. The more you add, the more vibrant your color will be!
Creative Variations: Experiment with mixing colors! You can create pastel shades or even rainbow swirls by blending different colors.
What Could Go Wrong: If you suddenly don’t like the color you've created, remember—you can adjust it! Try adding a bit of yellow to brighten an overly dark color, or a touch of blue to darken a light shade.
Step 5: Package the Paint
After mixing, it’s time to pour your foam sidewalk paint into containers. Squeeze bottles are fantastic because they allow for precision in application. However, cups or jars work well for broader strokes or entirely artistic finger painting!
Step 6: Get Creative!
Now that your paint is prepared, it's time to unleash your imagination! Head outside with brushes, sponges, or even just your hands! Create beautiful designs, patterns, or even a collaborative family mural. The possibilities are endless!
Step 7: Clean Up
Once you’re done creating, just take a bucket of water and rinse off any remaining paint. The paint will wash away easily, leaving no lasting damage.
Tips for Success
- Safety First: Always supervise children while crafting. Although the ingredients are safe and non-toxic, kids should not ingest the paint.
- Test First: Before painting a large area, test a small section of your sidewalk to check how the paint reacts to the surface.
- Store Properly: If you have leftover paint, you can store it in airtight containers in the fridge for a few days. However, it's best to use it fresh for the best foam effect!
- Time of Day: When painting, choose a cooler part of the day, so the paint doesn’t dry too fast and allows you time to work on your masterpiece.
Additional Information
Outdoor Foam Sidewalk Paint is a fantastic tool for engaging with children in creative play while allowing them to express themselves artistically. I encourage you to take this opportunity to spend valuable time with your kids while helping them build confidence and enjoy working with their hands.
If you want to expand your artistic horizons, you can also experiment with different textures by adding sand for a gritty feel or even glitter for a sparkly touch. Remember, crafting is about exploration and finding joy in the process. You’ll create beautiful memories while having fun!
Conclusion
Making Outdoor Foam Sidewalk Paint is an accessible project that’s perfect for families, teaching creativity and allowing for boundless expression. With just a few simple, everyday ingredients, you can create something beautiful together. I hope my tips and insights help you navigate this fun crafting adventure. Enjoy painting, and don't forget to step back occasionally and admire your amazing creations! Happy crafting!