How to Make Neon Pink Candy Apples: A Step-by-Step Guide
Candy apples are not just a sweet treat; they’re a celebration of creativity and color. When I first dipped my apples into vibrant candy coatings, I felt like a kid again. Today, I'm excited to share with you my journey in making neon pink candy apples, a delightful twist on the classic treat that's perfect for parties, holidays, or just to brighten up any day.
Why Neon Pink Candy Apples?
Neon pink candy apples have recently gained popularity due to their eye-catching appearance and playful color. They're a perfect addition to events like birthday parties, baby showers, or even Halloween. Who could resist a bright, shiny apple that looks so fun? Plus, they’re surprisingly easy to make, and once you master the technique, you can easily customize them with different colors and flavors.
Ingredients and Materials You’ll Need
To get started, gather the following ingredients and materials:
Ingredients:
- 4 medium to large apples (Granny Smith, Fuji, or Honeycrisp work best for their tartness and firmness)
- 2 cups granulated sugar
- 1 cup corn syrup
- 1/2 cup water
- 1/4 teaspoon food coloring (neon pink)
- 1/2 teaspoon vanilla extract (optional)
- A pinch of salt
Materials:
- Candy thermometer
- Wooden sticks (or craft sticks)
- Baking sheet
- Parchment paper
- A medium saucepan
- Heat-resistant spatula
- Cooking spray
- Food safe gloves (optional, for cleanliness)
Step-by-Step Tutorial: Making Neon Pink Candy Apples
Step 1: Prepare the Apples
Start by washing the apples thoroughly to remove any waxy coating that may interfere with the candy sticking. Pat them dry with a clean towel. Now comes the fun part: inserting the sticks!
- Insert the Sticks: Gently push a wooden stick into the top of each apple, going about halfway down. Make sure you apply gentle pressure; if you push too hard, you might split the apple.
- Cooling Time: Set your apples aside while you prepare the candy coating. Ideally, refrigerate them for about 30 minutes. This gets them cold, which helps the candy set up faster.
Step 2: Cook the Candy Coating
This is where the magic happens! The sugar transforms into a delicious, shiny coating.
- Combine Ingredients: In your medium saucepan, combine sugar, corn syrup, and water. Stir until well combined.
- Heat: Place the saucepan over medium heat. It’s crucial to use medium heat because high heat can cause the sugar to burn. Stir the mixture until the sugar dissolves.
- Add a Candy Thermometer: Once everything is dissolved, stop stirring and allow the contents to reach 300°F (the hard crack stage). Using a candy thermometer here is vital, as this temperature helps create that perfect crunchy coating.
- Color and Flavor: When your mixture reaches 300°F, remove it from the heat. Carefully add in the neon pink food coloring, and if you’re using it, mix in the vanilla extract too for added flavor. Be careful! The hot mixture can bubble and splatter, so keep a safe distance.
Step 3: Coat the Apples
Now it’s time for the best part: dipping your apples!
- Preparation: Before you dip, prepare a baking sheet lined with parchment paper and lightly coat it with cooking spray to prevent sticking.
- Dip the Apples: Holding the stick, dip each apple into the hot candy mixture. You want to coat it fully; twirl it to ensure even coverage. If you see any excess dripping, you can gently swirl the apple to shake off the extra candy.
- Set on Parchment: Quickly place the dipped apples on your prepared baking sheet to cool and harden. This is a skill you’ll get better with practice. It might take a few tries to get an even coating.
Step 4: Let It Dry
Allow your candy apples to cool completely for about 30 minutes before serving. During this time, the candy will harden into that glossy finish we all love.
Troubleshooting Common Issues
Even seasoned crafters face challenges. Here’s how to tackle a few common issues that may arise:
- The Candy Won't Stick: If your candy is sliding off the apple, it might be due to excess moisture on the apple. Ensure they are completely dry before dipping.
- Cracks in the Candy Coating: If you notice cracks, this could mean the candy mixture reached too high a temperature or cooled too much before dipping. If this happens, just melt it and try again!
Tips for Success
- Safety First: Hot sugar can cause severe burns, so make sure kids stay clear of the cooking area. Consider wearing food-safe gloves if you're sensitive to heat.
- Ingredient Substitutions: If you don't have neon pink food coloring, you can create other colors using different food colorings. Blend them to get unique shades!
- Flavor Variations: Consider using flavored extracts like almond or lemon for a twist on the taste. Just remember to keep the measurements the same when tweaking flavors.
Creative Variations
Once you've perfected the classic neon pink, you can explore creative variations. Here are some fun ideas:
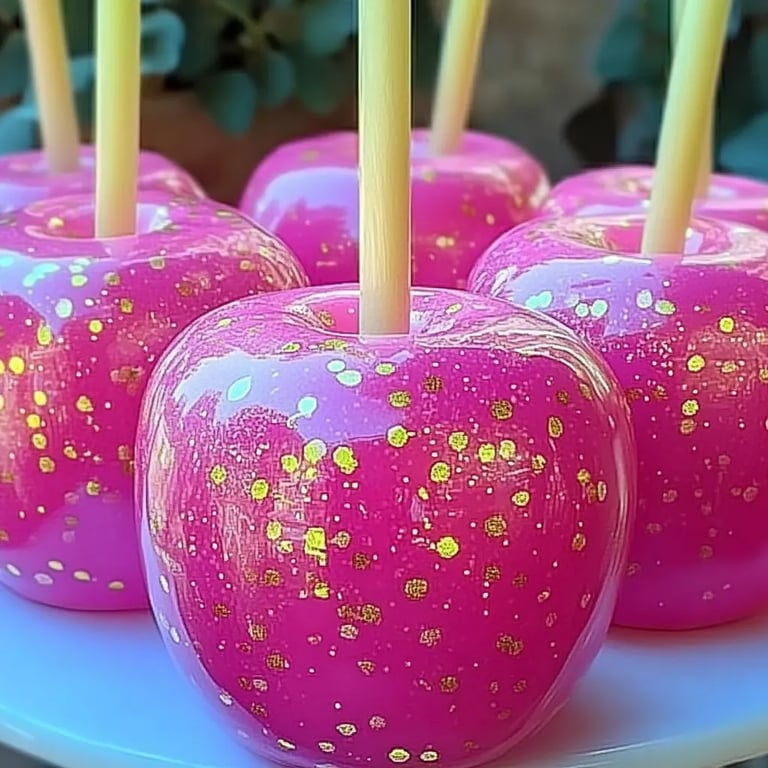
- Topping it Off: After dipping, consider rolling the candy apples in crushed nuts, sprinkles, or edible glitter for added texture and visual appeal.
- Swirled Candy Coating: Combine different food colorings and create a swirled look for a unique aesthetic.
- Chocolate Drizzle: Melt some chocolate and drizzle it over your candy-coated apples for a delicious contrast.
A Sweet Ending
Making neon pink candy apples is a delightful project that I genuinely enjoy sharing with friends and family. Whether for an event or just a Friday night treat, they are bound to bring smiles. I hope this guide makes you feel confident in your candy apple crafting journey! Remember, practice makes perfect, and the most important ingredient is your creativity. So go ahead and dabble in color, flavor, and fun!
Happy crafting and enjoy your beautifully bright treats!