How to Make Neon Bouncy Balls in an Aurora Jar: A Step-by-Step Guide
Hello, fellow crafters! I’m thrilled to share with you one of my favorite DIY projects: making neon bouncy balls in the enchanting style of an Aurora Jar. If you’re searching for a fun, engaging activity that’s perfect for kids’ parties, playdates, or simply sparking creativity on a rainy afternoon, you’ve come to the right place. These vibrant, bouncy balls not only provide endless hours of enjoyment, but they also introduce a unique twist on the classic childhood crafting experience.
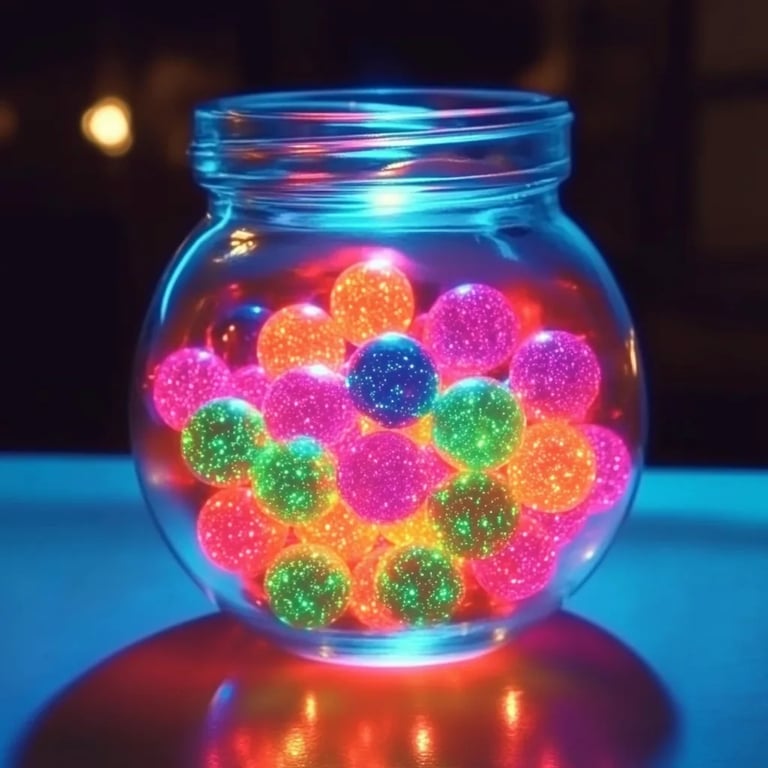
What Are Aurora Jars and Why Are They Popular?
Before diving into the crafting process, let’s clarify what an Aurora Jar is. Imagine swirling galaxies captured in a jar—colorful, glowing, and mesmerizing. It’s a delightful visual treat! The best part? We’re going to create our very own neon bouncy balls to populate this universe. You can use them as fun toys or decorative elements in your Aurora Jar, and they glow brilliantly under UV light, making them perfect for nighttime adventures or themed parties.
So, why are these bouncy balls so popular? Beyond their vibrant colors, they fuel imagination, encourage play, and are incredibly satisfying to create. Plus, they’re a hit for home decor too! The potential uses are limitless, making this project a fantastic addition to your crafting repertoire.
Materials You'll Need
Before we jump into the tutorial, let me share the materials you’ll need. Don’t worry; these are simple items that are typically found at home or can be easily purchased.
Essential Materials:
- Borax (1 teaspoon)
- White school glue (1/4 cup)
- Water (1/4 cup)
- Neon food coloring (2-3 drops; choose your favorite vibrant shades)
- Cornstarch (1 tablespoon)
- Small mixing bowl
- Wooden stick or spoon for mixing
Optional Materials for the Aurora Jar:
- Glass or plastic jar with a tight lid (an old jam jar works perfectly)
- Clear glitter or glow-in-the-dark stars (for added effects)
- String lights (for illuminating the jar)
Safety Gear:
While our materials are generally safe, I always advise wearing gloves when handling glue and Borax, especially if you have sensitive skin.
Step-by-Step Tutorial for Making Neon Bouncy Balls
Step 1: Mixing the Glue Solution
- Start by taking a small mixing bowl. Pour in 1/4 cup of white school glue. This serves as the base for our bouncy ball.
- Add in 2-3 drops of neon food coloring. Don’t hesitate to mix different colors to create unique shades! Stir carefully with your wooden stick or spoon until the color is evenly distributed.
Why This Step Matters: The glue acts as a binder, and the food coloring provides that vibrant hue we’re after. The consistency here is crucial; if the glue is too thick or thin, it might affect the texture of your bouncy balls.
Step 2: Preparing the Borax Mixture
- In a separate cup, combine 1 teaspoon of Borax with 1/4 cup of warm water. Stir until the Borax is completely dissolved.
What Could Go Wrong: If the Borax doesn’t dissolve completely, it may form lumps that could make your balls uneven. Keep stirring until you achieve a smooth solution.
Step 3: Combining Mixtures
- Once your Borax solution is ready, slowly pour it into the glue mixture. Stir vigorously to combine. You'll notice it starting to thicken almost immediately.
Tip: You can switch to using your hands here! Once the mixture has thickened, knead it gently until you attain a rubbery consistency.
Step 4: Forming the Balls
- Take a small amount of the mixture (about the size of a marble) and roll it between your palms to form a perfect ball shape.
Why This Step Matters: Proper rolling creates a smooth surface, which not only enhances the aesthetics but also optimizes bouncing.
Step 5: Testing and Drying
- Check how well your bouncy ball performs by dropping it from a small height onto a hard surface. If it bounces well, great! If not, you might have a mix that's too soft; try kneading it for a bit longer or adding a touch more Borax solution.
- Allow your bouncy balls to dry completely for about 24 hours. Store them in a cool area, away from sunlight, to maintain their vibrant colors.
Safety Warnings
Always supervise children during the crafting process, especially when mixing Borax and glue. Although these materials are relatively safe for general use, it’s best to err on the side of caution.
Alternative Methods and Ingredient Substitutions
If you’re looking for a simpler method, you can use the following alternatives:
- Instead of Borax, you can use liquid starch. Just replace the Borax mixture step with adding the starch directly to your glue and coloring.
- If you want to avoid Borax altogether, try making bouncy balls with a DIY recipe using equal parts water and corn syrup, although they won’t bounce as well.
Creative Variations
Feel free to get creative! Here are some variations you might enjoy:
- Layering Colors: Instead of mixing all the colors, try layering them when forming the balls for a beautiful tie-dye effect.
- Glittery Balls: Add fine glitter to the glue mixture for a sparkly touch.
- Glow-in-the-Dark: Substitute some of the standard food coloring with a glow-in-the-dark version for an added fun factor.
Personal Anecdotes
I remember the first time I made these with my niece—it became a special bonding experience! We crafted our bouncy balls and filled a large mason jar, adding fairy lights to illuminate it during story time. It sparked not just laughter, but a spark of creativity that led to further crafting sessions!
Conclusion
Making neon bouncy balls in an Aurora Jar is not only a rewarding experience but also a delightful way to express creativity. Whether you’re crafting solo or sharing the fun with family and friends, these bouncy balls can bring smiles and inspiration. So why wait? Gather your materials, roll up those sleeves, and embark on this colorful crafting journey with me.
Happy crafting, and may your bouncy balls bounce as high as your imagination!