How to Make Mason Jar Lanterns: A Complete Guide to Crafting Your Own Enchanting Glow
Hello there, fellow crafters! Today, I'm excited to share one of my absolute favorite DIY projects: making Mason Jar Lanterns. These charming little creations not only add a cozy ambiance to any setting, but they're also incredibly versatile. Whether you’re planning a wedding, a cozy backyard gathering, or simply want to brighten up your home with some handmade decor, Mason Jar Lanterns are the perfect solution. I've found that they are delightful for summer evenings outside, bring warmth to winter nights, and can be crafted for festive occasions, all while being a fun project for all ages.
In this tutorial, I’ll guide you through the entire process, step by step, so you can create beautiful, glowing lanterns that showcase your personal style. I promise you'll find plenty of tips along the way to avoid common pitfalls and make this crafting experience truly enjoyable. So, let's dive in!
Why Mason Jar Lanterns?
You might wonder what’s so special about Mason Jar Lanterns. Well, they encapsulate the essence of rustic charm while being incredibly easy to customize. They are made from simple materials you probably already have around the house, and they're perfect for both indoor and outdoor use. Plus, they make wonderful gifts, party favors, or simply a beautiful addition to your own home decor.
What You'll Need:
Materials:
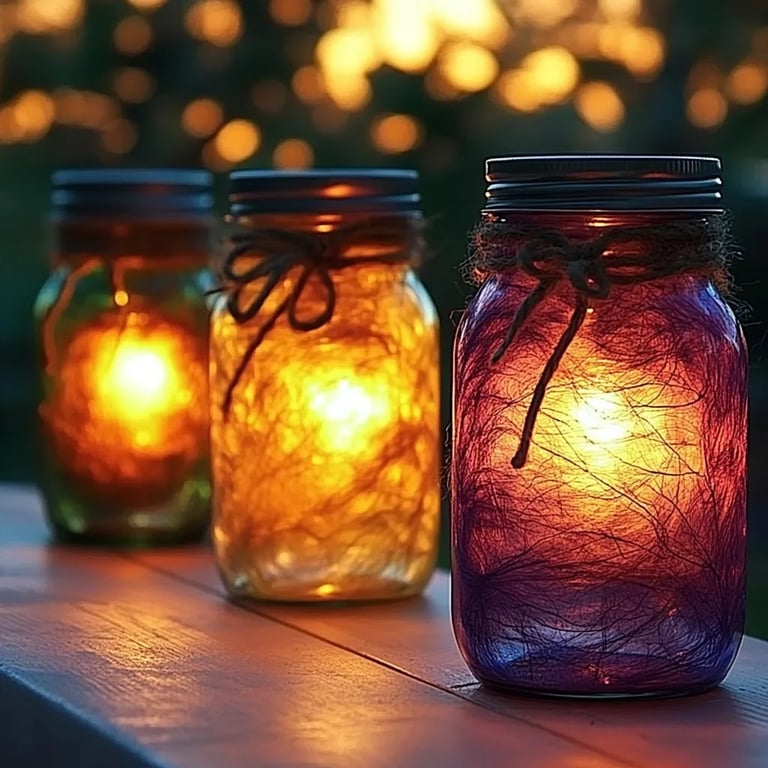
- Mason Jars (you can use any size or style, but pint-sized jars work great)
- LED Tealight Candles (safer than real candles for indoor use)
- Twine or Ribbon (for embellishment)
- Wire (optional) (to create handles)
- Paint (optional; acrylic or glass paints work well)
- Mod Podge or Glitter Glue (for added sparkle)
- Paintbrush (if you choose to paint)
- Glue Gun (for secure embellishments)
- Decorative Items (such as faux flowers, leaves, or fairy lights)
Tools:
- Scissors
- Paint Tray or Plate (if painting)
- Lighter (if using real candles)
- Safety Gloves (if you're using sharp tools)
Step-by-Step Tutorial
Step 1: Prepare Your Mason Jar
Start by cleaning the Mason jar thoroughly. This ensures any dust or residue is removed, allowing for better paint adhesion if you decide to paint your jar. If you're using real candles, ensure the jar isn't cracked or damaged.
Step 2: Painting the Jar (Optional)
If you'd like to give your lantern a bit of color, using acrylic paint is a fantastic option. Simply pour some paint into the jar, swirl it around to coat the inside, and let it dry upside down on paper towels to remove excess paint. You can experiment with different techniques like sponging or layering colors for unique effects.
Tip: Thin layers of paint will dry faster and reduce the risk of streaks. If it appears too thick, just paint over it with a dry brush.
Common Mistake: Not Letting the Paint Dry Completely
Be patient! Skipping this step can lead to smudges or even peeling paint later. If you’re in a rush, use a hairdryer set to low heat to speed up the drying process.
Step 3: Adding Sparkle
Once your paint is dry, it's time to add some sparkle with Mod Podge or glitter glue. Apply it to the areas of the jar you desire. While the glue is still wet, sprinkle glitter over the top, shaking off any excess. This is where you can make your lantern truly shine!
Step 4: Insert the Light Source
For safety, I highly recommend using LED tealight candles instead of real ones, especially if you're creating this project for children or for events where supervision might be limited. Simply drop the LED candle into the bottom of the jar.
Step 5: Embellish Your Lantern
Now comes the fun part: embellishing your lantern! You can wrap twine or ribbon around the neck of the jar and secure it with a bow or a simple knot. This adds an extra layer of charm. Additionally, consider gluing some faux flowers, leaves, or pebbles to the outside for personalized touches.
Personal Anecdote: I once made a batch of these lanterns for a friend's bridal shower using burlap and mason jar lids painted in pastel colors. They were a hit, and my friend still uses them in her home!
Step 6: Create a Handle (Optional)
If you want to hang your lantern, this part is for you. Cut a length of wire (about 18 inches) and wrap it around the neck of the jar several times, leaving long ends. Shape these ends into a handle. Not only is this practical, but it adds a rustic touch!
Step 7: Display with Flair
Once you've decorated and assembled your lanterns, it’s time to find the perfect spot for them. You can place them on tables, hang them from trees, or line a pathway for an enchanting outdoor look.
Safety Warnings
- Real Candles: If you choose to use real candles, never leave them unattended, and place them on a stable surface away from flammable materials.
- Sharp Tools: Be careful when using scissors or a glue gun—always keep a first aid kit handy just in case of mishaps.
Creative Variations
Feeling adventurous? Here are a few creative variations to take your Mason Jar Lanterns to the next level:
- Painted Jars: Try using a sponge technique to create a gradient effect or dab it with a crumpled paper towel for texture.
- Seasonal Themes: Decorate jars for holidays! For example, use orange and black for Halloween, or silver and blue for winter.
- Fairy Lights: Instead of a candle, stuff the jar with battery-operated fairy lights for a magical glow.
Conclusion
And there you have it—your very own Mason Jar Lanterns! This project is not only a wonderful way to add a personal touch to your home, but it also offers a delightful way to unwind and unleash your creativity. Don’t be afraid to experiment and make these lanterns your own.
I hope you enjoyed this crafting journey as much as I did. Remember, the joy of crafting lies not only in the finished product but also in the memories created during the process. Share your lantern creations with me, and let's inspire each other in this wonderful world of DIY! Happy crafting!