#How to Make Magical Mermaid Sparkle Sensory Bottles
Welcome, fellow crafters! Today, I’m thrilled to share with you a delightful DIY project that combines creativity, relaxation, and a touch of magic: the Mermaid Sparkle Sensory Bottle. This whimsical craft has become immensely popular, particularly among parents and educators looking to introduce sensory play into the lives of children, or even to incorporate a little sparkly joy into their own lives. Whether you’re using it for sensory exploration, calming moments, or simply as a beautiful decoration, this colorful bottle is sure to charm anyone who lays eyes on it!
Why I Love Mermaid Sparkle Sensory Bottles
Sensory bottles can be a source of entertainment and a great calming tool. They’re fabulous for kids who may be overwhelmed by their surroundings, helping to focus their attention and engage their senses. Plus, the visual appeal of the swirling glitter and colorful components can soothe anyone's anxiety. Personally, I love incorporating themed designs, and what could be more enchanting than a mermaid theme?
When and How to Use Sensory Bottles
These mermaid-inspired sensory bottles can be used in various settings: during quiet time at home, as a calming tool for children in preschool, or even as a delightful centerpiece for a mermaid-themed party. You can simply shake it up for a splash of color and sparkle or lay it down and watch the mesmerizing movement of the contents. This is not just a crafting project; it’s an invitation to create an experience.
What You’ll Need
Before we dive into the step-by-step tutorial, let’s gather our materials. Luckily, you don’t need anything too fancy! Here’s a detailed list of what I recommend:
- Plastic bottle: A clean, empty plastic bottle (like a water or soda bottle) with a secure cap. I prefer using a 16 oz bottle for this project.
- Clear liquid glue: This will act as the base for your sensory bottle. I love using clear glue because it produces beautiful effects.
- Water: You’ll need distilled water for clarity and to minimize cloudiness over time.
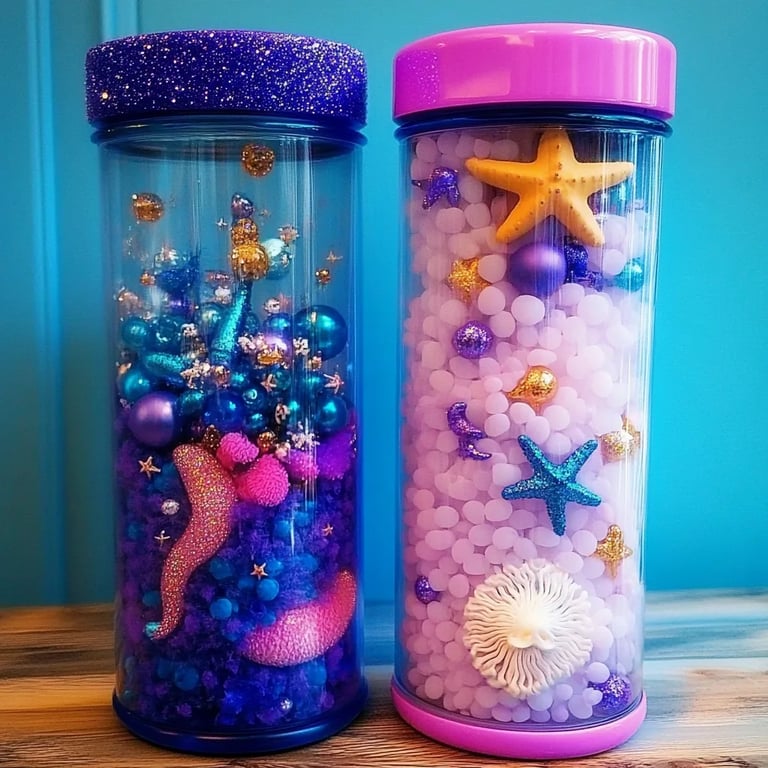
- Glitter: Choose a mix of fine and chunky glitter—iridescent, blue, and green glitters work wonderfully for a mermaid theme. Feel free to experiment with different colors!
- Small decorative items: Consider using sequins, beads, or even small mermaid figurines or shells for an added touch.
- Food coloring (optional): If you want to enhance the color of the water, blue or green food coloring works beautifully.
- A funnel: This will help you pour your ingredients without making a mess!
- Hot glue gun (optional): This can be used to secure the cap of the bottle, ensuring that it doesn’t come loose during use.
Step-by-Step Guide
Now, let’s get crafting! Follow these steps for creating your very own Mermaid Sparkle Sensory Bottle.
Step 1: Prepare Your Bottle
Start by thoroughly cleaning and drying your plastic bottle. If you're using a bottle that originally contained a beverage, be sure to remove all labels and any residue. A clean start ensures that nothing interferes with your glitter’s shimmer.
Step 2: Add Your Glue
Pour about 1/3 cup of clear liquid glue into the bottle using the funnel. This glue will thicken the liquid in the bottle and create a beautiful mesmerizing effect when you shake it.
Tip: While the glue adds thickness, too much can make the bottle sluggish. If you want quicker movement, try reducing the amount of glue to 1/4 cup.
Step 3: Fill with Water
Add distilled water to the bottle until it’s nearly full, leaving a little space at the top for movement. This water will allow all the fun elements to swirl beautifully.
What could go wrong: If you accidentally overfill the bottle, you may not be able to secure it properly. If this happens, simply pour some water out until you have the desired level.
Step 4: Add Color and Glitter
Here comes the fun part! If you’re using food coloring, add a drop or two to achieve your desired hue. Next, sprinkle in a mix of your chosen glitters and any small decorative items like sequins or miniature shells.
Personal Anecdote: I always tend to get excited here, often pouring too much glitter in! Remember that a little goes a long way, so be conservative at first. You can always add more glitter later if needed.
Step 5: Secure the Cap
Before sealing the bottle, give it a good shake to mix the contents and observe the effects. Once you’re satisfied, securely attach the cap. For extra safety, apply a small amount of hot glue around the rim. This will keep little hands from opening it up and spilling the contents.
Safety Warning: Always monitor young children with sensory bottles to prevent any accidents, especially if there are small parts in your mixture.
Step 6: Enjoy!
Your Mermaid Sparkle Sensory Bottle is now complete! Give it a good shake and watch the glitters and decorations dance and twirl. Feel free to use it as a decorative piece on a shelf or gift it to a friend.
Creative Variations
Crafting allows endless creativity! Here are a few variations you might consider:
- Ocean Adventure: Add tiny plastic sea creatures along with blue and green glitter to create an under-the-sea atmosphere.
- Fairy Dust: Replace the mermaid theme with a fairy theme using pinks, purples, and stars or butterfly decorations.
- Seasonal Bottles: Adapt the colors and contents for different seasons (fall leaves, snowy glitter, etc.) to keep them fresh and exciting year-round.
Troubleshooting
Occasionally, things might not go as planned. If your glitter settles too quickly, you can add more glue for weight or try a thicker liquid like hair gel. Bottles with a leak can often be fixed with a little hot glue around the seal.
Final Thoughts
As I wrap up this crafting journey, I hope you feel empowered to create your very own Mermaid Sparkle Sensory Bottle. This project is not just about making something beautiful; it’s an opportunity to explore and engage with your senses, making it a perfect activity for all ages. Whether you’re crafting alone or with little ones, take your time, enjoy the process, and let your creativity flow like the ocean tides. Happy crafting!