How to Make Ice Chalk for Summer Art: An Easy Guide to Creative Fun
Hey there, fellow crafters! As summer rolls in, I know we’re all looking for ways to keep our kids entertained and engaged, and what better way than with a vibrant DIY project that combines art and science? Today, I’m excited to share my tried-and-true method for making ice chalk. This fun project allows you (and your little ones) to unleash your creativity on a large canvas—your driveway or sidewalk! With just a few simple materials, you can create beautiful, colorful art that will leave both kids and adults in awe.
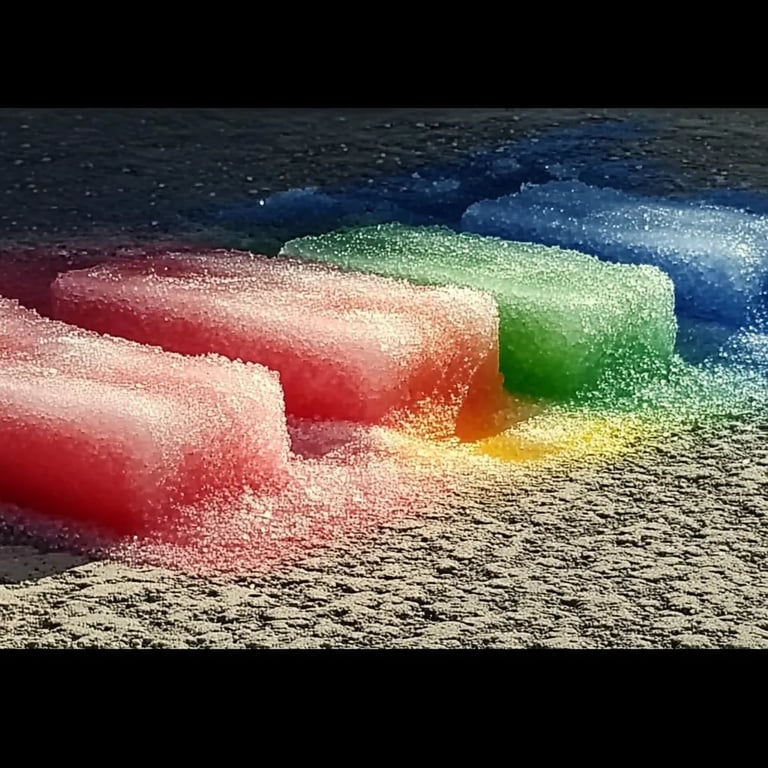
What Is Ice Chalk and Why Is It So Popular?
Ice chalk is essentially a frozen chalk that you can use to draw on pavement or concrete. It's incredibly popular during summer months because it offers a unique twist on traditional sidewalk chalk, allowing for cooling relief during hot days while creating eye-catching designs. These colorful frozen blocks melt as they’re used, providing an exciting sensory experience that doubles as a fun science project. Plus, they’re easy to clean up with just water and can wash away with a rainstorm—no mess, no fuss!
When Can You Use Ice Chalk?
- Summer gatherings: They’re a hit at family barbecues, birthday parties, and neighborhood block parties.
- Playdates: You can spark creativity during playdates with friends.
- Arts and Crafts Day: These add a splash of fun to any arts and crafts session.
- Outdoor Learning: Introduce some outdoor education with color mixing lessons or geometric shapes.
The Recipe: What You’ll Need
Before we dive right into the tutorial, let's gather our materials. Here’s what I personally use to make ice chalk:
- Water: You’ll need enough to fill your molds (around 4 cups).
- Cornstarch: This will give our chalk its texture (about 1 cup).
- Food coloring: Go for liquid food coloring or washable paint for vibrant colors.
- Ice cube trays or silicone molds: These are for shaping your chalk. Silicone molds will make it easier to pop the chalk out.
- Mixing bowl: To blend your ingredients.
- Spoon or whisk: For mixing.
- Freezer space: Make sure you’ve got room in your freezer for the molds to chill!
Step-by-Step Tutorial to Make Ice Chalk
Step 1: Preparing Your Mixture
- Mix the Dry Ingredients: Begin by measuring out 1 cup of cornstarch into your mixing bowl. This is a crucial step because cornstarch will give the ice chalk its solid texture once frozen.
- Add Water: Pour in 4 cups of water gradually while stirring to avoid lumps. The consistency should be somewhat similar to a pancake batter—smooth and easy to mix.
- Incorporate Color: Now comes the fun part! Add your choice of food coloring. I usually mix in about 10-15 drops for vibrant hues, but feel free to adjust based on your preference. Make sure to mix thoroughly until the color is uniform throughout the mixture.
Why This Step Matters:
If the mixture is too watery, your ice chalk may break apart when you use it. On the flip side, if you make it too thick, it may not freeze properly.
Step 2: Filling the Molds
- Pour Into Molds: Carefully pour your colored mixture into ice cube trays or silicone molds. I’ve found that silicone molds work best because they are flexible, making it easier to pop out your ice chalk later.
- Tap to Remove Air Bubbles: Give the molds a gentle tap to release any trapped air bubbles. This ensures that your chalk will freeze evenly and won't crack apart as it hardens.
Possible Pitfalls:
If you overfill the molds, it will create a mess as it expands during freezing. Leave some space at the top of each mold.
Step 3: Freezing
- Place in Freezer: Now, carefully place the filled molds in your freezer. Make sure they are level to avoid spills!
- Wait for Freezing Time: Ideally, take a little patience here. Allow your molds to freeze for at least 4-6 hours, or until completely solid. I often prepare these the night before for an all-day artsy event.
Bonus Tip:
If you want to create mixed-color chalk, you can pour in one color then let it freeze slightly before adding another color on top.
Step 4: The Big Reveal
Once your ice chalk is fully frozen, it’s time to have fun!
- Remove From Molds: Gently flex the silicone molds to release the ice chalk. If you used a rigid mold, you might need to run some warm water on the outside to loosen it.
- Time to Create!: Take the chalk outside, grab some friends or family, and start creating! You can draw anything from simple shapes to vibrant murals.
Tips for Successful Ice Chalk Creations
- Avoid Direct Sun: If it’s too hot outside, your chalk might melt faster than you can use it! Find a shaded area to work.
- Store Properly: Any extra ice chalk can be stored in a Ziploc bag in the freezer for future use. Just thaw it a bit outside or under warm water before using.
- Personalize Your Chalk: Think about adding glitter to your mixture for a sparkling effect!
Creative Variations
- Use Different Shapes: Try heart-shaped molds, star shapes, or even create mini chalk sculptures for more dimension.
- Scent It: For an olfactory twist, you can add a few drops of essential oils to your mixture before freezing.
Safety Warnings
- Supervision Required: Always supervise young children when the chalk is used. Though non-toxic, you should discourage them from eating any of it.
- Safety Gear: If crafting with older kids, make sure they wear old clothes, as food coloring can stain.
Final Thoughts
Making ice chalk has become one of my favorite summer activities, combining creativity, fun, and a bit of science. I hope this comprehensive guide has inspired you to give it a try! Remember, crafting is all about experimenting and enjoying the process. So don’t be afraid to mix things up a little and make your ice chalk uniquely you! I can’t wait to see the amazing artworks you create—share your vibrant masterpieces and let’s inspire one another!
Happy crafting! 🌈