How to Make Glowing Pumpkin Suncatchers: A Festive DIY Craft for Your Home
As an avid crafter, there’s something magical about the fall season that just ignites my creativity. The leaves are turning, the air is crisp, and Halloween is just around the corner. One of my favorite projects to undertake during this time is making glowing pumpkin suncatchers. Not only are they a charming way to celebrate the season, but they also serve as delightful decorations that can liven up your windows or even your garden.
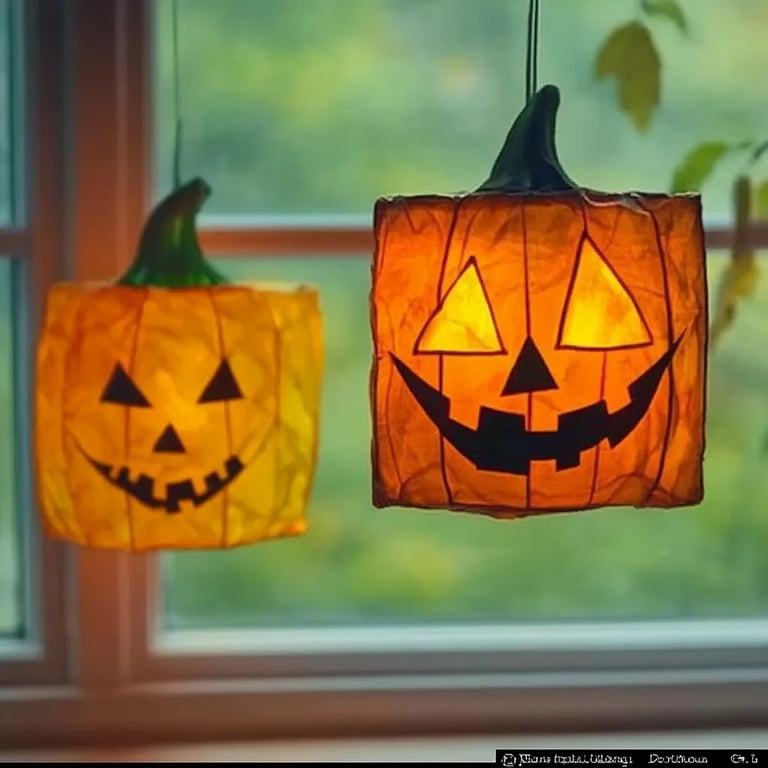
Glowing pumpkin suncatchers are popular for several reasons: they bring an enchanting glow to your space when lit, they’re easy and fun to make, and they are perfect for both kids and adults. Whether you're looking to brighten up your house during Halloween or simply enjoy a little bit of autumn cheer, these suncatchers are a delightful project that anyone can tackle.
What You'll Need
Before we jump into the tutorial, let’s gather our materials. Don't worry; most of these items are common household supplies or can be easily found at your local craft store:
- Transparent plastic sheets (such as old CD cases, or transparency film)
- Acrylic paints (orange, green, black, and a touch of yellow for added glow)
- Paintbrushes (varying sizes for different detailing)
- Craft knife or scissors (for cutting shapes)
- Black marker (for sketching designs)
- Battery-operated tea lights (they’re safe and can fit easily behind the suncatchers)
- Pencil (for tracing designs)
- Temporary adhesive or tape (to hold pieces in place while painting)
- Paper towels or an old rag (for cleanup)
- Parental supervision (recommended if kids are involved!)
Step-by-Step Tutorial
Step 1: Prepare Your Workspace
I always start by clearing my workspace. I recommend using a large table covered with a plastic tablecloth or some newspapers to catch any accidental spills. It’s a little safety net that makes cleanup a breeze. Make sure you have good lighting, too, as it makes a world of difference when you’re trying to paint fine details.
Step 2: Sketch Your Pumpkin Design
Before any paint hits the plastic, I like to sketch out my design. You can go for a classic pumpkin shape or opt for something more whimsical. Using a black marker, I often draw a joyful jack-o'-lantern face, complete with a big smile and a quirky nose. This step matters because having a clear outline will guide your painting and reduce the chance of mistakes.
What Could Go Wrong?
If you make a mistake while sketching, don’t fret! Simply use rubbing alcohol on a cloth to wipe it away from the plastic or cover it with paint later.
Step 3: Cut Out Your Shapes
Using a craft knife or scissors, carefully cut out your pumpkin shapes from the transparent plastic. For little hands, supervise this step closely. Make sure the cuts are smooth, as jagged edges can detract from the overall look. Don’t throw away the cut-out centers! They can be turned into adorable mini jack-o'-lanterns.
Step 4: Paint Your Design
Now, let the real fun begin! Using acrylic paints, start filling in the outlines you sketched. I generally use a bright orange for the pumpkin body, deep green for the stem, and black for the face. The beauty of acrylic paints is that they dry quickly, allowing for layers if needed.
Tips for Painting:
- Use lighter coats first to avoid dripping. It’s easier to add more than to take it away!
- If your brush is too wet, it may mix colors unintentionally. Keep a paper towel handy to blot the brush.
- Allow each section to dry completely before adding a second coat or different colors.
Step 5: Adding Glow
Here's a key step that truly makes your suncatchers pop! After the paint has dried, carefully dab a tiny bit of yellow or white paint on the areas of the pumpkin that would get sunlight. This will create a glowing effect when your suncatchers are backlit.
Step 6: Secure Your Suncatchers
Once the paint is completely dry, it’s time to attach your battery-operated tea lights. Arrange your suncatchers where you want them displayed and use a small piece of tape or temporary adhesive to hold them in place.
Creative Variations
Don’t feel limited to just pumpkins! Try creating ghosts, bats, or even hay bales. You could even make themed sets for different holidays throughout the fall season.
Safety Warnings
Always use good scissors or a craft knife with caution. If children are involved, ensure they have adult supervision, especially during the cutting phase. Use paints in a well-ventilated area and avoid ingesting any materials.
Final Touches and Display
Finding the right spot for your glowing pumpkin suncatchers can elevate their charm. Hang them in a sunny window so they can soak up natural light, or use window suction cups to display them without fear of dropping them.
Personal Reflection
Creating glowing pumpkin suncatchers is more than just a craft; it’s about the memories and joy crafted alongside friends and family. One year, my daughter and I set up a mini craft party, and seeing that glow in her eyes as we painted brought so much joy to my heart.
In conclusion, I hope this guide has inspired you to get crafty this Halloween. With just a few materials and a dash of creativity, you can create a beautiful, glowing pumpkin suncatcher that will warm your home as the days grow shorter. So grab your supplies, roll up your sleeves, and let’s get crafting! Happy Halloween!