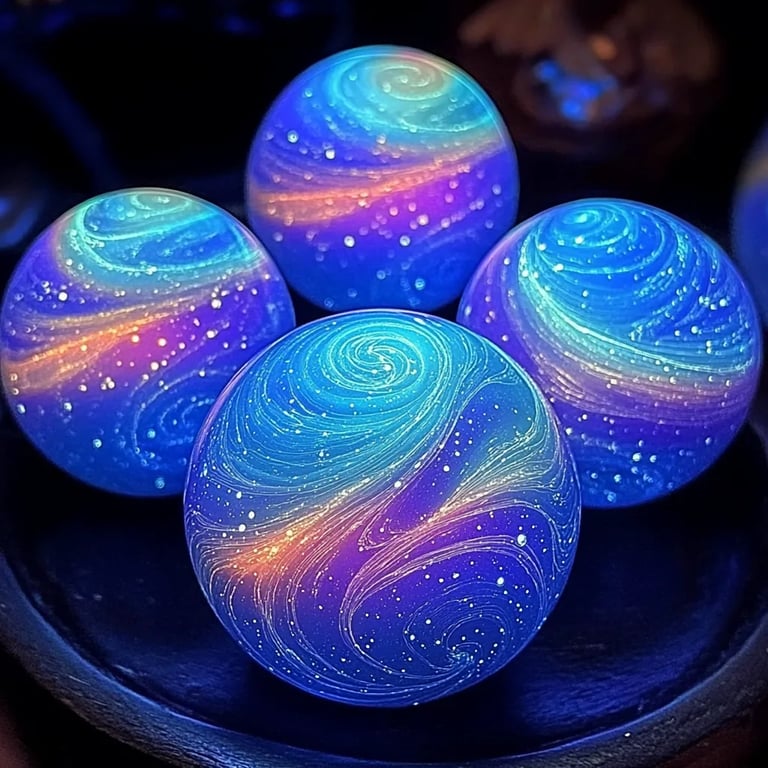
How to Make Glow in the Dark Swirl Bounce Balls for Kids
As a passionate crafter and parent, I’ve discovered the joy of making DIY crafts that enchant kids and adults alike. One of those magical projects involves creating Glow in the Dark Swirl Bounce Balls. Not only are they visually captivating, but they also double up as a fun play item after dark! Whether it’s for a birthday party gift, a fun science project, or simply a creative afternoon activity, making these bounce balls is a wonderful way to engage your children in crafting. Plus, who doesn’t love watching something glow and swirl in the dark?
Why Glow in the Dark Swirl Bounce Balls?
Glow in the dark items have an undeniable allure. They spark imagination and add an element of magic to playtime. The appeal of these bounce balls extends beyond mere aesthetics; they can be used for night games, outdoor parties, or even as unique décor. Brightly colored, swirling patterns can intrigue your kids, while the glow feature encourages creative outdoor activities even after the sun sets.
With this tutorial, I'm excited to share my knowledge and guide you through the crafting process.
Materials You'll Need
Before you embark on this colorful journey, gather the following materials:
- White PVA Glue (non-toxic)
- Cornstarch
- Water
- Glow in the Dark Powder (look for kid-safe options)
- Food Coloring (varied colors for swirling effects)
- Mixing Bowls and Spoons
- Gloves (to prevent stains)
- Round Mold (like a silicone ball mold or any round object)
- Sealant (optional, for preserving glow)
- Measuring Cups
Why Each Material Matters
- White PVA Glue: The base for our bounce balls, providing the essential adhesive quality that binds everything together.
- Cornstarch: Acts as a binding agent and helps create the bounce.
- Water: Helps to mix and adjust the consistency.
- Glow in the Dark Powder: The magic element that will make your balls glow when the lights go out.
- Food Coloring: This is what will give your balls their stunning colors and swirls.
Step-by-Step Tutorial
Let’s get started!
Step 1: Prepare the Mixture
In a mixing bowl, combine 1 cup of PVA glue with 1/2 cup of water. Use a spoon to mix until it’s smooth. This combination is crucial; too much water will make it runny, and too little will make it hard to mold.
Tip: If you're using a colored glue, you can skip the food coloring for a fantastic base color!
Step 2: Add Cornstarch
Gradually mix in 2 cups of cornstarch. This step is essential because it provides the texture and helps the balls bounce. Make sure you mix thoroughly; lumps can lead to poorly formed balls. If your mixture is too thick, add a tiny bit of water—start with just a tablespoon! If it’s too runny, add more cornstarch.
Step 3: Color and Glow
Once you reach a nice dough-like consistency, it's time to add the fun! Add glow in the dark powder to your mixture according to the instructions on the package (typically about 1/2 teaspoon per ball) and a few drops of food coloring. I suggest doing this in small batches, like splitting the mixture into three parts and adding different colors to each.
Warning: Make sure to wear gloves when handling food coloring—it stains!
Step 4: Knead the Dough
Get your hands in the mixture and knead the dough for about 5-10 minutes. This step activates the cornstarch and helps blend the colors. You’ll want it firm enough to hold its shape but not overly dry.
Common Mistake: If the dough feels crumbly or dry, you haven’t added enough water. If it’s sticky, add more cornstarch.
Step 5: Form the Balls
Once you have a pliable consistency, take small pieces of the dough and roll them into balls. I usually make them about the size of a golf ball for optimal bounce. If you’re going for the swirl effect, mix small amounts of different colored dough together before rolling, twisting or folding gently.
Step 6: Mold Your Balls
If you’re using molds, press the dough firmly into each cavity and smooth it out on top. This will ensure they hold their shape.
Step 7: Let Them Dry
Place your balls on a baking sheet lined with parchment paper or in the molds and let them dry for 24 hours at room temperature. It’s crucial to let them cure fully; otherwise, they won’t bounce well.
Tips for Drying: Avoid placing them directly in the sun, as this can warp their shape.
Step 8: The Finishing Touches
Once they are dry, you can choose to apply a sealant if you wish. This helps preserve the color and glow. Simply spray a light coat and let them dry completely.
Troubleshooting
- Bouncing Issues: If your balls don’t bounce, they may not have dried completly or had too much water in them.
- Swirling Problems: If the colors didn’t swirl, either you didn’t mix them enough or you overdid it.
Variations and Creative Ideas
Now that you know how to make the basic version, you can personalize your glow balls:
- Add Sparkles: Mix in some craft glitter for extra shimmer.
- Use Scented oils: A few drops can make your balls smell delightful!
- Different Shapes: Try different molds, such as animals or stars for variety.
Safety Guidelines
While crafting, ensure that all items are kid-friendly and non-toxic. Always supervise young children, especially when using small materials or food coloring that can stain.
Conclusion
Creating Glow in the Dark Swirl Bounce Balls is not just a fun activity; it’s a fantastic way to bond with your children and watch their imaginations come to life. With just a few supplies and some creativity, the possibilities are endless. I'm so excited to see what you’ll create! So gather your materials, roll up your sleeves, and let the crafting adventure begin! Happy crafting!
Feel free to share your experiences, variations, and any challenges in the comments below!