How to Make Friendly Bat Roll Decor: A Step-by-Step Guide for Craft Enthusiasts
Hello, fellow crafters! Today, I'm thrilled to share with you a delightful DIY project that has become a perennial favorite among enthusiasts of all ages: the Friendly Bat Roll Decor. With Halloween just around the corner, this charming decoration can infuse your home with a playful yet spooky ambiance.
What is Friendly Bat Roll Decor?
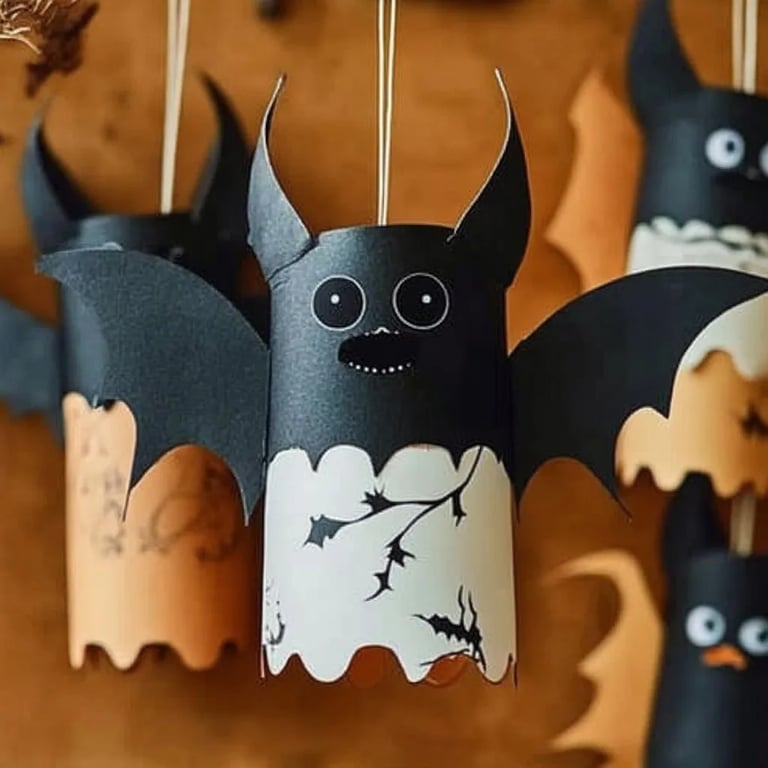
If you’re unfamiliar, Friendly Bat Roll Decor refers to adorable little bats that are crafted from easy-to-find materials, rolled up, and designed to hang on walls or even as an accent in a Halloween-themed display. These playful bats add a whimsical touch to your décor and can be used in various settings—from classroom decorations to home Halloween parties. Their popularity stems from their cuteness and the fact that they are simple to make, even for the crafting novice.
Why Make Friendly Bat Roll Decor?
There are numerous reasons why creating Friendly Bat Roll Decor may be your next favorite project. For starters:
- Accessibility: You don’t need a suite of crafting tools or pricey supplies. Most materials are likely already in your craft stash!
- Customizability: You can personalize your bats in various ways, from colors to patterns to additional embellishments.
- Fun for All Ages: This is a great project to do with kids—sparking their creativity while making something that brings joy to the season.
- Perfect for Practice: If you are new to crafting or looking to improve your skills, rolling and attaching materials can refine your techniques!
Step-by-Step Tutorial
Now, let’s jump into the fun part: creating your Friendly Bat Roll Decor! Below, I've detailed every step of the process, including the materials you'll need, potential pitfalls, and solutions to common issues. So grab your crafting supplies, and let's get started!
Materials Required
- Black Cardstock or Construction Paper (ideal for the bat's body)
- Scissors
- Glue Stick or Hot Glue Gun (ensure adult supervision with hot glue)
- Googly Eyes (for a whimsical touch)
- White Paint Pen or White Gel Pen (optional, for added details)
- Wire or Pipe Cleaners (optional, for added structure)
- String or Ribbon (for hanging)
- Cotton Balls or Batting (optional, for a fluffy tail and wings)
Step 1: Preparing the Bat Body
Begin by cutting the black cardstock into bat shapes. You’ll want to ensure that your bat silhouette has a rounded body and exaggerated wing shapes. The basic shape might resemble an elongated oval with two triangular wing extensions on either side.
Tip: Use a template! If you're not sure about freehanding your bat, search online for bat silhouettes, print one out, and trace it onto your cardstock.
Potential Pitfall: If you find the wings are too flimsy, consider doubling your cardstock or using heavier cardstock to give more structure to the bat.
Step 2: Rolling the Bat
Once you have your bat shape cut out, it's time to create rolls for the body. Starting with the base of the bat, tightly roll the cardstock toward the wings. The tighter the roll, the sturdier the bat will be.
Why This Matters: A tight roll creates a more defined shape, making your bat look sleek and professional.
Fix It: If your roll becomes loose or unravels, simply add a bit of glue at the end of the roll to secure it in place.
Step 3: Adding Features
Now comes the fun part—adding personality to your bat! Use your glue stick or hot glue gun to attach googly eyes to your rolled bat's head. You may also want to add details with a white paint pen, creating a smile or fangs for added character.
Personal Anecdote: When I first started crafting these bats, I went overboard with the eyes—some ended up looking like they were winking at you! The fun part is there’s no wrong way to personalize your bats.
Step 4: Attach String for Hanging
Cut a piece of string or ribbon, and attach it to the top of the bat using glue. This allows you to hang your friendly creations wherever you'd like—doorway, wall, or even from the ceiling.
Step 5: Create Fluffy Wings
If you want to add more depth, consider attaching cotton balls or batting to the bat’s wings. This will not only add texture but also give a more whimsical feel to your decoration.
Alternative Methods: Instead of cotton, you could also use colored tissue paper for a different look. Just crumple it up for a more whimsical appearance.
Step 6: Final Touches
Once all the pieces are dry, step back and admire your work! You can create an entire flock of bats to hang as a series along your wall or even have one singular statement bat flying solo.
Safety Warning: If using hot glue, ensure children are supervised, as the glue can cause burns.
Creative Variations
Feeling adventurous? Here are a few variations to explore:
- Glow-in-the-Dark Bats: Use glow-in-the-dark paint to create a stunning effect at night!
- Decorative Patterns: Instead of a solid black bat, try creating a patterned bat with colorful construction paper. Think polka dots, stripes, or even a plaid design for a trendy take.
- Storytime Display: Use your bats to set the scene for Halloween stories by hanging them against a backdrop of spooky decorations or storybook illustrations.
Conclusion
Congratulations on creating your Friendly Bat Roll Decor! I hope this project has not only enhanced your craft skills but also brought joy to your Halloween season. Whether you’re decorating your home, classroom, or simply creating a magical little project to share with family and friends, these bats are sure to bring smiles all around.
So, gather your materials and let your creativity soar! Happy crafting, and may your home be filled with the delightful spirit of Halloween!