How to Make Fluffy Pet Rocks: A Step-By-Step Guide to Crafting Your Own
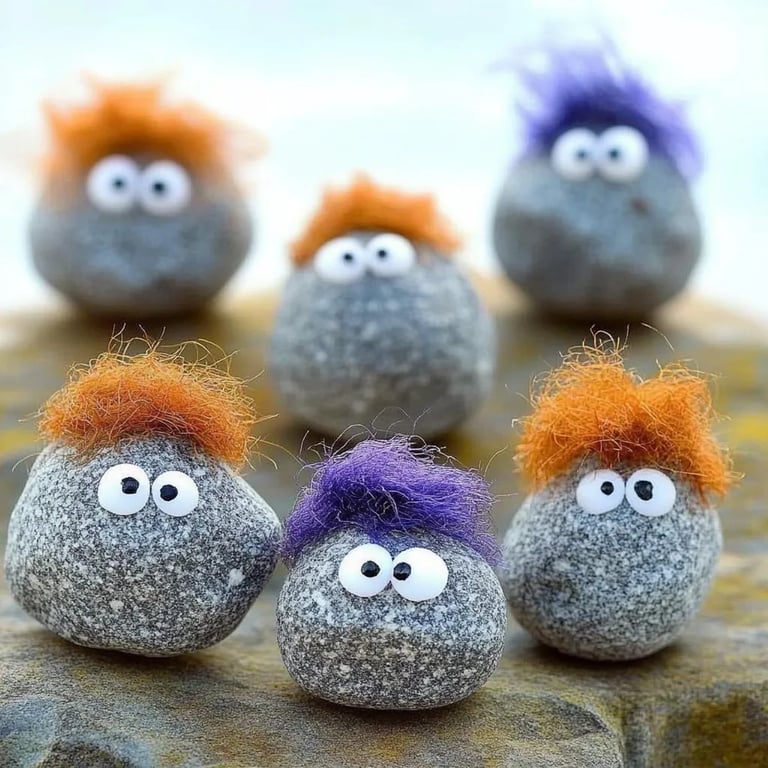
Have you ever wanted a pet that requires little to no care, but brings all the comfort and joy of furry companionship? Well, let me introduce you to the wonderfully whimsical world of Fluffy Pet Rocks! These delightful little creations are not only a fantastic DIY project for crafters of all ages, but they also make perfect gifts and unique home décor that will add a dash of charm to any space. Whether you’re using them as a conversation starter, decoration, or simply to get your creative juices flowing, making Fluffy Pet Rocks has never been more popular—especially during those cozy weekends at home or crafty gatherings with friends.
In this article, I’ll guide you through the step-by-step journey of crafting your very own Fluffy Pet Rocks using simple materials you likely already have at home. Trust me; this project is not only fun but also therapeutic in its own way. So grab your supplies, and let's get started!
What You'll Need
Before diving into the crafting process, let’s gather our materials. Here’s a comprehensive list of what you’ll need:
Basic Materials:
- Smooth round rocks: Pick a few various sizes for different pets (1-4 inches in diameter works well).
- Acrylic paint: Choose colors that inspire you for your pet’s body and features.
- Crafting glue: A hot glue gun works best, but white school glue can be used if you prefer.
- Faux fur fabric or fluffy yarn: This will give your rocks that cute, furry look.
- Googly eyes: You can also paint eyes if you prefer.
- Paintbrushes: Different sizes for various details.
- Sealant spray (optional): To protect your finished rocks if they’ll be displayed outdoors.
Optional Materials:
- Felt: For additional embellishments like collars and accessories.
- Markers: For finer details.
- Ribbons: To create cute bows or collars.
Step-by-Step Tutorial
Step 1: Preparing Your Rocks
Why It Matters: The base of your Fluffy Pet Rock is crucial for a good finish. A smooth surface will make it easier to paint on and will give a more polished look.
- Start by washing your rocks in warm soapy water to remove dirt and dust. This ensures that the paint adheres well later on.
- Allow the rocks to dry completely. This might take a couple of hours, so be patient!
Tip: If you’re in a hurry, use a paper towel or cloth to wipe off the excess water.
Step 2: Painting the Base Color
What Could Go Wrong: Using low-quality acrylic paint or painting on wet rocks could lead to streaks or peeling paint.
- Choose a color for your pet’s body and apply the acrylic paint using a brush. You may need 2-3 coats, especially if opting for lighter colors over a darker rock.
- Let the first coat dry before applying subsequent coats.
Safety Warning: If you’re using a hot glue gun, be cautious of burns. Likewise, make sure you’re in a well-ventilated area when working with spray sealants.
Step 3: Adding Details
- Once the paint is completely dry, it's time to add details! Use your smaller brushes or markers to create features like noses, mouths, and whiskers.
- Glue on googly eyes or paint them if you prefer a more unique look.
Tip: For a whimsical touch, experiment with different expressions! A surprised or sleepy face adds character.
Step 4: Creating the Fluffy Fur
Why This Matters: This is the essential step for transforming a simple rock into a fluffy pet. The texture will give your rock life!
- Cut a piece of faux fur or yarn to the desired length. Measure foam that might go on the top to resemble ears if you’re making a creature like a bunny or dog.
- Apply glue on the rock surface where you want the fur to stick and press the faux fur into the adhesive. For yarn, you can twist it into fluffy tufts and glue them on.
- Allow the glue to dry for a while.
Tip: Cutting the faux fur into small strips or patches can create a layered fluffy effect for a more dynamic look.
Step 5: Final Touches
- Once everything is dry, you can embellish your Fluffy Pet Rock with additional accessories. Create small felt or fabric collars, bows, or even tiny hats using crafty fabric scraps.
- For a final touch of protection, spritz your rock with sealant spray to keep it looking vibrant and prevent wear.
Alternative Method: If you don’t want to use a sealant, simply keep your Fluffy Pet Rocks indoors, where they can stay dry and pristine!
Step 6: Show Off Your Creations!
Once your Fluffy Pet Rocks are complete, you can display them on a shelf, start a fun rock garden, or even give them as gifts to family and friends. The joy they bring is contagious, and you'll likely receive countless compliments on your creations!
Personal Anecdote
I remember the first time I made these delightful rocks. It was a rainy Sunday afternoon, and I desperately needed a creative outlet. I rummaged through my craft supplies and stumbled upon some smooth rocks I’d collected during a summer hiking trip, acrylic paints, and a little bit of fur from a past project. What started as a simple craft soon turned into a memorable declaration of creativity and fun! My fluffy little companions quickly became a centerpiece in my living room, sparking conversations about crafting and creativity.
Creative Variations
Get creative! Beyond the basic method outlined above, here are some alternative ideas to expand your crafting experience:
- Seasonal Themes: Create Halloween-themed pet rocks with spooky faces or Christmas ones sporting Santa hats!
- Pet Rock Family: Make a whole family by creating individual personalities—different sizes and colors reminiscent of a family pet.
- Animal Variants: You can create creatures like turtles, bears, or even mythical creatures by changing up the paint colors and embellishments used.
Final Thoughts
Making Fluffy Pet Rocks is a rewarding and enjoyable experience that not only unleashes your creativity but also fills your home with charm and personality. Remember, crafting is all about exploration and expression—there’s no right or wrong way to create your fluffy companions. So gather your materials, let your imagination run wild, and dive into the crafting process. I promise you the joy and satisfaction you’ll get from creating these adorable fluffy pets will keep beckoning you back to your craft space time and again!
Happy crafting! 🌟