How to Make DIY Suncatchers from Old CDs: A Beginner's Guide
Hello fellow crafters! Today, I'm thrilled to share one of my favorite upcycling projects: creating stunning DIY suncatchers from old CDs. If you’re looking for a fun, eco-friendly craft that brings joy, color, and creativity into your living space, you’ve found the right project! Suncatchers not only brighten up your home with beautiful colors dancing through your windows, but they also serve as a fabulous conversation starter. Plus, we’re all looking for ways to recycle and give new life to old materials, right?
Why Are Suncatchers So Popular?
Suncatchers are a delightful craft that lends well to all ages. They can be made from various materials, but CDs are perfect for this project due to their reflective surfaces. When the sunlight hits them, they cast rainbow-like reflections that can fill a room with warmth and happiness. Whether you want to hang them in a window, use them in a garden, or even display them as indoor decor, suncatchers can give an artistic touch to any space. Plus, they make fantastic gifts!
Materials You'll Need
Before we dive into the step-by-step process, let’s gather our materials. Here’s what you will need:
- Old CDs or DVDs: The star of our show! Look through your collection for discs that are no longer in use.
- Hot glue gun and glue sticks: For adhering materials together.
- Colored tissue paper: This will be used to create the colorful designs in your suncatchers. Feel free to mix and match colors!
- Scissors: To cut your tissue paper and possibly your CDs.
- Jute twine, string, or fishing line: For hanging your suncatcher.
- Optional: Glass beads, sequins, or other embellishments to make your suncatcher even more unique.
Step-by-Step Tutorial: Making Your Suncatcher
Step 1: Preparing the CDs
I find that the first step really sets the tone for the whole project. Start by giving your old CDs a quick clean with warm, soapy water to remove any dirt. After rinsing, thoroughly dry them with a soft cloth. Cleaning the CDs ensures that your suncatcher will have a clean and shiny surface, allowing the light to refract beautifully.
Tip: Avoid using abrasive materials that could scratch the CD's surface.
Step 2: Cutting Tissue Paper
Next, take your colored tissue paper and cut it into small squares or fun shapes – think circles, triangles, or even whimsical patterns. The squares should be about 1-2 inches wide, but you can experiment with size to see what you love most!
Why this step matters: The size and patterns of your tissue paper pieces will create the overall look of your suncatcher, allowing you to express your creativity.
Step 3: Glueing the Tissue Paper onto the CD
Using your hot glue gun, start to apply glue to the shiny side of the CD. Begin adding the tissue paper pieces by carefully placing them over the glue as you go along. You don’t need to cover the entire CD if you like a more rustic look, but be sure to leave some gaps to let light shine through.
What could go wrong: If you add too much glue, it could seep through the tissue paper and make it look messy. To avoid this, apply glue in small, manageable sections and work your way around.
Step 4: Adding Embellishments
Now is the fun part! If you want to personalize your suncatcher, this is your chance to add beads, sequins, or any small embellishments. Simply glue them on in a random or organized pattern for added flair.
Personal Anecdote: I once added tiny glass beads to a suncatcher I made for a friend's birthday. It gave it such a beautiful shimmer when the sunlight hit it—she still tells me it’s her favorite gift to this day!
Step 5: Attaching the Twine
Once you’ve let your decorated CD dry completely, it’s time to create the hanging portion. Cut a piece of jute twine or string about 12-18 inches long. Use your hot glue gun to attach one end of the twine to the top of your CD. This will be your hook for hanging.
Safety Warning: Be careful while using the hot glue gun. The tip can get very hot, and you don’t want to accidentally burn yourself!
Step 6: Finding the Perfect Spot
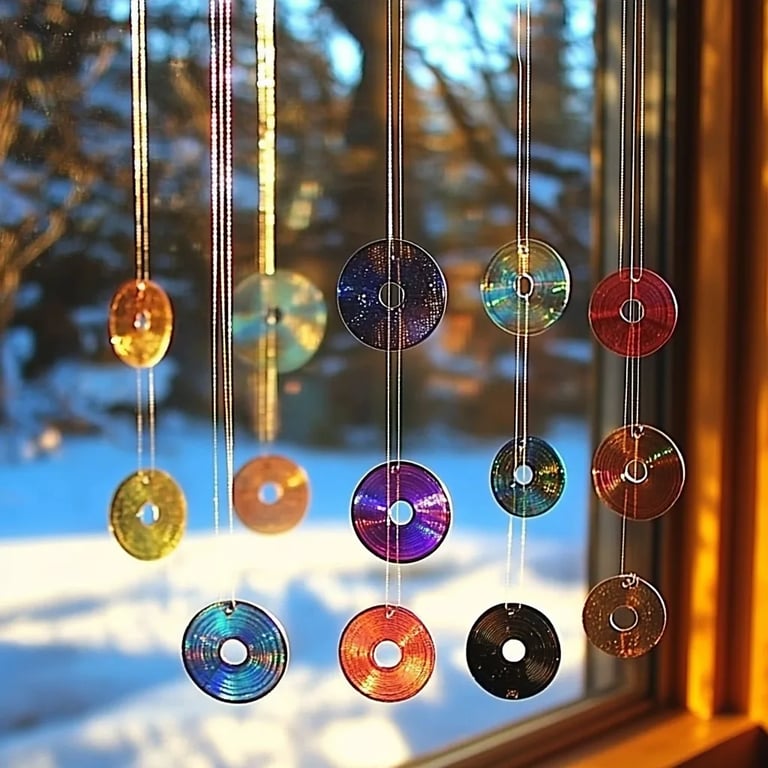
Your suncatcher is now complete! Hang it in a sunny window, or even outdoors in your garden. The more light it catches, the more vibrant the colors will be! I love hanging mine at different heights to create a stunning display.
Creative Variations and Tips
- Layering: Try layering different colors of tissue paper to create a more dimensional look. The more layers, the more depth!
- Different Shapes: Experiment with different shapes of CDs, such as smaller ones from CDs or DVDs.
- Seasonal Themes: Change out your suncatchers for different seasons using fall colors, bright summer tones, or even icy blues and whites for winter.
Troubleshooting Common Issues
- Tissue Paper Tears: If your tissue paper tears while applying, don’t fret! You can either patch it up with another piece or embrace it as part of the rustic charm!
- Suncatcher Isn't Hanging Right: If the twine feels weak, try adding a dot of glue around the knotted area to ensure a secure hold.
Conclusion
Making DIY suncatchers from old CDs is a wonderful way to explore your creativity, recycle materials, and produce functional decor that brightens your home. Remember, the beauty of crafting lies in the journey, so don’t stress about making it perfect. Each suncatcher will hold its unique charm based on your creative choices.
So, gather those materials, carve out some time for fun, and let the sunshine in! Happy crafting!