How to Make DIY Seashell Crabs: A Step-by-Step Guide for Craft Lovers
When the summer sun casts its golden rays upon sandy shores, it’s impossible to resist the charm of seashells. These natural treasures not only evoke memories of beach vacations but also inspire countless creative crafts. One delightful project that I absolutely love making is DIY Seashell Crabs. These adorable crustacean replicas are perfect as home decor, gifts, or even as a fun activity for kids. They radiate whimsy and creativity, making them a cherished addition to any craft collection.
Why DIY Seashell Crabs Are So Popular
Seashell crabs have gained popularity in the crafting community due to their simplicity, charm, and versatility. They serve various functions—table decorations, party favors, or even whimsical garden ornaments. Given their ocean-inspired theme, they are especially popular in summer months and beach-themed parties. Moreover, creating seashell crabs allows for personal expression—each crab can be uniquely styled, reflecting your creativity and personality.
From my experience, working with seashells not only brings satisfaction but also encourages mindfulness as you connect with nature. So, let’s dive into creating these charming crafts!
What You’ll Need
Here’s a comprehensive list of materials to gather before you start.
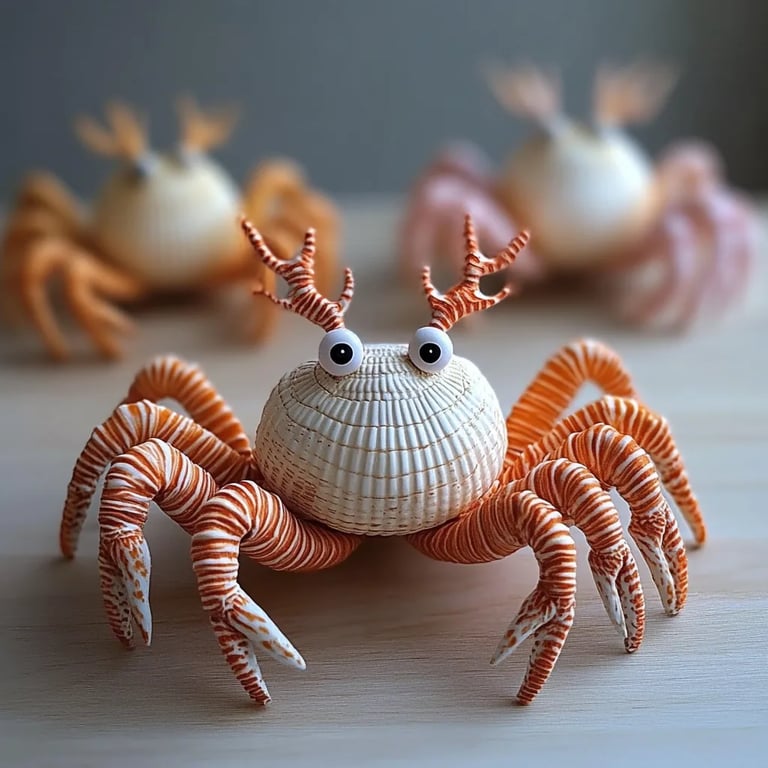
Materials:
- Seashells: A variety of sizes. Look for a larger, flat shell for the body (like a clam shell) and smaller shells for legs and claws.
- Hot glue gun & glue sticks: Essential for quick and sturdy bonding.
- Acrylic paints: I suggest vibrant colors like red, orange, and blue for decorating your crabs.
- Paintbrushes: For applying your creative flair.
- Googly eyes: A must for adding personality to your crab.
- Wire or pipe cleaners: These can be used for legs and detailed features.
- Scissors: For cutting any materials if needed.
- Sealant spray (optional): To protect the finished piece.
- Work surface: A mat or paper to keep your crafting area clean.
Safety Warning:
Always use your hot glue gun with caution. The glue can reach high temperatures, which may cause burns if it comes in contact with your skin.
Step-by-Step Tutorial to Craft Your Seashell Crab
Now that we have our materials ready, let’s jump into the crafting process!
Step 1: Prepare Your Seashells
Start by cleaning your seashells to ensure they are free of sand and debris. I usually wash them with warm, soapy water and let them dry completely before using them. Cleaning ensures that your paint adheres better later on.
Step 2: Form the Body
Take your large shell—this will be the main body of your crab. If it’s uneven, you can sand it down a bit to make it sit flatter on your crafting surface. This will prevent it from tipping over once finished.
Step 3: Create the Legs
Using your wire or pipe cleaners, cut down pieces that will serve as the crab’s legs. I typically cut four pieces for each side, about 3 to 4 inches long. You can bend these legs for a more realistic look. I’ve found that bending the legs gives them more character and stability.
Tip: If you’re using pipe cleaners, you can twist them together for more dimension.
Step 4: Glue the Legs
Using the hot glue gun, attach the legs to the underside of the shell. Make sure to space them evenly apart to balance the crab. Hold them in place for a few seconds until the glue sets—this is where patience is critical! If you find that a leg is too wobbly, reinforce it with more glue.
What Could Go Wrong: Sometimes, the legs may not stick well, which can happen if the shell surface is too smooth. In such cases, adding a bit of texture by using sandpaper can help!
Step 5: Add Claws
For the claws, select smaller shells and glue them to the front ends of your crab. This creates a more authentic look. If you feel creative, you can also sculpt claws from air-dry clay or use more pipe cleaners for a fun, stylized version.
Step 6: Bring Your Crab to Life
Now comes the fun part—painting! Choose your colors and paint the crab, allowing freedom for artistic expression. Go for bold colors or patterns—stripes, spots, or even glitter for extra flair (use glitter sparingly!). Let the paint dry thoroughly before moving on to the next step.
Anecdote: I remember one summer afternoon painting crabs with my niece—she dared me to create a purple crab. It turned out beautifully, and now it’s one of our favorite summer memories!
Step 7: Attach the Eyes
Once the paint is dry, glue on the googly eyes. This is the final touch that brings your crab to life! Position them well to give your crab character—facing each other or one looking slightly askew creates unique charm.
Step 8: Seal Your Masterpiece (Optional)
If you want your crab to last longer, consider spraying a sealant over your finished work to protect it from the elements. This is a great step if you intend to display them outdoors.
Creative Variations
The beauty of crafting is that the possibilities are endless. Here are a few variations to try:
- Seashell Fish: Use a longer shell for the body, smaller shells for fins and tail, and paint them in bright colors.
- Seashell Turtles: A round shell can easily be made into a delightful turtle by adding limbs and a painted shell.
- Seasonal Themes: Consider painting seasonal patterns—perhaps pumpkins for fall or snowflakes for winter.
Conclusion
Crafting DIY seashell crabs is a splendid way to express your creativity while bringing a bit of the beach to your home. I hope this detailed guide empowers you to take on this project with confidence and joy! Remember, crafting is not just about the end product but the journey—and the memories you create along the way.
So, gather your materials, unleash your creativity, and let your crafting spirit shine! If you have questions or need further guidance, feel free to reach out or leave a comment below. Happy crafting!