How to Make DIY Scented Aroma Stones: A Comprehensive Guide for Crafting Enthusiasts
Hello, fellow crafters! Today, I'm thrilled to share with you one of my favorite DIY projects—making scented aroma stones. These delightful little creations not only fill your space with captivating fragrances but also double as beautiful decorative items.
What Are Scented Aroma Stones?
Scented aroma stones are versatile, handmade pieces that can add a touch of scent and elegance to any room. They are small, often stone-like, and infused with essential oils, making them perfect for freshening up your home, office, or even your car. Whether you use them in your bedroom to create a calming atmosphere or in your living room for a refreshing touch, aroma stones are a wonderful way to personalize your space.
Why Are They Popular?
One of the reasons scented aroma stones have surged in popularity is their DIY nature. Everyone loves a good crafting project! Plus, the ability to choose your own fragrances allows you to tailor them to your mood or the season. These stones are also budget-friendly compared to store-bought air fresheners and can make wonderful gifts for friends and family.
When and How to Use Aroma Stones
You can strategically place your aroma stones around your home, in drawers, or even give them as gifts. They’re perfect for:
- Home Décor: Enhance your living space with customized scents that match your style.
- Gifts: Create unique and heartfelt gifts for loved ones on special occasions.
- Relaxation: Use calming scents in your meditation or yoga space to create a soothing ambiance.
- Seasonal Decor: Change scents with the seasons for a fresh vibe all year round.
Now that you’re excited to dive into this crafting journey, let’s get started! I’ll guide you through the entire process step-by-step, sharing tips, potential pitfalls, and personal anecdotes along the way.
—
Materials Needed
Before we begin, here’s a comprehensive list of materials you'll need:
- Baking Soda: 1 cup (this acts as the primary ingredient)
- Cornstarch: 1/2 cup (adds texture)
- White Vinegar: 1/2 cup (reacts with baking soda to create the stone-like texture)
- Essential Oils: Choose your favorite scents (I love lavender for relaxation or lemon for a fresh burst of energy!)
- Mixing Bowl: For combining your ingredients
- Spoon or Spatula: To mix the ingredients
- Silicone Molds: To shape your aroma stones (you can find these in craft stores or online)
- Baking Sheet: For drying the stones if you prefer an oven method
- Parchment Paper (optional): To line your baking sheet
- Measuring Cup and Spoon: For accurate measurements
Step-by-Step Tutorial
Step 1: Mix the Dry Ingredients
In a mixing bowl, combine 1 cup of baking soda and 1/2 cup of cornstarch. This is the base of your aroma stones, and it’s crucial because it provides the texture and structure. Using a whisk can help ensure the mixture is lump-free.
Tip: If your mixture has lumps, don’t worry! Just break them down with some extra mixing. A smooth consistency is essential for even drying.
Step 2: Add the Vinegar
Next, slowly add 1/2 cup of white vinegar to the dry mix while stirring continuously. This is where the magic starts! You'll notice fizzing—that's the reaction between the vinegar and baking soda. It’s best to add the vinegar gradually to avoid overwhelming the mixture.
What Could Go Wrong: If you dump all the vinegar in at once, it might foam over and create a mess. Trust me, I learned this the hard way! Just a small bit at a time works wonders.
Step 3: Incorporate Essential Oils
Once the fizzing subsides and you have a thick paste, it’s time to add your essential oils. I usually start with about 15-20 drops, but feel free to adjust based on your scent preference. For a stronger aroma, you can add more.
Note: The scent will become less pronounced as the stones dry, so don’t be shy about bumping up the amount.
Step 4: Mix Until Smooth
Using your spoon or spatula, mix the ingredients well to combine until you have a consistent, thick paste. This will be your signature scent blend. Take a moment to enjoy the aroma—the beauty of crafting is that it engages all the senses!
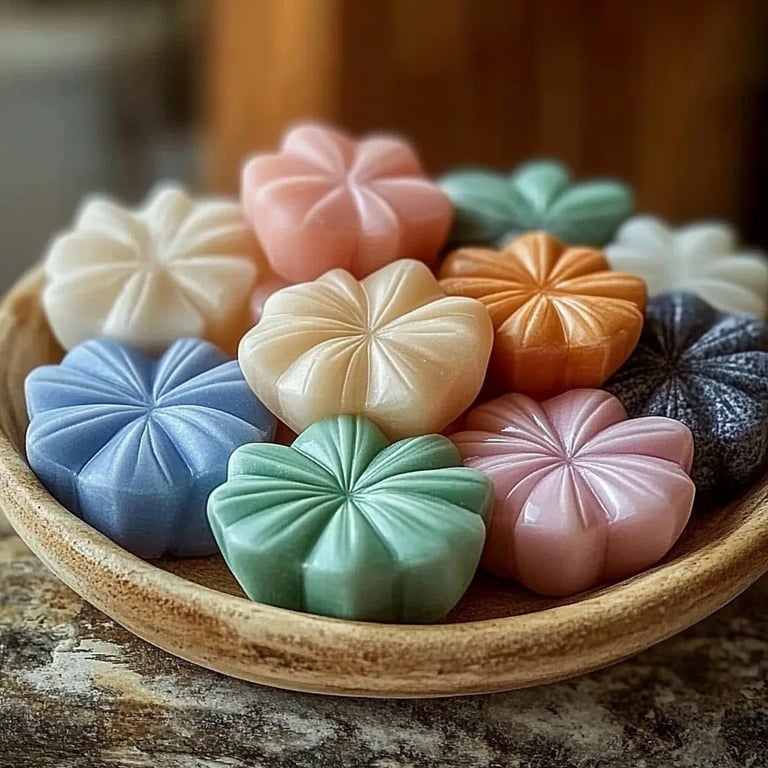
Step 5: Shape Your Aroma Stones
Now comes the fun part! Spoon the mixture into your silicone molds. You can choose various shapes—hearts, stars, or even simple circles. Gently press down to eliminate any air pockets (as I once learned, bubbles can create weak spots in your finished product).
Personal Anecdote: The first time I made aroma stones, I used too small molds and ended up with tiny, fragile stones. I recommend larger molds for a sturdier end result.
Step 6: Drying Time
After filling your molds, you have a couple of options for drying:
Option 1: Air Drying: Leave your stones in a cool, dry place for 24-48 hours. This method preserves the essential oils' integrity but takes longer.
Option 2: Oven Drying: Preheat your oven to 200°F (93°C). Place the filled molds on a baking sheet lined with parchment paper. Bake them for about 1-2 hours. Keep an eye on them—overbaking can lead to cracks.
Safety Warning: Avoid using high temperatures, as this can cause the essential oils to evaporate too quickly.
Step 7: Unmolding and Curing
Once your aroma stones are hard, carefully unmold them. Let them cure for an additional day on a drying rack. This helps any excess moisture escape and enhances the scent.
Creative Variations
Once you’ve mastered the basic recipe, feel free to get creative! Here are some variations you might enjoy:
- Aesthetic Touches: Before the stones dry, add natural materials like dried flowers or herbs for decorative appeal.
- Colorful Stones: Use food coloring to tint your mixture. Just a few drops will do!
- Layering Scents: You can make several thin layers of different scents in one mold for a multi-layered fragrance experience.
Final Notes
Making DIY scented aroma stones is a gratifying experience that fills your space with delightful fragrances while also allowing your creativity to shine. Don’t be afraid to experiment with different scents, shapes, and methods to make these stones uniquely yours!
I hope you found this guide helpful and inspiring. If you encounter any bumps along the way, remember that crafting is all about experimentation and having fun. Embrace the process, cherish your creations, and enjoy every whiff of your stunning aroma stones. Happy crafting!