How to Make DIY Scarecrow Jars: A Step-by-Step Guide for Crafting Enthusiasts
Welcome, fellow crafters! As the days grow shorter and the air turns crisp, I find myself getting excited about autumn and all the cozy vibes it brings. One delightful project that I’ve fallen in love with is creating DIY scarecrow jars. Not only are these whimsical decorations perfect for Halloween and Thanksgiving, but they're also a fantastic way to showcase your creative flair. Plus, they make lovely gifts or charming pieces for your home decor!
Scarecrow jars are versatile and easy to make, appealing to both seasoned crafters and beginners alike. Whether you're using them for centerpieces at a holiday gathering or as adorable accents on your front porch, they are sure to bring a smile to anyone who sees them. So, grab your crafting materials and let’s dive into the wonderful world of scarecrow jar making!
What You'll Need
Before we get started, let me quickly run through the materials you'll need for this fun and festive project. I promise these items are easy to find and won’t break the bank!
Materials
- Glass jars (Mason jars, empty pasta jars, or any clear jars you have on hand)
- Natural twine or burlap fabric
- Colorful fabric scraps (in fall colors like orange, yellow, and brown)
- Hot glue gun and glue sticks
- Wiggle eyes or googly eyes
- Markers or paint (permanent markers or acrylic paints)
- Scissors
- Felt pieces (for the scarecrow's nose and hat)
- Artificial flower stems or dried corn husks (for decoration)
Safety Precautions
Although this project is fairly safe, remember: Crafting should always be fun and safe! If you're using a hot glue gun, be cautious of burns. Work on a stable surface to avoid spills, and keep scissors out of reach of little ones if you're crafting with kids.
Step-by-Step Guide
Step 1: Preparing the Jar
First, gather your glass jar and ensure it’s clean and dry. If you’re using a recycled jar, remove any labels and adhesive residues. An easy way to do this is by soaking the jar in warm, soapy water. Once clean, set it aside to dry.
*Why this matters:* A clean jar is essential for adhesion, especially if you're decorating the outside. It also provides a better canvas for painting or gluing.
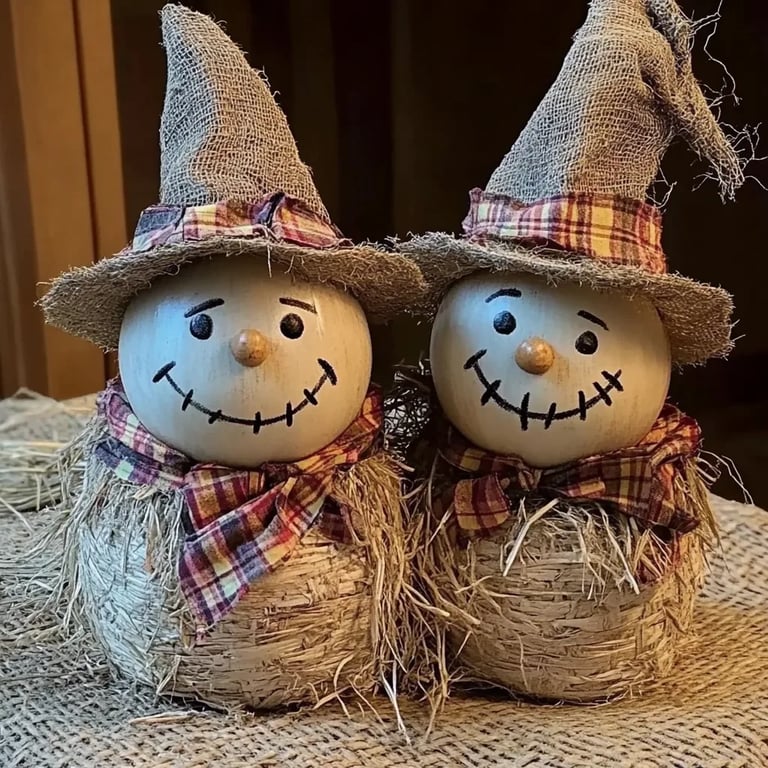
Step 2: Create the Scarecrow's Face
Take your black marker or paint and draw a face on the jar. If you're using paint, remember to let each layer dry before adding facial features. I often recommend drawing a simple smiley face with a stitched mouth and two buttons for eyes to keep it cute and charming.
*Tip:* Use a pencil to sketch out your design lightly before going over it with a more permanent medium. If you make a mistake, you can erase it more easily!
*What could go wrong:* If your paint runs or smudges, don’t panic! You can often touch it up later with more paint after it dries.
Step 3: Decorate with Fabric
Now, it's time to make your scarecrow a hat! Cut a piece of your fabric into a square that can serve as a floppy hat. You can layer multiple shapes (like triangles) for added dimension if you're feeling adventurous.
Wrap some twine around the base of the hat and secure it with a hot glue gun. Glue this hat on top of the jar’s lid.
*Alternative method:* Use a foam hat or felt to create a more structured look. These materials hold their shape beautifully!
Step 4: Add a Nose
Next, grab a piece of felt to cut out a triangle for the nose. Attach it to the center of the face just below the eyes using the hot glue.
*Personal anecdote:* I remember the first time I made one of these; I used a funky pattern for the nose and it turned out really quirky! It ended up being a favorite of mine.
Step 5: Bring in the Twine
Now, take your natural twine and wrap it around the jar’s neck to create a collar. This step not only adds charm but also gives it a rustic feel. Secure it with a knot and trim any excess string.
*Why this is important:* The twine enhances the farm-fresh look and separates the decorative elements from the main jar, creating visual interest.
Step 6: Final Touches
Complete your scarecrow jar by decorating the lid or adding a few artificial flowers or corn husks around the neck for added flair. You can glue these in place or tuck them underneath the twine. Don’t forget to fluff the flowers or husks to give a more natural, whimsical appearance.
*What to avoid:* Don’t overload your decor! Sometimes less is more, so choose a few key pieces that stand out rather than trying to cram in every embellishment you have.
Troubleshooting Tips
- If the eyes don’t stick: Ensure the surface is free of dust and oil, and apply enough glue for a good bond.
- If the fabric frays: You can either finish the edges with fabric glue or a lighter to seal the ends, preventing more fraying.
Creative Variations
Feel free to personalize your scarecrow jar by experimenting with styles! Instead of a traditional scarecrow, try creating a pumpkin jar, ghost jar, or even a magical witch jar. Use different color schemes or materials for upcoming holidays such as Christmas or Easter!
Conclusion
There you have it! Your very own DIY scarecrow jar that’s not just a decoration but a delightful piece of art that reflects your personality and creativity. I hope you enjoyed this process as much as I did crafting my own.
The feeling you get from creating something with your own hands is beyond rewarding. Plus, sharing these creations with friends or using them to brighten up your living space adds an extra layer of joy! I’d love to see your versions, so feel free to share your creations online and tag me!
Happy crafting, everyone!