How to Make DIY Bioplastic Suncatchers: A Complete Guide from an Experienced Crafter
Hello, fellow crafting enthusiasts! Today, I’m excited to share a project that beautifully combines sustainability with creativity—DIY bioplastic suncatchers. If you haven’t tried making suncatchers yet, you’re in for a treat! These charming decorations not only brighten your living space but also bring a sense of warmth and joy that only handcrafted items can offer.
What Are Bioplastic Suncatchers?
Bioplastic suncatchers are colorful, translucent decorations made from biodegradable materials. They catch the light and create stunning patterns as sunlight filters through them, making them perfect for hanging in windows, in gardens, or even as gifts. The rise of eco-friendly crafting projects has made bioplastic suncatchers increasingly popular, and for good reason! Not only are they eco-conscious, but they also provide a creative outlet for both adults and children. You can use these suncatchers to celebrate seasonal changes, add vibrancy to your home, or simply enjoy the crafting process.
Why Choose Bioplastic?
The growing concern over plastic pollution makes bioplastics an excellent choice for eco-conscious crafters like us. Unlike traditional plastics that persist in the environment for hundreds of years, bioplastics break down more easily, reducing our impact on the planet. Plus, making bioplastic suncatchers is a wonderful way to engage children in discussions about sustainability and the environment!
When To Use Your Suncatchers
You can hang your suncatchers in any window, but they really shine when placed in direct sunlight, casting colorful patterns on your walls and floors. They make fantastic gifts for birthdays, holidays, or simply as a way to share a bit of cheer with friends and family.
Now, let’s roll up our sleeves and get started on this fun and meaningful crafting adventure!
—
Materials Needed for DIY Bioplastic Suncatchers
- Bioplastic Ingredients:
- 1 cup water
- 1 cup corn syrup (which acts as a plasticizer)
- 1 cup cornstarch
- Food coloring (optional)
- Other Supplies:
- Mixing bowl
- Whisk
- Saucepan
- Silicone molds (or you can use baking sheets)
- Toothpicks or skewers (optional, for holes)
- Baking parchment or wax paper
Step-by-Step Tutorial
Step 1: Prepare Your Workspace
First things first—let's create a clean crafting area. Spread some newspaper or a drop cloth to catch any spills. I love to listen to some music or an audiobook while I craft; it makes the process even more enjoyable!
Step 2: Mix the Ingredients
In a mixing bowl, combine 1 cup of water, 1 cup of corn syrup, and 1 cup of cornstarch. Make sure the cornstarch is well mixed with the water and syrup to prevent lumps.
Tip: Why This Mix Is Important
The combination of water, corn syrup, and cornstarch is crucial for creating a pliable bioplastic. Corn syrup prevents the plastic from becoming too brittle, allowing it to be more flexible and durable.
Step 3: Cook the Mixture
Pour the mixture into a saucepan and heat it over medium heat, stirring continuously. You’ll notice the mixture thickening; this is completely normal! As it thickens, it will start to resemble a thick glue.
Common Pitfall: Lumps!
If you notice lumps forming, just keep stirring vigorously with your whisk. If it’s too thick to stir, you might need to add a splash more water to reach a smoother consistency.
Step 4: Add Color
Once your mixture is the right consistency, remove it from the heat. If you’re using food coloring, this is your moment to add a few drops to the mix. You can create vibrant, colorful suncatchers or go for pastel hues—whatever suits your fancy!
Step 5: Mold the Suncatchers
Now for the fun part! Carefully pour (or scoop) the mixture into silicone molds or onto baking sheets lined with parchment paper. The thickness can vary depending on your preference—thicker for sturdiness and thinner for a more delicate look. If you want a hole at the top of your suncatcher for hanging, now is the time to insert a toothpick or skewer.
Step 6: Let Them Dry
Place your molds in a cool, dry area and let them sit for 24 to 48 hours. The longer you let them dry, the sturdier they will become. If you’re in a rush, you can also speed up the drying process in a dehydrator at a low temperature.
Step 7: Remove and Hang
Once your suncatchers are fully dried, gently remove them from the molds. If they seem a bit sticky, don’t panic! Just dust them lightly with cornstarch to remove excess stickiness.
Creative Variations
Want to add an extra layer of creativity? Here are a few fun variations to personalize your suncatchers:
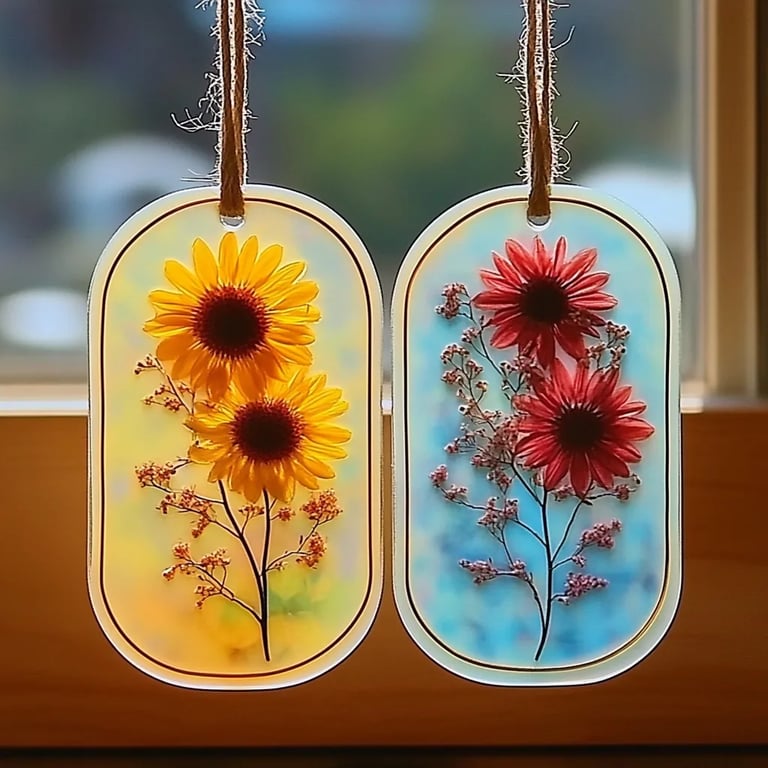
- Embedded Nature: Press small flowers or leaves into the mixture before it sets for a beautiful organic touch.
- Sparkle and Shine: Add biodegradable glitter for a magical, sparkling effect.
- Ombré Effects: Create an ombré look by mixing a few shades of food coloring together in separate bowls and layering them in your molds.
Safety Tips
When working with hot mixtures, make sure to use caution. I recommend wearing oven mitts when handling the saucepan and keeping young crafters at a safe distance during cooking.
Troubleshooting Common Issues
- Too Fragile: If your suncatchers are too brittle, consider adjusting your corn syrup-to-cornstarch ratio next time, using 1.5 cups of corn syrup to 1 cup of cornstarch.
- Sticky Textures: If you find your suncatchers too sticky post-drying, dust them with cornstarch to absorb excess moisture.
Final Thoughts & Encouragement
Creating DIY bioplastic suncatchers is not just a project—it’s an experience! You’ll likely experience a few challenges along the way, but that’s all part of the crafting journey. Embrace the unique qualities of your creation, and let it stand out as a testament to your creativity and sustainability efforts.
I encourage you to share your beautiful new suncatchers with friends and family or hang them proudly in your own home. With each glimmer of light reflecting off your handcrafted suncatchers, I hope you find a sense of joy and accomplishment.
Happy crafting! 🌞✨