#How to Make Cornstarch and Conditioner Moon Dough: A Crafter's Guide
As an experienced crafter, one of my absolute favorite projects is making moon dough. This unique sensory material, also known as cloud dough, combines the smoothness of cornstarch and the creaminess of conditioner to create a soft and moldable medium that toddlers, kids, and even adults adore. Not only is moon dough a fantastic tool for imaginative play, but it's also an incredible stress reliever for those of us who enjoy the touch and feel of crafting materials.
What is Moon Dough?
Moon dough is a delightful play material that feels wondrously fluffy and has a consistency akin to that of kinetic sand. It is moldable and can be shaped into various forms, making it ideal for creative playtime scenarios. What sets moon dough apart is its use of conditioner, which gives it a pleasant scent and a silky texture—perfect for endless hours of tactile exploration.
I love using moon dough in rainy day activities, educational playtime, or just as a fun stress-relief exercise for myself. The best part? It takes just a few minutes to make, and the ingredients are simple and budget-friendly!
Why Moon Dough is Popular
- Sensory Experience: The texture is smooth and satisfying, providing sensory stimulation that many children find soothing and enjoyable.
- Safe Ingredients: Both cornstarch and conditioner are safe to handle (though not for eating!), making it a worry-free crafting option for children.
- Easy to Customize: You can tailor it with colors and scents, creating a unique experience every time you make it.
Materials You Will Need
Here’s what you need to get started:
- 1 cup of cornstarch: This is the primary ingredient that gives moon dough its structure and consistency.
- 1/2 cup of conditioner: I recommend using a relatively inexpensive, hypoallergenic conditioner. The scent will carry through in the moon dough, so feel free to choose your favorite fragrance!
- Mixing Bowl: For combining the ingredients.
- Spoon or Spatula: For mixing.
- Food Coloring (Optional): If you want to add a pop of color to your dough, this is totally optional.
- Storage Container: To keep your moon dough fresh when you’re not playing with it.
Step-by-Step Tutorial to Make Moon Dough
1. Gather Your Ingredients
Start by gathering all of your materials in one place. This makes the process smoother and more enjoyable. I like to keep my workspace organized, as clutter can slow down my flow.
2. Measure the Ingredients
In your mixing bowl, measure 1 cup of cornstarch and pour it in. Cornstarch is the backbone of moon dough, giving it that desired soft texture. Be sure to level off the measuring cup to get an accurate amount.
3. Add the Conditioner
Next, measure out 1/2 cup of conditioner and add it to the cornstarch. Now’s the time to choose a conditioner that has a pleasant scent—my go-to is coconut or vanilla, as they evoke a warm, cozy feeling.
4. Mix the Ingredients
Using your spoon or spatula, start to mix the cornstarch and conditioner together. It might seem a little crumbly at first, and you may think, "Is this really going to work?" Don’t worry; that's perfectly normal!
5. Knead the Dough
Once the mixture is relatively combined, I like to dive in with my hands. This allows me to feel the texture and ensure a thorough mix. Start kneading it like you would bread dough. If it’s too crumbly, add a touch more conditioner (1 tablespoon at a time) until it reaches your desired consistency. If it feels too sticky, sprinkle in a little more cornstarch.
Pro Tip: Mix in food coloring at this stage! Wear gloves if you don’t want your hands to stain.
6. Store Your Moon Dough
Once mixed and kneaded well, your moon dough should feel soft and pliable. Store it in an airtight container or resealable bag to keep it fresh for months.
Tips and Troubleshooting
- Consistency Check: The perfect moon dough will feel soft, but not too sticky or crumbly. If it’s not quite right, adjust with more cornstarch or conditioner until you are satisfied.
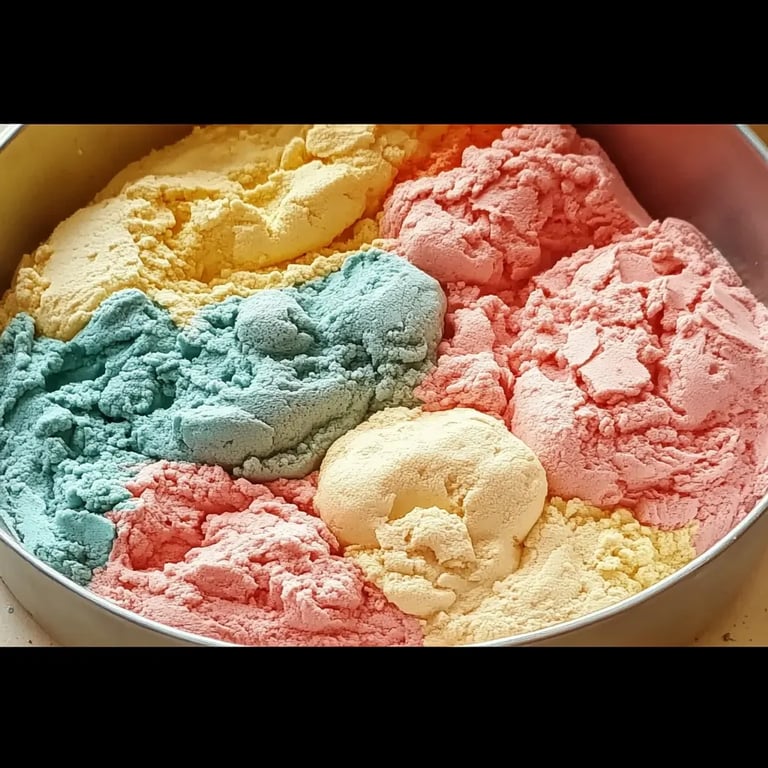
- Make It Colorful: You can split your batch and make multiple colors. Just knead in drops of food coloring until you reach your desired hue!
- Storage Note: If you notice it beginning to dry out, add a small amount of conditioner to restore moisture.
Creative Variations
Feel free to get creative! Here are some fun twists you can try:
- Scent Variations: Infuse your moon dough with a few drops of essential oils for a unique sensory experience.
- Add-ins: Mix in tiny beads or glitter for a little extra sparkle! (However, be cautious with younger kids, as these could be a choking hazard.)
- Themed Play: Create different colors and textures for seasonal themes—think green for Christmas and orange for Halloween!
Safety Tips
While cornstarch and conditioner are safe to use, always supervise young children during play. Encourage them not to taste the dough and remind them that it’s not food but a fun crafting material.
Final Thoughts
Making cornstarch and conditioner moon dough is not only a fun activity but also an opportunity for sensory exploration and imaginative play. Bringing together these simple ingredients can result in a beautifully textured product that provides hours of entertainment. The beauty of crafting lies in the flexibility and personalization it offers.
I hope this detailed guide inspires you to create your own moon dough at home! Don’t forget to share your creations or any variations you've tried—you may even spark some new ideas and inspire others in your crafting circle. Remember, the most important part of crafting is to have fun. Happy crafting!