How to Make Colorful Glow Candy Apples: A Step-by-Step Guide
Hello, fellow crafters! Today, I'm excited to share my passion for crafting one of the most deliciously vibrant treats you'll ever make: Colorful Glow Candy Apples. These eye-catching creations are not only a hit at Halloween parties, fairs, and movie nights, but they also serve as a delightful centerpiece or gift for any festive occasion. Imagine the joy on your loved ones' faces when they see these whimsical, glowing masterpieces!
In this article, I’ll walk you through every step of the crafting process, sharing insider tips, personal anecdotes, and safety advice. With a little patience and creativity, you'll be able to whip up these stunning candy apples in no time!
What Are Colorful Glow Candy Apples?
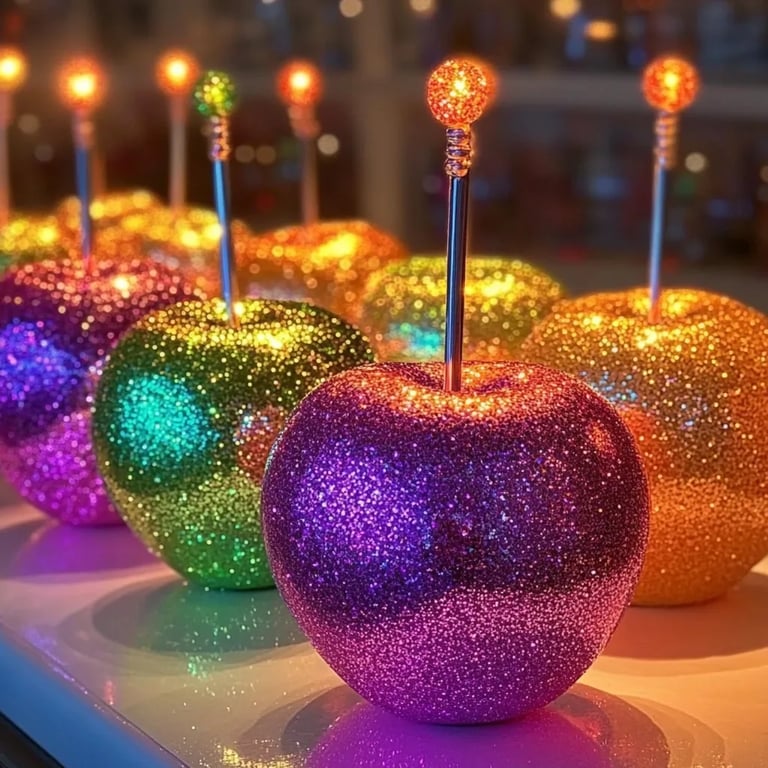
Colorful Glow Candy Apples are glossy, hard-coated apples that glisten with vibrant colors, enhanced by the addition of glow-in-the-dark elements. Traditionally, they’re made with caramel or candy coatings, but we’re going to take it up a notch by using edible glow powder and color dyes. Perfectly suited for Halloween, birthday parties, or any occasion that calls for a touch of whimsy, they’re as fun to make as they are to eat!
Ingredients and Materials You’ll Need
Before diving into the process, let’s gather everything we need. Here’s a list of ingredients and materials that will help us create these beauties:
Ingredients
- Apples (6 medium-sized): I recommend using firm apples like Granny Smith or Fuji for their crispness and ability to hold the coating.
- Granulated Sugar (2 cups): This will create the sweet candy coating.
- Light Corn Syrup (1 cup): It helps to prevent crystallization in the sugar, ensuring a smooth finish.
- Water (1 cup): This is what integrates your sugar and corn syrup.
- Food Coloring: Choose vibrant colors like red, blue, and green. You’ll need at least 3 different shades.
- Edible Glow Powder: Look for food-safe glow powder (usually phosphorescent). Make sure to check that it’s specifically labeled as edible!
Tools
- Candy Thermometer: This is essential for ensuring that your sugar mixture reaches the correct temperature for hardening.
- Skewers or Lollipop Sticks: These will act as the sturdy bases for your apples.
- Baking Sheet: Line it with parchment paper to prevent the apples from sticking.
- Saucepan: For cooking the sugar mixture.
- Heatproof Gloves: Just a safety precaution; melted sugar can stick and cause burns.
The Step-By-Step Process
Step 1: Preparing the Apples
Before we get our hands sticky, we need to prep our apples.
- Wash and Dry: Thoroughly wash the apples to remove any waxy coating and then dry them completely. Moisture can interfere with the candy coating's adhesion, so this step is crucial.
- Insert Skewers: Push a skewer into the top of each apple, making sure it's securely in place. This will be your handle for dipping.
- Optional: For a fun twist, you can dip your apples in caramel before coating them in the candy mixture. However, this step requires additional cooling time!
Step 2: Making the Candy Coating
Now, let’s get to the sweet treat part!
- Mix Ingredients: In a medium saucepan, combine the granulated sugar, corn syrup, and water. Stir just enough to mix the ingredients; avoid excessive stirring once the heat is on, as this can cause crystallization.
- Heat the Mixture: Place the saucepan over medium heat and attach your candy thermometer. Allow the mixture to boil without stirring until it reaches the hard crack stage (300°F or 150°C). This is where a lot can go wrong! Sugar can quickly go from perfect to burned, so keep a close eye and be patient.
- Add Color and Glow: Once you reach the desired temperature, remove the saucepan from the heat. Carefully stir in your food coloring, one drop at a time, until you achieve the desired vibrancy. Next, sprinkle in the edible glow powder, mixing it well so it’s evenly distributed.
Tip: If the mixture starts to harden before you can dip your apples, return it to low heat until it softens again.
Step 3: Dipping the Apples
It’s time to bring your apples to life!
- Dip Apples: Holding the skewer, dip an apple into the candy mixture, swirling it around to coat completely. Lift and allow the excess mixture to drip back into the saucepan.
- Positioning: Place the dipped apple upright on the lined baking sheet. If you’re feeling extra fancy, you can rotate the apple gently before placing it down for a more uniform coating.
- Repeat: Repeat the dipping process for each apple. If you want multiple colors per apple, dip a second time after the first layer hardens.
Step 4: Cooling and Setting
After you’ve coated your apples, it’s important to let them cool properly.
- Cool Completely: Allow the apples to sit at room temperature until the candy coating is completely hardened. This allows its glow properties to activate as well!
- Store Carefully: If you’re not eating them right away, store the apples in a cool, dry place, avoiding refrigeration as moisture can ruin the candy coating.
Variations of Colorful Glow Candy Apples
Now that you've mastered the basic Colorful Glow Candy Apples, here are some creative variations:
- Glitter Toppings: After dipping, sprinkle edible glitter on the apples to give your treats an extra sparkle.
- Chocolate Drizzle: Once the candy coating has cooled, drizzle melted chocolate over the apples before adding glow powder for a more decadent treat.
- Flavored Coating: Switch things up by adding extracts (like vanilla or cinnamon) to your sugar mixture for a flavored candy apple experience.
Common Mistakes and Troubleshooting
- Sugar Crystallization: If you see crystals forming in your candy mixture, you can try adding a bit more corn syrup or lemon juice. Always remember to avoid stirring the mixture once it starts boiling.
- Sticky Coating: If your apples are sticky after cooling, it could be due to humidity. Make sure to store your apples in a dry place.
Safety Tips
- Candy Hot: Remember that the sugar syrup gets extremely hot (up to 300°F), so handle it with care and always work in a space where you can prepare without distractions.
- kiddos: Keep young children out of the kitchen during the candy-making process, especially when working with hot sugar.
Final Thoughts
Making Colorful Glow Candy Apples is both an art and a science. With practice, you’ll be able to whip up these vibrant delights, impress your friends and family, and perhaps even start your own candy apple tradition. I hope this guide has inspired you to grab your apron and take on this fun project. Remember, crafting is all about experimenting, so don’t be afraid to put your spin on things! Happy crafting!