How to Make Bubble Painting: A Step-by-Step Guide for Creative Fun!
Welcome to the wonderful world of bubble painting! As someone who has spent countless hours crafting and exploring creative avenues, let me tell you this: bubble painting is not just an art activity; it’s an experience that fosters creativity and brings joy to people of all ages. Whether you’re a parent looking for a fun weekend project with your kids, a teacher hoping to engage your students in a unique art lesson, or simply someone seeking a relaxing artistic outlet, bubble painting is a fantastic choice.
What is Bubble Painting?
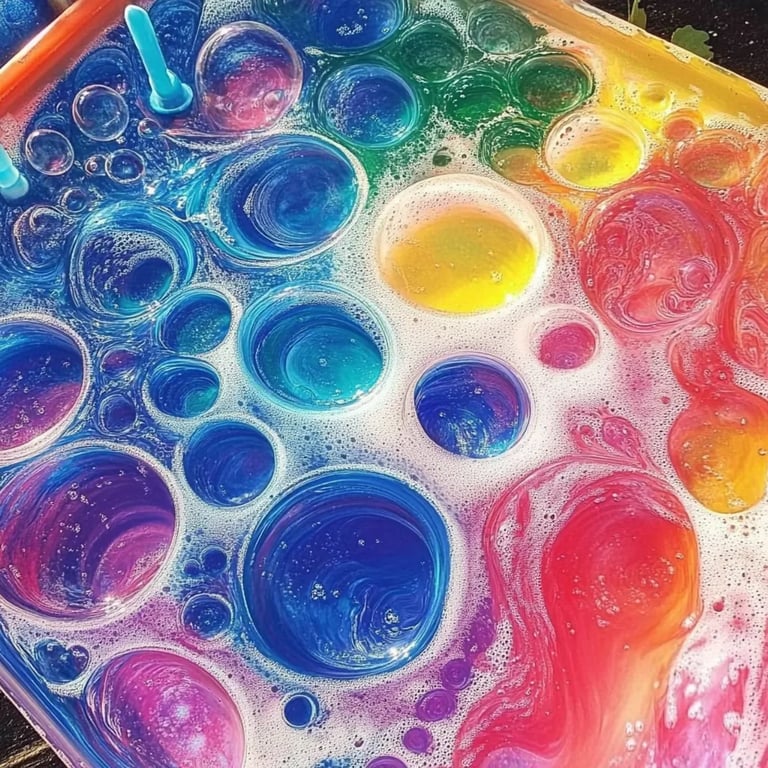
Bubble painting is an exciting art activity that combines the whimsy of bubbles with vibrant colors, allowing you to create stunning, textured masterpieces. This playful technique involves blowing colored bubbles onto paper, creating eye-catching patterns that look like anything from abstract art to fantastical landscapes. It’s popular because it caters to the inner child in all of us, and it’s incredibly easy to set up. Plus, it’s a great way to reuse materials you may have lying around the house!
When and How to Use Bubble Painting:
- Arts and Crafts for Kids: Perfect for birthday parties, summer camps, or family fun nights.
- Educational Settings: Great for teaching concepts like color mixing, air pressure, and even science with the bubbles themselves.
- Mindfulness and Relaxation: An excellent way to unwind and let your creativity flow.
Now, let’s dive into this delightful activity with an easy-to-follow guide. I’ll take you through each step, share tips, and provide solutions for potential pitfalls. Let’s create something beautiful together!
Materials Needed
Before starting, gather the following materials:
- Bubble Solution: You can buy this pre-made or make your own with dish soap and water.
- Food Coloring or Liquid Watercolors: These will give your bubbles vibrant colors. I recommend food coloring for its bright hues and easy availability.
- Large Shallow Dish: Think of something like a baking pan where the bubbles can overflow without making too much of a mess.
- Paper: Thick watercolor paper or cardstock works best since they won’t warp easily.
- Straws: (Optional) For blowing bubbles, though there are other methods.
- Spoon or Whisk: For mixing your bubble solution and color.
- Protective Gear: Aprons or old clothes for everyone involved.
- Newspapers or Plastic Table Covering: To protect your work surface.
Step-by-Step Tutorial
Step 1: Prepare the Bubble Solution
First, let’s make the bubble solution if you’re opting for homemade. In a large bowl, mix together:
- 1 cup of dish soap
- 2 cups of water
- 1 tablespoon of sugar (optional, for stronger bubbles)
Gently stir to combine, being careful not to create too many bubbles. The sugar helps to stabilize the bubbles and creates a more robust solution, so I always include it.
Step 2: Add Color
Once you have your bubble solution ready, it’s time to add color. Pour a small amount of food coloring (about 5-10 drops) into the mixture. You can do this in separate containers if you want a variety of colors.
Pro Tip: Experiment with mixing colors! Try adding blue and yellow to make green or red and blue for purple.
Step 3: Set Up Your Work Environment
Cover your workspace with newspapers or a plastic tablecloth to catch any drips. Set your shallow dish in the middle of your setup. This ensures that you can contain the bubbles effectively without worrying about cleanup.
Step 4: Create Bubbles
This is the real fun part! If you’re using a straw, dip it into the bubble solution. Make sure to not suck in the solution, as it can be quite unpleasant! Instead, blow gently into the straw to create bubbles.
Alternatively, you can use a spoon or whisk to dip into the solution and then blow through it to create a frothy bubble mixture.
What Could Go Wrong? If your first attempt doesn’t yield many bubbles, check the solution. It might need more soap or water to balance the textures.
Step 5: Bubble Painting Time!
Once you have plenty of bubbles, here comes the exciting part. Carefully place your paper over the dish to let the bubbles land on it. Once lifted, you will see beautifully splattered patterns that emerge!
You can also blow bubbles directly onto the paper if you prefer quick, direct application.
Step 6: Let It Dry
Once satisfied with your masterpiece, let the paint dry for a while before removing it. Depending on your environment, this could take anywhere from 15 minutes to a couple of hours.
Personal Anecdote: The first time I did bubble painting, my daughter and I were amazed at how unique each piece turned out. Every time we tried a different color combination, the results were always surprising!
Tips and Variations
- Stamps and Silhouettes: Use cut-out shapes to create silhouettes. Dip the shapes in a contrasting bubble solution and stamp them on your paper.
- Layering: Once your first layer is dry, you can add more bubbles in different colors to create depth.
- Outdoor Fun: Take this activity outside! Just remember that wind can be an enemy to bubbles, so try to find a sheltered spot.
Safety Warnings
- Supervision for Kids: Always supervise children, especially when using straws, to prevent accidental ingestion of the solution.
- Cleanup: Bubble solutions may create slippery surfaces, so ensure that all spills are cleaned up promptly to avoid slips.
Alternative Methods
If you’re looking for alternatives to traditional bubble painting, consider:
- Bubble Wrap Printing: Instead of using paper, paint on bubble wrap for a stamp that can provide even more textured effects.
- DIY Bubbles with Glycerin: If you're up for a little experimentation, adding glycerin to your bubble solution can create stronger bubbles.
Final Thoughts
So there you have it! A comprehensive guide to creating bubble paintings. I encourage you to dive into this project with an open heart and let your creativity flow like those vibrant bubbles. This activity not only allows for artistic expression but also creates lasting memories with family and friends. Don’t forget to share your bubble paintings with others—they might inspire someone else to join in on the fun!
Now grab your materials, and let’s get bubbly! Happy crafting!