How to Make Bloody Pumpkin with Candy Fingers: A Spooktacular DIY Guide
As Halloween approaches each year, I can’t help but get excited about all the creative opportunities for spooky decorations. One of my favorite projects is making a “Bloody Pumpkin with Candy Fingers.” This project not only showcases your crafting skills but also brings a delightful (and slightly gruesome) touch to your Halloween festivities. Whether you’re hosting a haunted gathering or simply want to adorn your home with some fang-tastic decor, this creation is sure to impress.
Why the Bloody Pumpkin with Candy Fingers?
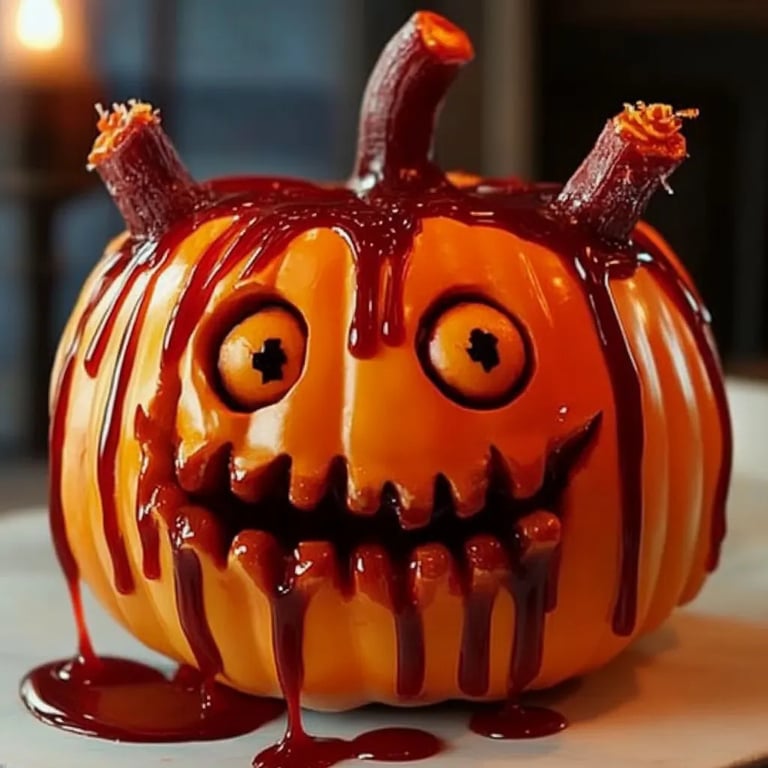
The Bloody Pumpkin isn’t just your average jack-o'-lantern; it’s a playful twist that merges classic autumn imagery with edgy, horror-inspired elements. It consists of a painted pumpkin, dripped with faux blood, and topped with gummy candy fingers protruding from the top, making it the perfect conversation starter at any Halloween party. Its popularity surges around October, as everyone is on the hunt for unique ways to celebrate the spooky season. Plus, it can serve a dual purpose: decoration and a fun treat for your guests!
Today, I will walk you through the entire process of creating your very own Bloody Pumpkin with Candy Fingers. I promise this tutorial is easy to follow, and I’ll share personal insights as well as tips to troubleshoot common issues. So, grab your crafting tools, and let’s get started!
Materials Needed
Here’s everything you’ll need to create your Bloody Pumpkin masterpiece:
- Pumpkin: Choose a medium to large pumpkin for best results.
- White Acrylic Paint: For the base coat to help showcase the "blood" later.
- Red Acrylic Paint: To create the faux blood effect.
- Corn Syrup: For mixing with red paint to achieve a glossy, dripping effect.
- Gummy Candy Fingers or Licorice Fingers: These will be your “creepy appendages.”
- Paintbrushes: A wide one for base coating and a smaller detail brush for the blood drips.
- Plastic Gloves: To keep your hands clean during the crafting process.
- Plastic Sheet or Old Newspaper: For protecting your work surface.
- Optional: Fake Blood: For additional effect if desired.
- A Craft Knife: For cutting the pumpkin if you decide to hollow it out (Optional).
Now that we have everything, let’s jump into the step-by-step process!
Step-by-Step Tutorial
Step 1: Prepare Your Workspace
Before I begin, I always make sure my workspace is organized. Lay down your plastic sheet or old newspaper to catch any spills or drips. This will save you time on cleanup later and keep the mess contained.
Step 2: Base Coat Your Pumpkin
- Paint with White Acrylic: Using your wide paintbrush, apply a generous layer of white acrylic paint over your pumpkin. Work your way from the top to the bottom, covering all sides. This white base helps the red blood stand out more vividly.
- Why It Matters: The contrasting colors will make your Halloween pumpkin more eye-catching.
- Tip: If your pumpkin has any blemishes, applying a base coat helps to smooth out the appearance.
- Dry the Pumpkin: Allow the white paint to dry completely. This usually takes about an hour, but I recommend letting it dry overnight if time permits.
Step 3: Create the Faux Blood
- Mix the Red Paint: In a small bowl, combine the red acrylic paint with a few tablespoons of corn syrup. The corn syrup will give it a shiny, gooey effect, mimicking real blood.
- What Could Go Wrong?: If your blood mixture is too thin, the drips won’t hold their shape. If it's too thick, it won't flow properly. Adjust the corn syrup and paint ratio until you achieve a honey-like consistency.
- Test the Mixture: Before applying it to your pumpkin, I like to test the mixture on a small piece of paper or a spare pumpkin if I have one on hand. This ensures the color and texture are what I want.
Step 4: Apply the Bloody Drips
- Drip the Blood: With your small paintbrush, start at the top of the pumpkin and let the faux blood drip down. The trick here is to be random and have fun with it!
- Creative Tip: For a more realistic appearance, let the blood drip unevenly in spots. You can even use your brush to flick some of the blood down for splatters!
- Let It Dry: Allow the blood concoction to dry fully. This should take about an hour for best results.
Step 5: Add the Candy Fingers
- Prepare the Candy: While the blood is drying, prepare your gummy fingers. If they are too soft, place them in the fridge for about 10-15 minutes to firm up.
- Insert the Fingers: Once the blood is dry, poke a few holes at the top and gently insert the candy fingers. They should stand up and look like they are protruding from the pumpkin.
- Personal Anecdote: The first time I did this, I made the mistake of placing them too near the edge, which made them fall over. Trust me; making sure they are well-placed and secure helps maintain your pumpkin's overall look!
Step 6: The Finishing Touches
- Add More Drips (Optional): For added depth and interest, you can drizzle more red paint around the candy fingers to give the appearance that they are “bleeding.”
- Display: I always place my Bloody Pumpkin in a well-lit area where it can be easily seen by guests. The flickering light of candles or fairy lights behind it can make it particularly haunting.
Safety Tips
While crafting is usually safe, here are a few things I always keep in mind:
- Use a Soft Craft Knife: If you’re cutting into the pumpkin, always cut away from yourself and use a soft knife for better precision and control.
- Child Supervision: If kids are involved in the crafting process, ensure they are supervised when handling paints and tools.
- Clean Up: As with any crafting project, clean up spills promptly. Acrylic paint can stain surfaces and clothing!
Creative Variations
- Pumpkin Faces: Carve spooky faces into your pumpkin before painting. The extra dimension will lend itself to an even eerier effect!
- Texture: Add sand or modeling paste to your acrylic blood to create a more viscous texture.
- Lighting Effects: Place battery-operated lights inside the pumpkin to glow from within, enhancing its haunting presence.
Conclusion
And there you have it! Your very own Bloody Pumpkin with Candy Fingers is complete. This crafting project not only looks fabulous but is also a great opportunity to express creativity and invite guests into the spirit of Halloween. Remember, the most important part of crafting is to have fun and enjoy the process.
If you run into challenges or have questions, don't hesitate to reach out or comment below! I’d love to hear your creative variations and any tips you might want to share. Happy crafting, and have a spooky Halloween!