How to Make a Stunning Neon Oil & Water Explosion: A Complete Guide
Hello, fellow crafters! Today, I'm excited to share with you one of my favorite projects—creating a Neon Oil & Water Explosion! If you're looking for a fantastic DIY experiment that combines art with a little bit of science, you've come to the right place. This project is visually stunning, easy to set up, and provides an excellent opportunity for both adults and kids to explore creativity. Whether you're planning a birthday party, a family gathering, or simply want to unleash your artistic flair, this mesmerizing display of swirling colors will surely impress everyone.
Why the Neon Oil & Water Explosion is So Popular
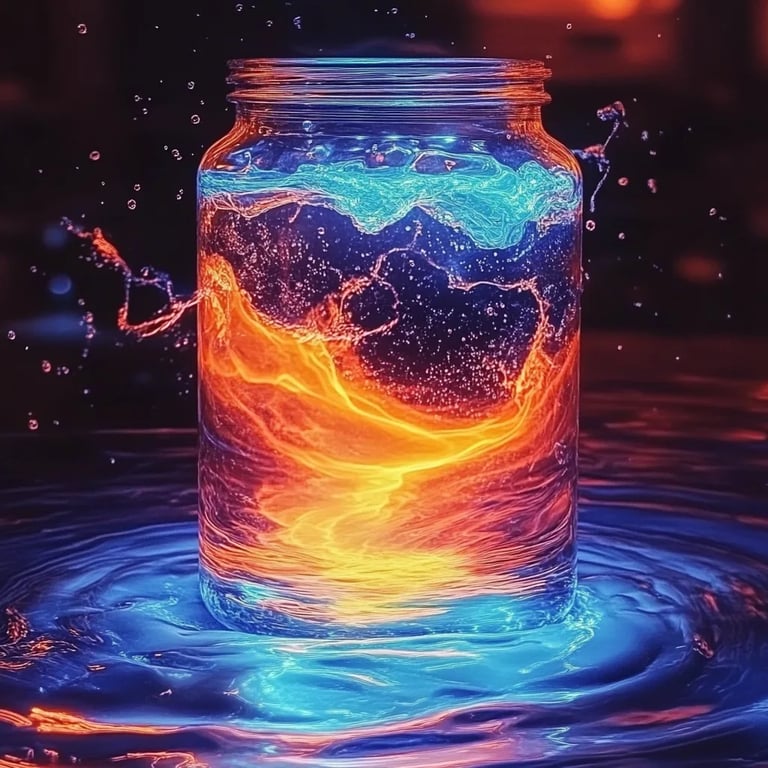
The Neon Oil & Water Explosion is a visually dramatic experiment that highlights the interaction between oil and water, two substances that don't mix well together. The neon colors add a fantastic pop, drawing viewers' attention, making it perfect for parties, classroom demonstrations, or just a fun afternoon activity. Not only is it beautiful to behold, but it also serves as an excellent introduction to basic chemical reactions and concepts like density and immiscibility.
One of the best parts? It requires simple materials that you may already have at home, or that can be easily sourced from your local store.
What You’ll Need
Here's a comprehensive list of materials you'll need for this project:
- Clear Glass or Plastic Container: A jar, bowl, or any clear vessel will do. The larger the container, the more dramatic the effect.
- Water: Enough to fill about halfway up the container.
- Vegetable Oil: You'll need a good amount of this; any cooking oil will work.
- Neon Food Coloring: These come in vibrant colors and are essential for the “explosion” effect. (You can also use liquid watercolors if you have them.)
- Baking Soda or Epsom salt (optional): This can alter the density and create more dynamic movements.
- Stirring Stick or Straw: For mixing, as well as creating the initial drops.
- Camera (optional): Trust me, you'll want to capture the results!
Step-by-Step Tutorial
Step 1: Prepare Your Base
The first step is preparing your container. Fill it halfway with water, ensuring there's enough space for the oil afterward without overflowing. This balance is crucial for a good effect.
Common Pitfall: Too little water can lead to the mixture being overly crowded, making it difficult for the colors to spread. On the flip side, too much water might dilute the colors. Aim for a balanced half-water and half-oil ratio in your final project.
Step 2: Color Your Water
Add several drops of your chosen neon food coloring to the water. For a more striking effect, mix multiple colors. Use a stirring stick or straw to gently swirl the colors together, but don't overmix; you want distinct blobs of color to create the explosion effect.
Tip: Choose contrasting colors for a more dynamic outcome. For example, mixing blue and yellow will create green, adding another vibrant layer to your display.
Step 3: Add the Oil
Slowly and carefully pour vegetable oil into the water-colored mix. You’ll notice the oil staying on top of the water because of its lower density. This separation is crucial for the explosion effect. As you pour, try to keep the stream thin and steady.
What Could Go Wrong: If the oil mixes with the water, it means you're pouring too quickly. In that case, don’t worry—just let the mixture sit for a few moments. The oil will eventually float to the top.
Step 4: Create the Explosion
Using your stirring stick, drop some of the neon food coloring directly onto the surface of the oil. Watch as the color sinks and disperses through the water, creating the explosion effect. For an even more dynamic display, you can also sprinkle a bit of baking soda or Epsom salt into the mix to enhance movement.
Safety Warning: Keep everything inside a stable area where spills won’t cause any damage. As fun as this project is, we want to avoid any accidents!
Step 5: Display and Enjoy
Once you've created your explosion, set it in a well-lit area to enjoy the vivid colors! The more light, the better the colors will pop. Feel free to take photos, share your creation, and even experiment with different ratios or colors in future projects.
Creative Variations
Now that you know the basic method, let’s talk about potential variations!
- Layering: After creating your initial explosion, consider layering other colors to see how they interact with the existing colors.
- Glow-in-the-Dark: Look for glow-in-the-dark paint instead of neon food coloring but note that it may not produce the same dramatic effect.
- Add Glitter: For added sparkle, sprinkle in some biodegradable glitter. This adds whimsy and catches the light beautifully!
Troubleshooting
* Colors are too muted: Ensure your food coloring is sufficient—more drops may be necessary.
* Mixture is too crowded: If you've added too much oil, it might need a larger container to help spread out the mixture.
* Colors are mixing too much: Remember to add color gently and in small amounts.
Closing Thoughts
Creating a Neon Oil & Water Explosion is not just a crafts project; it’s an experience filled with joy, creativity, and wonder. I hope you'll try this at home, whether for a classroom project, a fun evening with family, or personal artistic exploration. Remember, crafting is about enjoying the process—don't be afraid to experiment and make it your own. Happy crafting!