How to Make a Salt Volcano: A Fun and Creative DIY Craft for All Ages
Welcome, fellow crafters! Today, I am excited to share my experience with a delightful and easy project—the Salt Volcano. Not only is this craft a fantastic way to blend science and art, but it can also serve as an engaging centerpiece for parties, playdates, or even educational demonstrations at home or school. As someone who loves creating, I can assure you that making a Salt Volcano is as fun as it is rewarding!
What is a Salt Volcano?
A Salt Volcano is an eye-catching craft that mimics a volcanic eruption using ingredients you probably already have in your kitchen! The process involves creating a visually stunning explosion of colors that burst from a mound of salt, reminiscent of an actual volcano in action. The Salt Volcano is popular because it's an interactive project that can ignite curiosity in science and encourage children to learn through play. It’s perfect for a variety of occasions—science fairs, birthday parties, or simply a creative afternoon at home.
Why Make a Salt Volcano?
Creating a Salt Volcano is more than just a fun craft; it's a hands-on way to explore concepts like chemical reactions, the behavior of materials, and even artistic expression. The vibrant colors and mesmerizing eruption will captivate both children and adults alike. Plus, it’s an excellent opportunity to get creative and experiment with different colors and designs!
Let’s get started on making this enchanting project. Don’t worry; I’ll walk you through each step with tips, potential pitfalls, and creative variations along the way.
Materials You'll Need
Before diving into the crafting process, let’s gather our materials. Thankfully, these are accessible and inexpensive. Here’s what you’ll need:
- Table salt: This is the main ingredient for creating the volcano structure.
- Baking soda: This is essential for the eruption reaction.
- Vinegar: The catalyst for the bubbling eruption!
- Food coloring: Choose your favorite colors to make the eruption vivid.
- Small container: A cup, jar, or a bottle to hold the eruption. An old plastic cup works just fine!
- Tray or large dish: To catch any overflow and prevent a messy workspace.
- Water: To help shape the volcano.
- Optional: Small dinosaurs or toy figures can add a fun touch to the volcano scene.
Step-by-Step Process to Create Your Salt Volcano
Step 1: Create the Volcano Structure
Why it Matters: The salt mound forms the base of your volcano and dictates how dramatic your eruption will be.
- Start with a base. On your tray, pour a generous amount of table salt in the center. Aim for a mound about 6 inches tall and create a hollow space at the top for your container. The mound should resemble a volcano, wide at the bottom and narrowing at the top.
- Shape it. To create a more convincing volcano apex, shape the salt with your hands into a peak that slopes downward. Use a mixture of water and salt to solidify your structure. It will hold better and prevent your creation from crumbling.
What Could Go Wrong: If your volcano is too flat, the eruption might lack dramatics. To remedy this, just take some salt from the tray and build it higher.
Step 2: Prepare Your Eruption Chamber
Why it Matters: This is where the explosive magic happens!
- Insert your container (like a cup) at the top of the salt mound. It should fit securely and snugly without toppling over. The container holds the reaction mixture of vinegar and baking soda.
- Add baking soda. Pour about 2 tablespoons of baking soda into the container. This reaction will create the fizzing effect later!
Step 3: Add Color and Eruption Ingredients
Why it Matters: The visual impact of your eruption depends on the careful layering of colors.
- Mix in food coloring. Now, get creative! You can choose to pour a few drops of food coloring directly in with the baking soda, or for a neater effect, drizzle it around the sides of the container, which can create a colorful ‘lava’ flow.
- Prepare the vinegar. Fill a small cup with about 1/2 cup of vinegar. You can add more food coloring to this mix for extra visual interest.
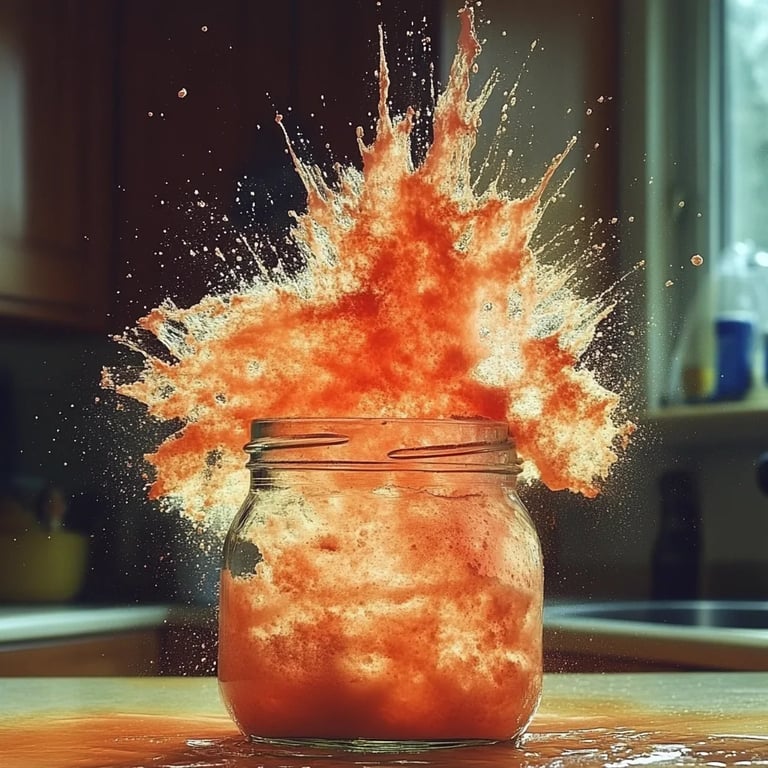
Step 4: Erupt the Volcano!
Why it Matters: This is the moment we’ve all been waiting for!
- Pour the vinegar into your container slowly. As the vinegar meets the baking soda, it creates a fizzing reaction that results in an eruption of bubbly, colorful ‘lava’ flowing down the sides of your salt volcano.
- Watch in awe! Enjoy the bubbling, fizzing, colorful eruption. This part never fails to bring joy and excitement!
What Could Go Wrong: If your volcano is not erupting, you may not have added enough vinegar or the baking soda may be clumped together. If it doesn’t work, add more vinegar gradually until you see an eruption.
Tips for Success
- Safe Exploration: While this project is relatively safe, I recommend wearing gloves and possibly safety goggles, especially if kids are involved. Vinegar can irritate skin and eyes in high amounts.
- Experiment With Ingredients: You can substitute vinegar with lemon juice for a similar effect or add dish soap to the vinegar for even more fizz!
- Color Combinations: Don’t hesitate to experiment with different combinations of food coloring. Creating a rainbow eruption can be extra delightful.
Personal Anecdotes
I remember the first time I made a Salt Volcano with my niece. I was unsure about how messy it might get, but we embraced the chaos! The laughter and joy we shared during that eruption brought us closer together, and my niece was so eager to explain the science behind the fizzing reaction. When her friends joined in later, it turned into a mini science lesson that was both fun and educational!
Creative Variations
- Dinosaur scene: Add little dinosaur figures around your volcano to create a Jurassic eruption scene!
- Themed colors: For a holiday-themed eruption, such as red and green for Christmas or oranges and browns for Halloween, customize your food coloring to suit your occasion.
- Edible version: Consider using edible glitter for a magical touch or edible food colors for a festive dessert volcano!
Conclusion
Creating a Salt Volcano is not just a craft; it’s an experience that merges creativity with education. Watching the vibrant colors bubble and flow can spark a passion for science and art, making it perfect for children and the young-at-heart alike. The skills you develop in crafting this volcano could lead to countless hours of experimenting and joyful messes.
So, gather your materials, unleash your creativity, and let the eruptions begin! I hope you enjoy making your Salt Volcano as much as I have, and I can't wait to hear about your colorful adventures. Happy crafting!