How to Make a Pony Bead Axolotl: Your Ultimate Guide to Crafting This Adorable Creation
Hello, fellow crafters! Today, I’m thrilled to share my passion for crafting by guiding you in making a vibrant and adorable Pony Bead Axolotl. If you haven’t come across these charming little creatures yet, axolotls are unique amphibians often referred to as "Mexican walking fish," though they are not fish at all! Their quirky appearance, with frilly gills and perpetual smiles, has made them a popular symbol in various crafts, including the adorable pony bead creations I’ll walk you through in this tutorial.
Whether you’re an experienced crafter or a complete novice, this project is perfect for all skill levels and can be used as a keychain charm, a decorative piece for your room, or a fabulous addition to a gift basket. I promise, by the end of this craft, you'll have a delightful axolotl that you can proudly show off or share with friends!
Why Pony Beads?
Pony beads are incredibly popular in the crafting community, mainly because they are colorful, versatile, and affordable. These beads come in a range of colors and sizes, allowing for endless creative possibilities. Plus, working with them is super easy, making it a suitable project for all ages. Let’s dive into the crafting process!
Materials You'll Need
Before we get our hands busy, make sure you have the following materials on hand:
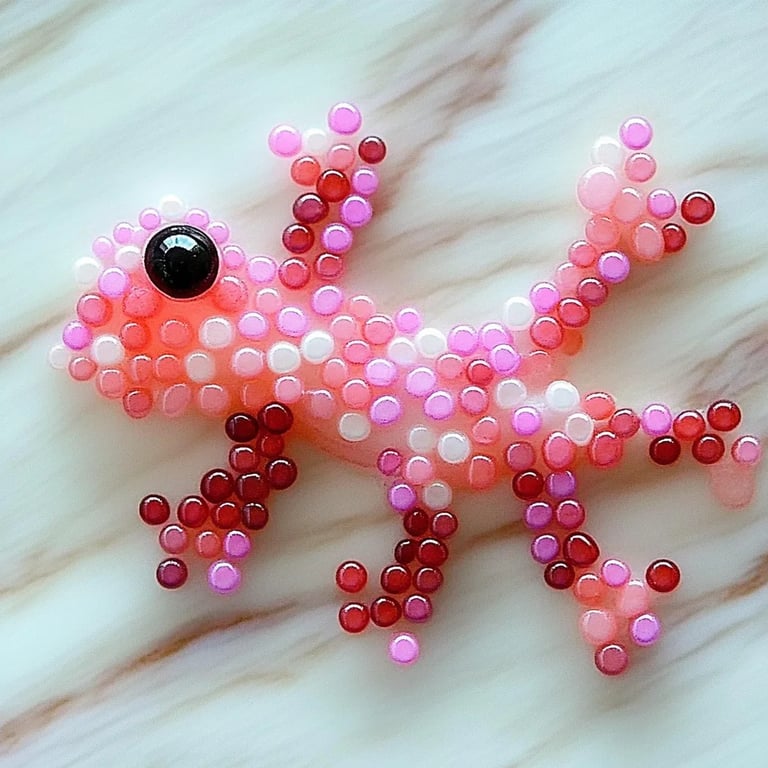
- Pony beads in various colors (mostly pink, white, and black)
- A sturdy needle (like a plastic craft needle)
- Nylon thread or fishing line (clear or colorful)
- Scissors
- A bead mat (optional, but helpful for managing those pesky little beads)
- Optional: small keychain ring, if you want to turn your axolotl into a keychain!
Step 1: Gather Your Beads
I find it easiest to start by organizing my beads. For a standard axolotl design, you will need:
- 30 pink beads (for the body)
- 6 white beads (for the eyes)
- 2 black beads (for the pupils)
- 2 pink or green beads (for the gills or fins, optional)
___Tip:___ Keep your beads in small containers or on a bead mat to make it easier to grab as we go along.
Step 2: Cut Your Thread
Next, I recommend cutting a length of nylon thread measuring about 25-30 inches. This gives you enough slack to work with without running out. Using fishing line can add extra durability to your creation, especially if you plan to use it as a keychain or a toy.
___Safety Warning:___ Be cautious with scissors or needles; ensure that children are supervised during this part of the crafting process.
Step 3: Create the Body
Now, let’s start stringing those beads!
- First Row: Start by threading on 6 pink beads. These will form the core of your axolotl’s body.
- Next Steps:
- String on 1 pink bead for the top of the head.
- Thread 2 pink beads for each side to form the body’s sides (for a total of 4).
- Finally, loop back to create the round shape by threading through the first bead you strung.
This basic construction forms the essential body shape. Adjust as needed by adding or removing beads to fit your design perfection.
Step 4: Add the Gills and Fins
Now it’s time to give our axolotl some flair!
- For the gills, thread on 2 pink beads and pinch them toward the side to give them some 3D effect. You can attach them by branching off from the main body (just a couple of beads away) and securing by threading back into a nearby bead.
- Consider using beads of different colors (like green) to add an even more fantastical design!
___Common Mistake:___ When pinching the gills, some might slide off. To fix this, ensure that you are tight on the thread, but not overly so as to warp your design.
Step 5: Add the Eyes
The eyes can really bring your axolotl to life!
- First Eye: Thread 1 white bead followed by 1 black bead (for the pupil), then secure by threading back through the white bead.
- Repeat for the second eye, placing it evenly on the other side of the head.
This is often where these cute little guys really shine! Allow your personality to show through in how you create your eyes. Some prefer big, cartoony eyes, while others opt for petite and cute!
Step 6: Finishing Touches
- Final Details: Check that all your beads are secure. Tug gently on each section and adjust as necessary.
- Knotting: Bring the ends of your thread together and tie a double knot tightly before trimming excess thread. A dab of clear nail polish on the knot can help secure it further (optional).
Step 7: Add the Keychain Ring (Optional)
If you want to turn your axolotl into a keychain charm, simply loop the final thread through a keychain ring before tying a knot. I find it adds an extra touch of charm to any backpack or set of keys!
___Creative Variation:___ Feel free to experiment with colors! Using glow-in-the-dark beads or metallic shades can create a stunning effect that catches light in the room.
Conclusion
Congratulations! You’ve crafted a delightful Pony Bead Axolotl. I hope this guide has provided you with both step-by-step instructions and a little sprinkle of crafting encouragement. As with any craft, practice makes perfect, and I encourage you to explore variations, whether it's tweaking colors or adding personal touches.
Remember, crafting is about the joy of creation and self-expression, so let your imagination run wild! I'm excited to hear how your axolotl turns out. Share your creations with fellow crafters online, and don’t forget to revel in the joy of every little bead. Happy crafting!