How to Make a Mini Edible Ocean World in a Cup: A Step-by-Step Guide
Hello there, fellow craft enthusiasts! I’m thrilled to share with you a whimsical project that blends creativity with a dash of culinary magic. Today, we’re diving into the enchanting world of a Mini Edible Ocean World in a Cup—a delightful, thematic dessert that’s perfect for parties, gatherings, or just a fun afternoon activity with the kids. This project has gained popularity for its visual appeal and interactive experience, allowing everyone to enjoy a sweet treat while exploring their creativity. So grab your aprons and let’s embark on this delicious adventure!
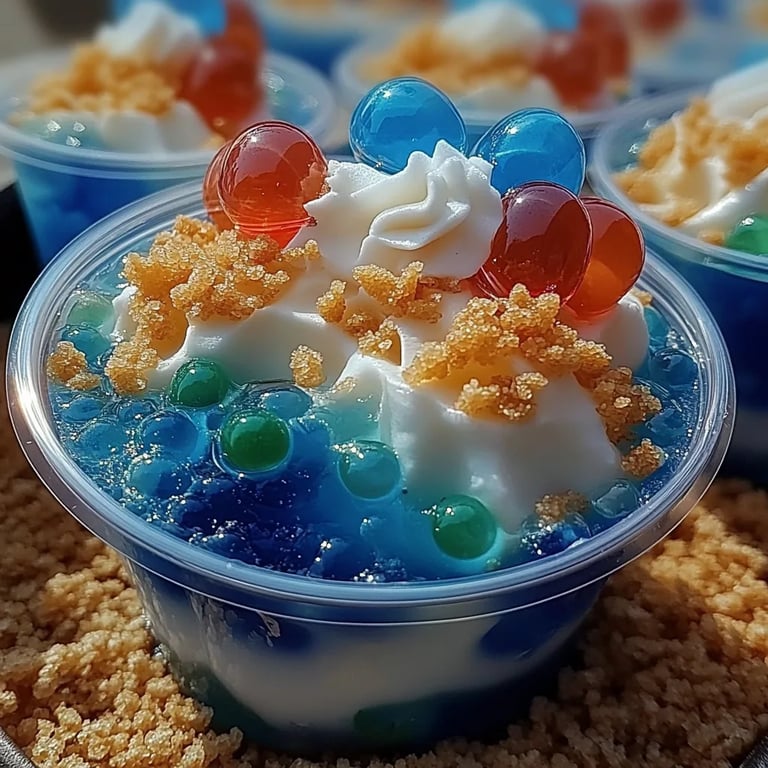
What is a Mini Edible Ocean World in a Cup?
A Mini Edible Ocean World in a Cup consists of layers of various edible components, resembling an actual underwater scene. Think vibrant blue jello representing ocean water, sandy layers created from crushed cookies, edible decorations such as gummy sea creatures, and maybe even some whipped cream to mimic waves. It’s more than just a dessert—it's an edible art piece that can spark conversations and wow your guests.
When to Use Your Edible Ocean World
This festive treat is perfect for a variety of occasions! Whether you’re celebrating a birthday, planning a beach-themed party, or even hosting a science-themed event, this edible ocean world can be tailored to fit the occasion. Plus, it’s an exciting hands-on activity for kids, great for encouraging creativity and fine motor skills!
Materials You’ll Need
Before we get started, let’s gather all the materials you’ll need for our ocean-inspired creation. Most of these should be readily available at your local grocery store or craft shop.
Ingredients:
- Blue gel or flavored jello (3 packs for vibrant ocean color)
- Graham crackers (for the sandy layer)
- Gummy sea creatures (like sharks and fish)
- Whipped cream (optional, for waves)
- Edible glitter or sugar (for an ethereal effect)
- Licorice ropes (to resemble seaweed)
- Miniature umbrella or cocktail picks (optional decoration)
Tools:
- Clear cups or jars (for a beautiful presentation)
- Mixing bowls
- Spoon
- Cooler/Fridge (for jello setting)
- Rolling pin or a heavy object (for crushing the graham crackers)
Step-by-Step Tutorial
Step 1: Prepare the Jello
I always start with the jello because it takes time to set. Begin by boiling water according to the instructions on the jello packets. Generally, you’ll need about 2 cups of boiling water per pack for a richer flavor. Stir in the jello mix until fully dissolved.
Tip: If you’d like a deeper blue, consider adding a few drops of blue food coloring.
Now, pour the jello into your cups, filling them halfway. Place the cups in the fridge, allowing them to set for at least 2-4 hours.
*Common Pitfall:* Don’t rush this step! If the jello isn’t set properly before adding more layers, they may mix, and you’ll lose that gorgeous ocean effect.
Step 2: Create the Sandy Layer
While the jello is setting, let’s turn our attention to the sandy layer. Grab your graham crackers and place them in a resealable plastic bag. Use a rolling pin to crush them into a fine texture, resembling sand.
Why this matters: The texture will add contrast to the jello and contribute to the aesthetic of your ocean scene.
After your graham crackers are crushed, you can set them aside until the jello is completely set.
Step 3: Add the Sandy Layer
Once the jello has fully set, take your cups from the fridge. Carefully spoon a layer of the crushed graham cracker mixture on top of the jello. About ¼ inch thickness should do!
Tip: Use the back of your spoon to gently press down the “sand” layer, making a stable base for the next layer.
Step 4: Layer in More Jello
Now it’s time to add another layer of jello! Prepare a second batch as you did for the first layer, this time using clear or flavored jello to create depth or color variation in your ocean. Pour the jello mixture over the sandy layer until you reach the rim of the cup.
*Important Note:* Use a spoon to gently pour the jello over the back of the spoon to minimize disruption of the sandy layer.
Let this layer set in the fridge for another 2-4 hours.
Step 5: Add Your Edible Sea Creatures
Once the second jello layer is set, it’s time for the fun part—adding your edible sea creatures! Place gummy fish, sharks, or any sea-themed candy you have to create a vibrant underwater scene.
Tip: Play around with positioning some candies “floating” in the mean while sticking others partially in the jello for a realistic effect.
Step 6: Whipped Cream Waves
If you want to elevate your ocean world, adding a dollop of whipped cream on top will create stunning “waves.” Simply pipe or spoon it onto the top layer.
Note: For extra flair, you can sprinkle edible glitter or sugar on top of the whipped cream for a sparkling ocean effect.
Step 7: Final Touches
Complete your mini ocean world by adding a few licorice ropes for seaweed and miniature umbrellas or cocktail picks for decoration.
Troubleshooting Common Issues
- Jello Layers Mixing: If you pour the next layer of jello too soon, it can mix. Always wait until the previous layer is completely set.
- Too Much Water in Jello: If your jello is too watery, mix an additional pack with a little less water than the instructions suggest. This should help achieve a firmer consistency.
- Sandy Layer not Sticking: Make sure to pack the graham cracker layer firmly against the jello layer beneath.
Creative Variations
- Colorful Ocean: Use different colors of jello and include a mixture of flavors for a multi-colored ocean experience.
- More Textures: Mix in toasted coconut for extra “sand” or edible candy rocks for a fun touch.
- Add Sea Plants: Use green pipe cleaners or candy to represent sea plants if you want to get really creative!
Safety Warnings
When crafting with children, ensure that any small decorations (like candy or gummy creatures) are safe for their age to avoid choking hazards. Always supervise young children during the crafting process.
Personal Anecdote
The first time I made the Mini Edible Ocean World, it was for my niece’s birthday party. The joy on their faces was priceless as they explored their creation, and they were thrilled to dig into their own edible work of art! It melted my heart to see them so engaged.
Conclusion
Creating a Mini Edible Ocean World in a Cup is not just about the ingredients or techniques—it's about the joy of making and sharing something beautiful and delicious. Whether you're crafting this with kids, for a party, or just because you want to indulge your inner child, I hope this guide helps you along your journey. Embrace the messiness, enjoy the process, and let your creativity flow! Now go on, get your cups ready, and make some ocean magic—and don’t forget to share the final creations! Happy crafting!