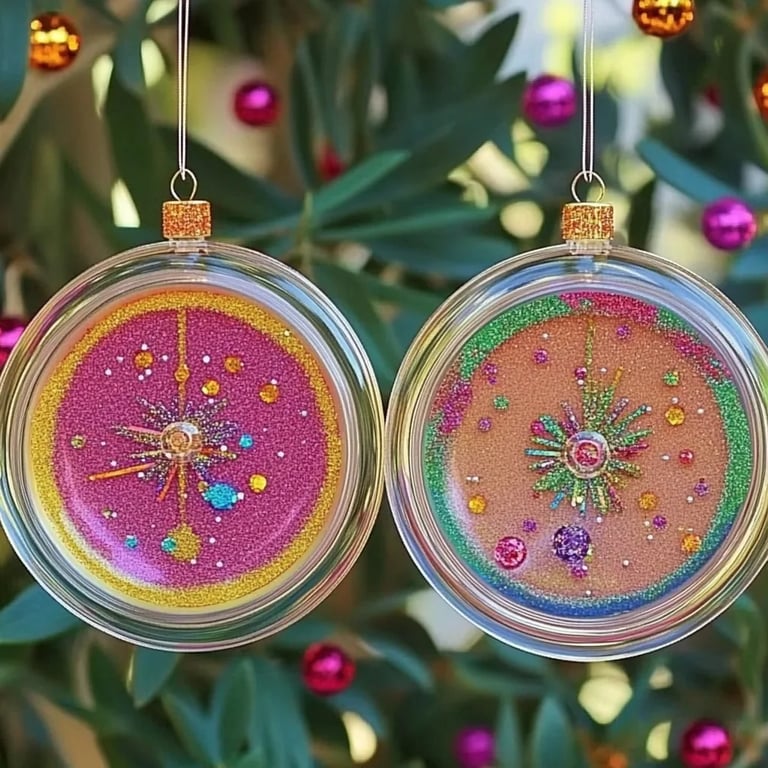
How to Make a Glitter Lid Suncatcher Mobile: A Step-by-Step Guide from an Experienced Crafter
As an avid crafter, I love finding new ways to brighten up my home and share that joy with others. One of my all-time favorite projects is the Glitter Lid Suncatcher Mobile. These stunning creations glimmer in the sun, casting color and light across a room, leaving everyone who witnesses their beauty in awe. Perfect for hanging in windows, porches, or gardens, they add a splash of whimsy and sparkle to any space. Whether you’re looking to brighten up your home décor or searching for a fun project to do with kids, this mobile is a fantastic choice that combines creativity with simplicity.
In this detailed guide, I’ll walk you through the entire process of creating your own Glitter Lid Suncatcher Mobile, share my insights and tips, and help you avoid common pitfalls. So, grab your crafting supplies and let’s get started!
What You’ll Need
Before diving into the step-by-step tutorial, let’s gather everything you need. The beauty of this project is that it uses easily accessible materials. Here’s what you’ll require:
Materials:
- Plastic or metal lids (think sour cream, yogurt, or mason jar lids—get creative!)
- Clear craft glue (or Mod Podge)
- Glitter (your choice of colors—go wild!)
- String or fishing line (for hanging)
- Scissors
- A hole punch (optional, but very useful)
- Paintbrush (for spreading glue)
- Paper plate or tray (for easy glittering)
- A clear plastic sheet or wax paper (for drying)
- Decorative elements (optional, such as beads, sequins, or pressed flowers)
Safety Items:
- Craft apron (to protect your clothes)
- Protective gloves (if you’re sensitive to glue)
Step-by-Step Tutorial
Step 1: Prepare Your Workspace
First things first, setting up a clean, organized workspace is essential for any crafting project. Lay down old newspapers or a craft mat to catch any glitter spills. Don’t worry; glitter can be a bit messy, but that’s part of the fun!
Step 2: Gather Your Lids
I usually recommend using a mix of different lid sizes for added visual interest. Start by soaking your lids in warm, soapy water to remove any residue, then rinse and dry them thoroughly. This step is crucial because any leftover oils can prevent the glue from adhering properly.
Step 3: Apply Glue and Glitter
Using a paintbrush, coat the top side of your lid with a generous layer of clear craft glue. Be sure to spread it evenly; a thick layer can create a clumpy look. Here’s where I often run into issues: too little glue can cause the glitter to fall off after drying. So, when in doubt, apply a bit more!
Once your lid is evenly coated, take your glitter and sprinkle it generously over the glued surface. I like to use a paper plate to catch any excess glitter, making the cleanup easier. Allow the glue to dry for 30 minutes before moving to the next step.
Step 4: Seal the Glitter (IMPORTANT!)
To ensure your glitter stays put and doesn’t shed everywhere, apply another layer of clear glue over the top of the glitter once it’s dried. This will create a seal and give your suncatcher a nice glossy finish. Allow this layer to dry completely, which might take an hour or so.
Step 5: Create the Hanging Assembly
Once your lids are dry, you can begin to prepare the hanging assembly. If you’re using a hole punch, create a small hole near the edge of each lid. If you don’t have a hole punch, just carefully use scissors to make a small slit.
Next, cut appropriate lengths of string or fishing line, depending on how low or high you want your mobile to hang. Thread the string through the hole you made and tie a knot to secure it.
Step 6: Assemble the Mobile
Now comes the fun part: assembling the mobile! Plan out how you'd like the lids to hang. You can have them at different lengths or create a symmetrical design—there’s no wrong way! To attach your lids, tie them onto a larger branch or a sturdy hanger. I often use a sturdy stick I’ve found in my backyard, as it adds a rustic touch that's perfect for any décor.
Step 7: Finishing Touches
If you want to add more flair, this is the time for embellishments! Feel free to glue on beads, sequins, or pressed flowers to your lids before attaching them to the mobile. I once added some floral embellishments to mine, and the final result was breathtaking!
Step 8: Find a Home for Your Suncatcher Mobile
Once your mobile is assembled, find a spot that gets plenty of sunlight to showcase your amazing new creation! Windows, porches, or even outdoor gardens are ideal spots. Hang it securely so it won’t fall with a gust of wind, and enjoy the dazzling play of light your mobile creates.
Tips from My Crafting Journey
- Add Color Variety: Play around with different glitter colors to match your room's theme or your child’s favorite colors!
- Test Adhesives: If you’re working with kids, I advise using a washable school glue for easy cleanup. While it may not seal as well as craft glue, it can be more forgiving during the crafting process!
- Use a Small Container: For controlling glitter, use a small container to shake and tap the excess glitter back inside to minimize mess.
- Experiment with Texture: Consider using metallic or holographic glitter for an extra sparkle effect that will make your suncatcher shine even more brilliantly under sunlight.
Final Thoughts
Crafting the Glitter Lid Suncatcher Mobile is a wonderfully therapeutic experience that sparks creativity and transforms everyday materials into something magical. Don’t be afraid to embrace your unique style and let your personality shine through your design! As you create, recall that crafts are about the journey, not just the end product. Enjoy each moment and feel empowered to experiment along the way.
In sharing tips and insights from my years of crafting, I hope to inspire you to dive into this project with enthusiasm and creativity. I’d love to hear how your own Glitter Lid Suncatcher Mobile turns out! So, gather those supplies, invite a friend, and brighten your space with your beautiful handmade creation. Happy crafting!