How to Make a DIY Mini Aquarium: Your Complete Guide
Hello there, fellow crafters! I'm excited to share my passion for a fun project that has brought immense joy to my home—creating a DIY mini aquarium. More than just a decorative item, a mini aquarium serves as a tranquil element in your space, offering a glimpse into a miniature underwater world that can enhance your decor while providing a serene escape from the day's hustle and bustle.
Whether you're looking to create a centerpiece for your living room, gift something unique to a friend, or simply engage in a relaxing crafting experience, a mini aquarium is a fantastic option. It's become popular in recent years due to its versatility, ease of customization, and the ability to bring nature indoors—even in small spaces.
Why Make a Mini Aquarium?
Mini aquariums are visually stunning and serve several purposes. They provide a habitat for small aquatic life, like fish and plants, and can act as an engaging educational tool for children, teaching them about ecosystems. Additionally, creating a DIY mini aquarium can be a rewarding meditation experience, allowing you to express your creativity while focusing on something calming and beautiful.
Now, let's dive in and explore how to make one yourself!
Materials You'll Need
Before we get started, gather the following materials:
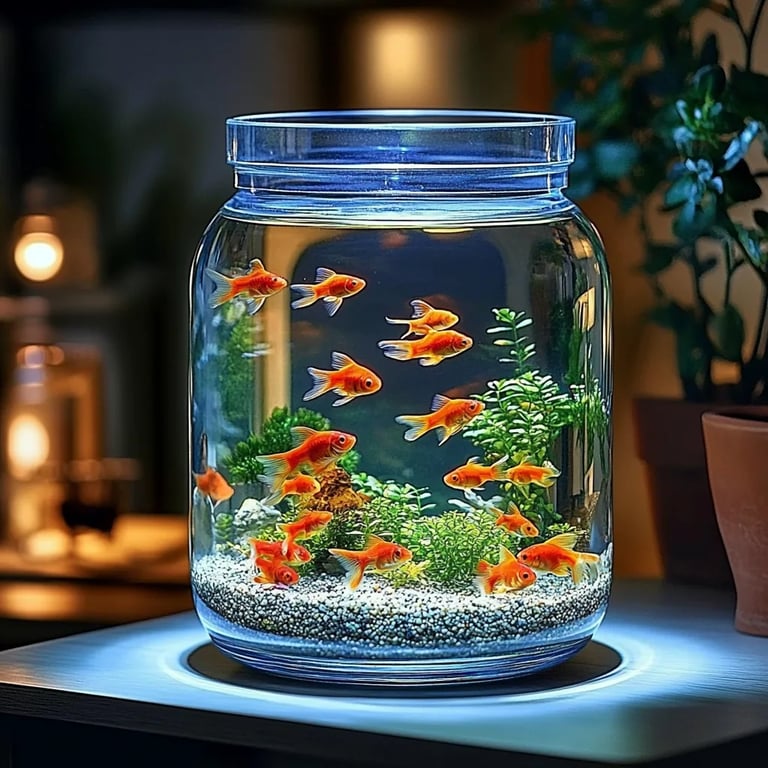
- Container: A glass jar, fish bowl, or any clear container. Remember, the larger the container, the more room your aquatic friends will have!
- Gravel or aquarium substrate: This will form the foundation of your aquarium.
- Aquatic plants: You can start with low-maintenance plants like Java moss, Anubias, or water ferns.
- Decor: These can be stones, driftwood, or small ornaments to add character to your mini aquarium.
- Water conditioner: Essential for treating tap water to make it safe for your aquatic life.
- Fish: Betta fish, shrimp, or small snails are great options for mini tanks. Remember to check compatibility and tank size requirements!
- Aquatic thermometer and water testing kit: To monitor temperature and check water quality.
- Light source (optional): LED lighting can help plants thrive, especially if you choose not to place your aquarium in direct light.
Step-by-Step Tutorial
Step 1: Choosing the Right Container
Choosing the right container is crucial. A glass fish bowl or an old pickle jar works beautifully. I especially love using repurposed jars as they tell a story and add a personal touch to the aquarium. Ensure the container is clean and free from harmful residues. Rinsing it with vinegar followed by a thorough wipe with water can help eliminate any potential toxins.
Tip: Make sure the opening of the container is wide enough for your hand to easily arrange the plants and decor.
Step 2: Adding the Gravel
Pour about 1-2 inches of gravel or substrate into the bottom of your container. Gravel not only assists with drainage but also provides a place for beneficial bacteria to flourish, which is vital for the nitrogen cycle in your mini ecosystem.
What Could Go Wrong?: If you skip this step, waste can accumulate at the bottom, leading to murky water and unhappy aquatic life.
Step 3: Planting Aquatic Plants
This is perhaps my favorite part! Arrange the plants. It's best to start with the tallest plants in the back and the shorter ones in front for visibility. Position them firmly in the gravel, ensuring the roots are adequately anchored. I often use tweezers for delicate plants since it aids in precision without uprooting what I've just planted.
Fix It: If a plant starts to float, gently press it down further into the substrate.
Step 4: Adding Decor
Now's your chance to get creative! Place decorative elements like rocks or driftwood that not only enhance the aesthetic but also provide hiding places for your fish or shrimp. However, be cautious of sharp edges that may harm your aquatic life.
Personal Anecdote: One time, I used a piece of driftwood that I thought was harmless, only to discover it had a sharp end that scraped my Betta's fin. Luckily, it healed, but that taught me to always double-check decor!
Step 5: Filling the Aquarium with Water
When filling the aquarium, do it slowly to avoid disturbing the gravel and plants. I use a bowl or cup to gently pour the water in, creating less disruption. Once it’s filled, let it sit for 24 hours, treating it with a water conditioner to eliminate chloramines and chlorine.
Safety Warning: Always check that the water temperature matches the ideal range for your chosen fish.
Step 6: Choosing Your Fish
Before adding fish, cycle your tank for at least a week, running the filter (if applicable) to establish beneficial bacteria. After this period, introduce your aquatic friends slowly. If it’s your first mini aquarium, I recommend starting with one Betta fish, known for their low maintenance and vibrant colors.
Tip: Always check the temperature and pH level before adding any fish to ensure a safe environment.
Step 7: Maintaining Your Mini Aquarium
Your mini aquarium requires regular maintenance. Here are some tips to keep it thriving:
- Weekly Water Changes: Change about 10-20% of the water weekly to maintain a healthy environment.
- Clean Filters: If you have a filtration system, clean it as per the manufacturer’s advice but avoid overdoing it to maintain beneficial cycling.
- Monitor Conditions: Regularly check temperature, pH, and ammonia levels to ensure stability.
What Could Go Wrong?: Overfeeding your fish can lead to poor water quality and unhealthy fish. Stick to the recommended feeding guidelines.
Creative Variations
Feeling adventurous? Consider these variations to add uniqueness to your mini aquarium:
- Themed Aquascapes: Create an underwater pirate adventure with miniature ships or a serene Zen garden with sand and smooth stones.
- Terrarium Combination: Explore a terrarium on top and an aquarium below for a stunning dual ecosystem.
- Seasonal Decorations: Change up the decor with seasons—fall leaves, winter snowmen, or summer beach themes!
Final Thoughts
Creating your own DIY mini aquarium can be a fulfilling and peaceful crafting project that enriches your home environment. As you gather materials, plan your design, and engage in caring for your aquatic life, you'll find joy in this little slice of nature.
Always remember to savor the process, celebrate your creativity, and don’t hesitate to reach out to fellow hobbyists for support and inspiration. Happy crafting, and welcome to your new aquatic adventure!