How to Make a Cotton Candy Aquarium Parfait: A Colorful Creation for Sweet Sensations
Greetings, fellow crafting enthusiasts! Today, I'm excited to share one of my favorite DIY projects: making a Cotton Candy Aquarium Parfait. This delightful treat not only pleases the taste buds but also serves as a visually stunning centerpiece for parties, showers, or simply a fun weekend project with family and friends. Its vibrant colors and whimsical presentation make it a hit with kids and adults alike. So, let’s dive into this fun and creative experience!
What Is a Cotton Candy Aquarium Parfait?
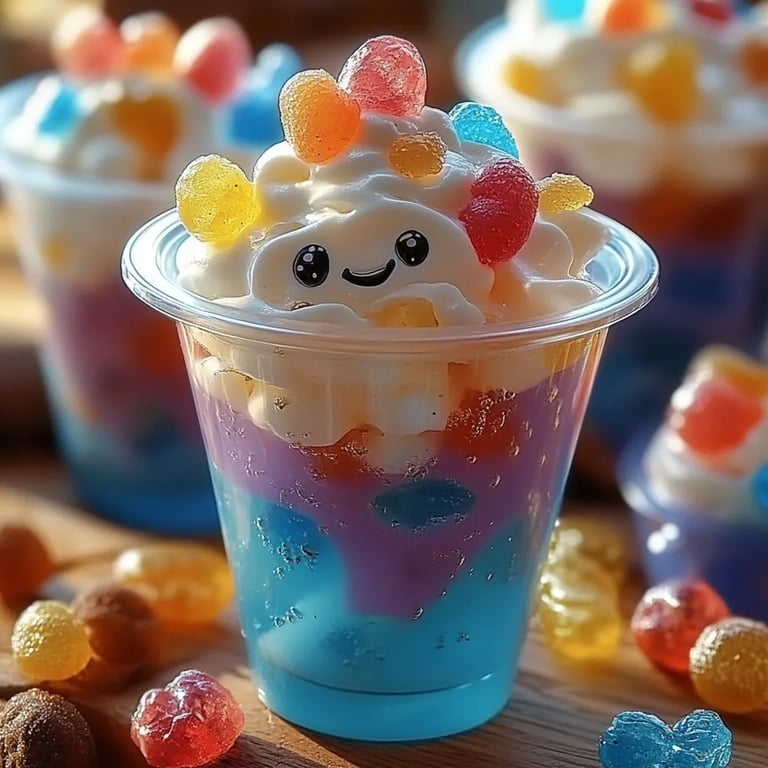
Picture this: layers of soft, fluffy cotton candy, colorful faux aquarium decorations, and a hint of cool, refreshing flavors all assembled into a perfect parfait. The Cotton Candy Aquarium Parfait is essentially a dessert that mimics an aquarium, featuring edible elements that resemble aquatic landscapes. This treat allows you to unleash your creativity while indulging in a cotton candy-inspired delight that is both playful and nostalgic.
This dessert is highly popular for birthday parties, summer gatherings, and everything in between. It’s a fantastic way to engage kids in a crafting experience, as they can help assemble the layers and personalize their parfaits. If you're ready to embark on this colorful adventure with me, let’s get started!
—
Materials Needed
Before we begin, let’s gather everything we need. Here’s your shopping list:
Ingredients:
- Cotton Candy – Blue and pink or purple are ideal for that aquatic vibe.
- Gelatin (or Jello) – Choose blue raspberry or lime for the water effect.
- Whipped Cream – You can use store-bought or homemade.
- Gummy Fish or Aquatic Candies – These can be options like Swedish Fish or gummy sea turtles.
- Clear Cups or Dessert Glasses – These will showcase your beautiful layers.
- Sugar – Optional, for sweetening the gelatin.
Decorative Elements:
- Sugar Crystals – Use blue and green for extra flair (optional).
- Edible Glitter – Optional, for a sparkling effect.
Tools Required:
- Mixing bowl
- Spoon
- Measuring cups
- Whisk for mixing gelatin (optional)
- Scissors for cut gummy candies (if needed)
—
Step-by-Step Tutorial
Now that we have our materials, let's dive into the detailed steps of creating our Cotton Candy Aquarium Parfait. Each step is crucial, so pay close attention as we move along.
Step 1: Prepare the Gelatin
Why It Matters: The gelatin will form the “water” layer of our aquarium.
- Mix the Gelatin: In a mixing bowl, dissolve your blue raspberry or lime-flavored gelatin in hot water as per package instructions. If you're using powdered gelatin, make sure to bloom it in cold water first.
- Chill: Allow the mixture to cool for about 30 minutes at room temperature, then refrigerate until firm, which usually takes about 1-2 hours. This sets the stage for our aquarium.
Potential Pitfalls: If you don’t let it cool long enough, the layers may not set properly. If it doesn’t set, simply reheat and chill again.
Step 2: Build Your Layers
Why It Matters: Creating distinct layers adds visual appeal and flavors to your parfait.
- Whip the Cream: If you want fluffy layers, whip your cream (if using homemade) until peaks form. This will create a nice texture that contrasts with cotton candy.
- Cut the Gelatin: Take your firm gelatin and cut it into small cubes or use a spoon to scoop out portions. These will mimic jellyfish or coral!
- Begin Layering: In your clear cup or dessert glass, start with a layer of gelatin cubes at the bottom. Then, add a layer of whipped cream over the gelatin.
- Add Cotton Candy: Top with a generous handful of cotton candy. It will fluff beautifully on top of the whipped cream, forming a “cloud” effect.
- Repeat Layers: Continue layering with gelatin, whipped cream, and cotton candy until your cup is full. This can be about 2-3 layers depending on the size of your cup.
—
Step 3: Adding Decorative Elements
This is where your creativity shines!
- Gummy Fish: Place your gummy candies or aquatic themes between layers for a hidden surprise.
- Final Touches: Upon completing your last cotton candy layer, sprinkle sugar crystals around the edges for a sparkling ocean effect.
- Edible Glitter: If you're feeling whimsical, dust some edible glitter on top. It adds a magical touch!
Step 4: Serve and Enjoy!
Presentation is key. These parfaits are best enjoyed immediately, as the cotton candy will dissolve over time. However, if you're preparing for an event, assemble just before serving.
—
Helpful Tips and Tricks
- Flavor Variations: Experiment with different flavored gelatin and cotton candy combinations! How about strawberry gelatin with pink cotton candy?
- Safety Warnings: Always supervise children while crafting and enjoy consumption, especially with small candies and sharp tools.
- Alternative Methods: If you don’t have gelatin, consider using blue Jello cups instead, adding a creamy layer of whipped topping.
- Personal Anecdotes: I remember the first time I made these with my niece. We spent the afternoon chatting and creating layers. The laughter poured in as we mixed flavors and decorated—it turned into a cherished memory!
—
Conclusion
Crafting a Cotton Candy Aquarium Parfait is a joyful and creative experience that anyone can participate in. It allows you to create something visually stunning while savoring sweet, fluffy cotton candy goodness. Whether you're hosting a party or simply sharing a sweet moment with loved ones, this parfait is bound to be a hit.
So, roll up your sleeves, gather your materials, and start layering your way to crafting an edible aquarium! I can’t wait to hear about your colorful creations and variations. Happy crafting, friends!