How to Make a CD Suncatcher Craft: A Step-by-Step Guide
Hello fellow craft enthusiasts! Today, I’m excited to share one of my favorite crafts that’s perfect for all ages—the CD Suncatcher. If you’re looking for a fun, visually stunning project that’s both easy and budget-friendly, you’ve come to the right place. Not only will you recycle old CDs that would otherwise gather dust in a drawer, but you’ll also create a vibrant piece of décor that dances with color in the sunlight.
What is a CD Suncatcher?
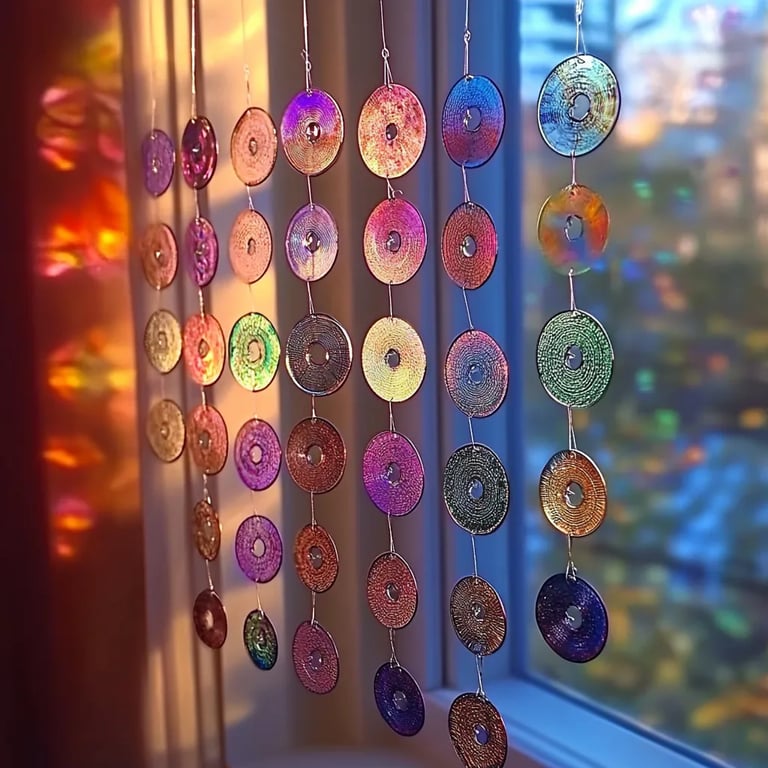
A CD Suncatcher is a decorative piece made from old CDs (or DVDs) that reflect light beautifully when hung in a window or outside in the sun. The shiny surface of the discs creates a rainbow effect that adds charm and color to any space. Whether you want to brighten up your home, garden, or even create a thoughtful gift for someone special, a CD Suncatcher is the perfect solution. Plus, the possibilities for designs, colors, and styles are only limited by your imagination!
Why Are CD Suncatchers So Popular?
One of the things I love about CD Suncatchers is their versatility. They can be tailored to suit any aesthetic—boho, modern, whimsical, you name it! They’re also a wonderful way to engage with kids or friends, making them a perfect craft for schools, parties, or rainy days. The process of making them allows you to experiment with colors and textures, all while promoting sustainability by recycling materials.
What You'll Need
Materials:
- Old CDs or DVDs (the more varied, the better!)
- Scissors or a craft knife
- Permanent markers or glass paint (for coloring)
- A glue gun (or strong craft glue)
- String or fishing line (for hanging)
- Beads (optional, for added decoration)
- A worksheet for design planning (not mandatory but helpful)
Safety Warning: If you're using a craft knife, please be cautious. Use a cutting mat or thick cardboard to protect your work surface and prevent any accidental cuts!
Step-by-Step Tutorial
Now, let’s dive into the process! From my years of crafting experience, I want to guide you through each step thoroughly, including insights on what to watch out for.
Step 1: Choose Your Design
Before you start cutting, take a moment to think about the design you’d like for your Suncatcher. You can sketch your ideas on a piece of paper or directly on the surface of the CD with a permanent marker. As a suggestion, abstract shapes or mandalas look fabulous but feel free to use your creativity!
Step 2: Prepare the CDs
If you want to give the CD a fresh look, start by painting one side with permanent markers or glass paint. The color can be solid or you can create patterns. This first layer of color will be the backdrop for your design, and it will appear magical when light hits it. Just remember: darker colors will create a deeper effect, while lighter colors will cast softer lights.
Tip: If you're using glass paint, make sure to choose non-toxic varieties that are safe for crafting.
Step 3: Cut the CD
Carefully use scissors or a craft knife to cut the CD into your desired shapes. Here’s where things can go wrong: CDs can be slippery! Stability is key here. I recommend holding the CD firmly on a cutting mat and pressing down with one hand while cutting with the other.
If the CD shatters (which can happen), don’t panic! Simply sweep up the pieces and dispose of them safely. Alternatively, you can create smaller pieces for a mosaic effect.
Step 4: Glue Your Elements Together
Once you have your CD pieces, it’s time for the fun part—gluing them! Use a glue gun or strong craft glue to attach your pieces to a larger base (this could be another CD, a piece of cardboard, or even a wire frame).
Make sure to layer the pieces creatively so they overlap slightly. This will enhance the light effects. Watch out for clumps of glue; they can create unsightly spots once dried.
Anecdote: I remember the first time I made a Suncatcher, I didn’t let my glue dry long enough before hanging it. Letting the glue cure completely will prevent unsightly drips or fallen pieces!
Step 5: Add Beads (Optional)
For those who want to take their Suncatcher to the next level, consider attaching beads at the ends of your hanging string. These not only add color but will also catch and redirect light beautifully.
Step 6: Prepare for Hanging
Now that you have your beautiful creation, it’s time to hang it up! Cut a length of string or fishing line and tie it to the top center of your Suncatcher. Make sure it’s sturdy enough to hold the weight.
Step 7: Find the Perfect Spot
Last but not least, find a sunny place to showcase your creation! Windows that receive direct sunlight are ideal.
Tip: If you want to experiment with different locations, try temporarily attaching the string with tape to see how the light interacts with your piece.
Creative Variations
- Nature Elements: Incorporate dried flowers, leaves, or twigs with your CD pieces for a more earthy vibe.
- Seasonal Themes: Tailor your colors and shapes according to the season—vibrant yellows and greens for spring, warm oranges and reds for fall, etc.
- Themed Suncatchers: Create pieces for special occasions like holidays or birthdays.
Wrap-Up
I hope this guide has inspired you to create your very own CD Suncatcher! Not only will you brighten up your surroundings, but you’ll also find immense satisfaction in crafting something beautiful from materials that would have otherwise gone to waste. Remember, craft is about having fun—there's no right or wrong way to create.
Feel free to experiment, make mistakes, and learn along the way. If you have any questions or would like to share your own Suncatcher creations, I’d love to hear from you in the comments below. Happy crafting!