How to Make a Baking Soda Glowing Ghost Jar: A Step-by-Step Guide
Hello there, fellow crafters! Today, I’m thrilled to share with you one of my favorite DIY projects—the Baking Soda Glowing Ghost Jar. This fun and spooky craft is perfect for Halloween or for adding a whimsical touch to your home decor. With just a few simple materials, you can create a glowing ghost that comes to life in the dark! Let's dive into the process together, and I'll guide you through every step, sharing my tips and tricks along the way.
Why the Baking Soda Glowing Ghost Jar is a Must-Make Craft
If you’ve ever found yourself enchanted by glowing decorations during Halloween, you’re not alone! The glowing ghost jar is popular for its spooky charm and the nostalgia of crafting that comes with it. It’s an excellent project for both kids and adults, making it a perfect family activity. You can use this ghost jar to spook up your Halloween festivities, or simply as a charming nightlight that gives a warm glow without the fear factor.
Materials You'll Need
Before we begin crafting, let’s gather everything you need. Don’t worry; none of these items are hard to find!
- Glass Jar: Any jar with a lid will work, but I recommend a mason jar for the best effect. It should be clean and dry.
- Baking Soda: This is the magic ingredient that will help create your glowing ghost.
- White Paint: Acrylic paint is perfect for this project. It’s easy to work with, dries fast, and is generally non-toxic.
- Black Marker or Paint: For making facial features on your ghost.
- Glow-in-the-Dark Paint: This is what makes our ghost glow at night! Ensure you get a paint that is suitable for use on glass.
- LED Tealight Candle: This will keep our glowing ghost lit without any fire hazards.
- Paintbrush
- Water
- Mixing Bowl
- Sponge or Cloth: For cleaning up.
Step-by-Step Tutorial
Now that we have our materials ready, let’s get started!
Step 1: Prepare Your Workspace
Creating art can quickly become chaotic, so I always make sure my workspace is tidy. Take the time to cover surfaces with newspaper or a plastic sheet, especially since we’re working with paint.
Tip: Arrange your materials in easy reach to make the process smoother.
Step 2: Mix the Baking Soda Slurry
In a mixing bowl, combine about half a cup of baking soda with a few tablespoons of water. You’re looking for a thick paste—think of it like pancake batter.
Why this Matters: The baking soda not only adds texture to your ghost but will also react with the glow-in-the-dark paint to enhance its luminosity.
Common Pitfall: If your mixture is too runny, it won’t adhere properly to the jar. If this happens, simply add a little more baking soda until you reach the desired consistency.
Step 3: Apply the Baking Soda Paste
Using your paintbrush, gently apply the baking soda paste all over the outside of the jar. You can create a thicker layer at the base and a lighter layer towards the top. This creates an organic look, making the ghost appear more ethereal.
Tip: I like to use a sponge to dab some of the paste to add texture. The unevenness will enhance the ghostly effect!
Step 4: Let It Dry
Set your jar aside to dry completely. This usually takes about an hour, but you can always use a heat gun or a hairdryer on a low setting if you’re eager to continue!
Safety Warning: If using a hairdryer, keep it at a distance and avoid overheating the glue, as it can create a mess.
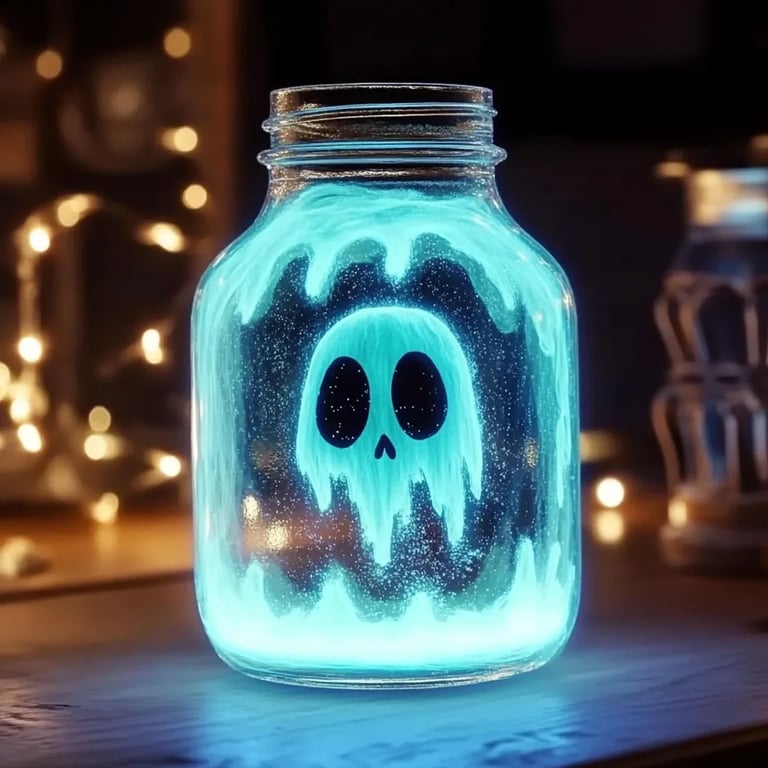
Step 5: Paint Your Ghost Face
Once the jar is dry to the touch, it’s time to have some fun! Use the black marker or paint to draw spooky eyes and a mouth. You can go for classic designs or even get creative with winks or silly faces!
Tip: Practice on a piece of paper first if you’re nervous about your design.
Step 6: Apply Glow-in-the-Dark Paint
Now, paint over the whole ghostly face with the glow-in-the-dark paint. Make sure to apply it liberally, as this step is crucial to ensure your ghost glows brightly at night.
Common Pitfall: Don’t forget to follow the manufacturer’s instructions on how long the glow-in-the-dark paint needs to charge in the light!
Step 7: Use the LED Tealight Candle
Once everything is dry, place an LED tealight candle inside your jar. This not only provides a flickering glow but keeps your project completely safe from any fire risk.
Tip: If you’d like to elevate your ghost, you can add some shredded white tissue paper inside the jar to mimic ghostly wisps.
Step 8: Give Your Ghost a Home
Place your glowing ghost jar in a spot where it can be fully appreciated. It could be on a windowsill, on your porch to welcome trick-or-treaters, or as part of a centerpiece on your dining table.
Creative Variations
Now that I’ve shared the basic process, let’s talk about some exciting variations you can explore:
- Color Your Ghosts: Experiment with different colors of glow-in-the-dark paint. Imagine a rainbow of ghosts lighting up your night!
- Spooky Friends: Make a whole family of ghost jars with varying heights and sizes. Each jar can represent a different character!
- Seasonal Transitions: Use themed colors or designs for other holidays throughout the year. Think snowmen for winter or blooming flowers for spring.
Troubleshooting & Tips
- Glow Issues: If your ghost isn’t glowing well, ensure it has been charged adequately under a light source. If it still doesn’t work, you may need a different variety of glow-in-the-dark paint.
- Paint Peeling: If you notice the paint starts chipping, ensure that you have applied adequate layers and let each layer fully dry before applying the next.
- Storing Your Ghost Jar: During the off-season, keep your ghost jar in a cool, dry place, away from direct sunlight to avoid fading.
Conclusion
Crafting your Baking Soda Glowing Ghost Jar is a delightful way to embrace your creativity while celebrating the spookiest time of the year. I hope this guide has encouraged you to try your hand at this fun project. Remember, crafting is all about exploration and expression, so don’t hesitate to put your twist on it! Happy crafting, and may your ghosts glow brightly!