How to Create Stunning Bubble Paintings: A Fun and Colorful Activity
Hello, fellow crafting enthusiasts! Today, I’m thrilled to share one of my absolute favorite creative activities—bubble painting! This mesmerizing technique combines the joy of painting with the playful nature of bubbles, resulting in vibrant, whimsical art pieces. Perfect for children and adults alike, bubble painting has become quite popular in my crafting circles, and for good reason—it's easy, affordable, and incorporates a delightfully unique texture that’s hard to resist!
Whether you’re looking for a fun family activity, a unique party project, or an engaging educational experience, bubble painting offers the flexibility and creativity to meet your needs. In this blog post, I will take you through a complete, step-by-step guide to making your very own bubble paintings, share valuable tips, and even provide some creative variations. So, let’s dive in and get our hands a little messy!
What You’ll Need for Bubble Painting
Materials List
Before we get started, here’s a comprehensive list of the materials you’ll need. Don’t worry—most of these items are easy to find in your kitchen or local art supply store!
- Liquid washable paint: Acrylic paints work well, but I recommend using liquid watercolors if you want bright, transparent colors.
- Dish soap: Any regular dish soap will do. This helps create those bubbly textures!
- Water: Tap water works just fine.
- Straws: A couple of reusable or disposable straws will allow you to blow bubbles.
- Paper: Watercolor paper or thick cardstock is ideal, but you can use regular printer paper if that’s what you have on hand.
- Containers: Small cups or bowls for mixing your paint solution.
- Newspaper or a plastic table cover: To protect your working surface.
- Optional: Glitter, stickers, or other embellishments for added flair.
Safety Precautions
Before we begin, let’s talk safety. While bubble painting is generally safe, make sure to supervise younger children as they use straws. In addition, it’s wise to wear old clothes or an apron to protect against unintentional splashes of paint. It’s an exciting and messy craft, so embrace it!
Step-by-Step Guide to Create Bubble Paintings
Step 1: Mixing the Bubble Paint Solution
To create your vibrant bubble paint, mix equal parts of liquid paint and water in a cup, then add a squirt of dish soap. For example, 2 tablespoons of paint, 2 tablespoons of water, and 1 tablespoon of soap should result in a vibrant and bubbly concoction.
Why This Step Matters: The mixture of paint, water, and soap will significantly affect the size and stability of the bubbles. The soap helps to create larger bubbles and allows them to lift off when you blow through the straw.
Potential Issue: If your paint doesn’t seem bubbly enough, try adding a bit more soap until you’re satisfied with the consistency.
Step 2: Set Up Your Workspace
Lay out newspaper or a plastic table cover to protect your surfaces. Place your paper in front of you and the bubble paint solution on the side. Make sure you have towels or wipes handy—trust me, you’ll need them!
Step 3: Blow Bubbles!
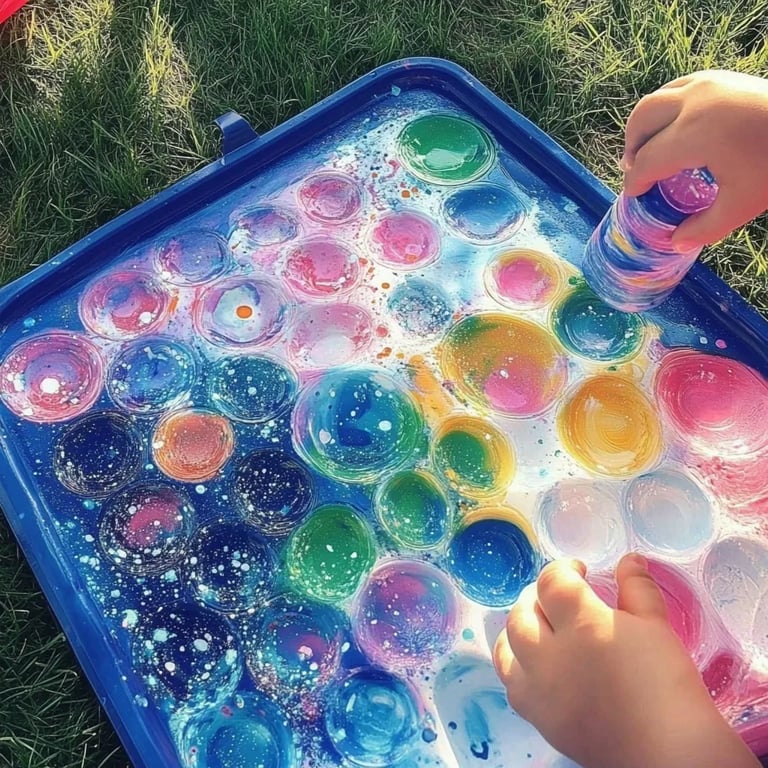
Dip one end of the straw into your bubble paint solution, ensuring it doesn’t touch the bottom where the paint is thickest. Then, gently blow through the straw to create bubbles.
Why This Step Matters: By blowing air into the solution, you create bubbles that will rise to the surface. When these bubbles burst, they will leave unique and colorful patterns on your paper.
What Could Go Wrong: If you accidentally suck in the paint (it happens!), don’t panic. Just rinse your mouth well with water. Avoid blowing too hard, as this can cause paint to splatter everywhere!
Step 4: Print the Bubbles
Once you’ve got a plethora of bubbles on the surface, quickly press your paper onto the bubble-laden liquid. The paint will transfer onto the paper wherever the bubbles burst.
Why This Step Matters: This process creates intricate designs—each print will be different and full of character. Embrace the unpredictability of art!
Step 5: Let it Dry
Carefully lift the paper, and you’ll see the vibrant, whimsical patterns left behind. Place it aside to dry completely, which may take anywhere from one hour to overnight depending on the thickness of the paint.
Step 6: Clean Up
Make sure to properly clean your workstation. Rinse any bowls or containers you used, and tidy up your creative chaos.
Tips and Tricks for Stunning Results
- Experiment with Colors: Don’t be afraid to mix different colors in one batch or layer multiple bubble prints for a more dynamic piece.
- Add Glitter: For extra sparkle, sprinkle some glitter onto the bubbles before they pop!
- Different Tools: Instead of straws, try using blowers or even a small air pump to create varying bubble sizes.
- Outdoor Fun: Bubble painting is best done outdoors, where you can embrace the sun and wash away any mess easily.
Creative Variations
- Themed Colors: Use colors that represent holidays or special events, like reds and greens for Christmas or pastels for spring.
- Stencils: Before printing, place stencils on your paper to create interesting shapes.
- Mixed Media: Incorporate your bubble paintings into larger collage artwork, layering with stickers or further painting.
Final Thoughts
Bubble painting is an engaging and delightful way to unleash your creativity! It takes just a few minutes of preparation, and the joy it brings is worth every second. As someone who has shared this activity with various friends and family members, I can tell you that the laughter and sheer excitement of watching colored bubbles rise and pop brings us together, regardless of age.
So, gather your materials and start experimenting! I can’t wait to see the amazing bubble paintings you create! Don’t forget to share your masterpieces on social media and tag me—I would love to celebrate your artistic journey with you! Happy crafting!