DIY Tin Can Lanterns: A Step-by-Step Guide to Crafting Your Own Magical Glow
Introduction: The Charm of Tin Can Lanterns
As an experienced crafter, I can tell you that few projects evoke as much joy and whimsy as DIY tin can lanterns. This charming craft combines recycling with creativity, transforming what would be discarded into stunning, illuminated art pieces. Perfect for outdoor gatherings, cozy evenings on the porch, or even festive occasions, these lanterns can cast a warm glow and create a delightful ambiance that delights family and friends.
Creating tin can lanterns is not just a craft; it's an experience. Whether you’re inspired by summer nights under the stars or you want to add a personal touch to your special events, these lanterns can embody the spirit of those moments. I've made countless variations, and I wholeheartedly believe that everyone can create this beautiful décor with just a few simple materials. So let’s dive into the process and conjure up some enchanting lanterns together.
What You'll Need: Simple Materials
Before we jump into the crafting process, you’ll need to gather a few accessible materials. Here’s what you’ll need:
- Empty Aluminum Cans (soup or soda cans work best)
- Hammer and Small Nail or a Screwdriver
- Pliers (optional but helpful)
- Warm Water
- Freezer
- Wire or Twine (to create a handle)
- Tea Lights or LED Candles (to avoid fire hazards)
- Paint (acrylic, spray paint, or glass paints)
- Paintbrushes (if using acrylic paint)
- Decorative Elements: ribbons, beads, or any embellishments you like.
- Safety Gloves (to protect your hands)
- Towel (for drying)
Safety Warning:
Working with sharp objects can be dangerous, so please proceed with caution. Wear gloves to protect your hands, and work in a safe space where you can dispose of debris properly.
Step-by-Step Tutorial: How to Make DIY Tin Can Lanterns
Step 1: Prepare Your Cans
First things first—I rinse out my aluminum cans and remove the labels. It’s crucial to have a clean surface to work with. After rinsing, I fill each can with water and pop them in the freezer for several hours until solid.
Why this matters: Freezing aids in the can’s stability while you’re creating your design. It helps prevent the can from bending when you’re hammering.
What could go wrong: If the water freezes unevenly, the can could warp. Be sure you have ample water to fill the can entirely. It’s better to leave it in the freezer overnight if you’re unsure!
Step 2: Create Your Designs
Once the water in the can is frozen solid, take it out of the freezer and let it sit for about 5–10 minutes to slightly thaw. This will make it easier to remove the ice later.
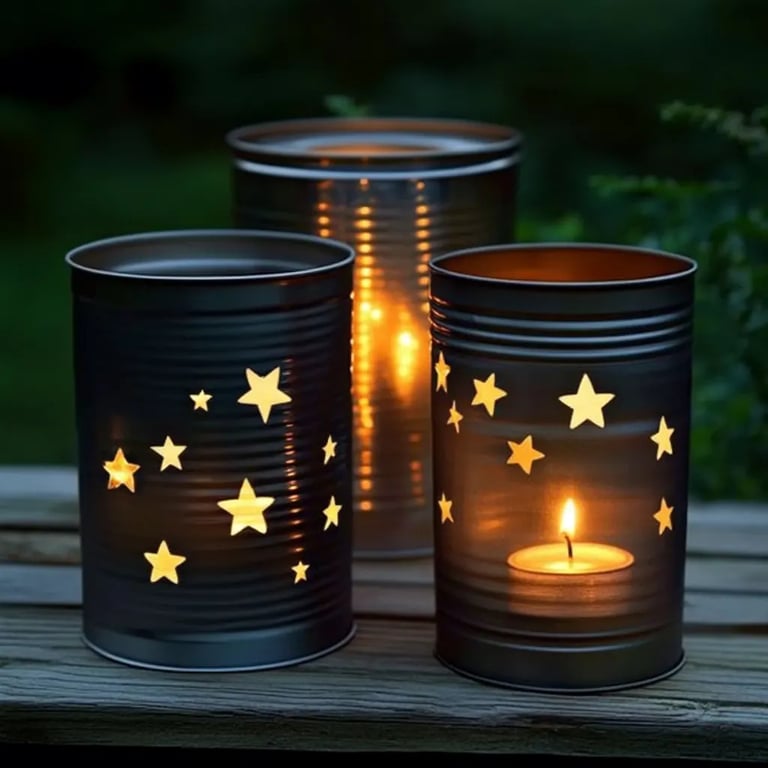
Secure the can with a towel or a cloth on a flat surface. Using your hammer and nail (or a screwdriver), begin to poke holes into the can to create your desired design. I often choose simple patterns like stars, hearts, or flowers to keep it easy.
Why this matters: The holes will let light shine through beautifully, casting patterns on the surrounding surface.
Tips:
- Change the size of the holes for different effects—a larger hole will produce a bolder light pattern.
- If you’re unhappy with your design, just use the pliers to gently pull the metal back in.
Step 3: Soften the Edge
Once you’re happy with your design, remove the ice by running warm water over the can (not too hot!). Then, dry the can completely. Carefully turn the can over and push inward slightly on the edges with your fingers or use pliers to remove any sharp, jagged edges.
Why this matters: Ensuring that the edges are smooth prevents cuts and makes your lantern safer to handle.
Step 4: Decorate Your Lantern
Now comes the fun part: painting! You can use spray paint or apply acrylic paint with a brush, adding layers for a more opaque finish. Experiment with your favorite colors! I often opt for vibrant hues or pastels, depending on the season.
Creative Variations: You could also choose metallic paints for a more glamorous look or glass-paint for a stained glass effect.
What could go wrong: If your paint doesn’t adhere well, give the can a light sand with fine-grit sandpaper before applying the paint.
Step 5: Add Wire Handles
Taking your wire or twine, cut a length of about 24 inches. Poke two small holes on opposite sides of the can, threading the wire through and twisting it to secure the handle. This step allows you to hang your lantern.
Why this matters: A handle makes it easy to carry or hang your lantern.
Step 6: Add a Flame
The safest choice is using battery-operated LED tea lights, which will flicker just like a real candle without the risk of fire. Place it inside your lantern, switch it on, and enjoy the glow!
Safety Note: If you choose to use real candles, ensure the lantern is placed on a heat-resistant surface and never leave it unattended.
Personal Anecdote
The first time I made these lanterns was during a friends’ gathering. We set our lanterns up in my backyard, and the soft glow created such an enchanting atmosphere. We spent hours sharing stories, with our laughter echoing under the lantern light. It reminded me why I love crafting—it's not just about creating objects but about creating memories.
Tips for Success
- Embrace Your Creativity: Don’t hesitate to go off script! Let your artistic side shine and experiment with textures, designs, and colors.
- Craft with Friends or Kids: This project is a great group activity! Just remember to supervise the hammering and cutting process.
- Consider Themes for Special Occasions: For Halloween, carve spooky designs or use black paint, and for holidays, embellish your lanterns with festive decor.
Creative Variations to Explore
- Layered Lanterns: Stack smaller cans on top of larger ones for an eye-catching centerpiece.
- Nature-Inspired Designs: Use leaves, flowers, or twigs to create unique patterns!
- Seasonal Decor: Change the colors and designs with the seasons to keep your decorations fresh and exciting.
Conclusion: Light Up Your World
Creating DIY tin can lanterns is not only a delightful experience but also an effective way to recycle and beautify your space. This humble craft can illuminate your home and spark joy during gatherings, creating heartwarming memories that will last a lifetime.
So grab your supplies, gather your friends or family, and let your creativity flow. The journey of crafting these lanterns is just as delightful as the final product—an embodiment of light and love in your home. Happy crafting!