DIY Mason Jar Aquarium: Create Your Own Miniature Underwater World
Hello, fellow crafters! Today, I’m thrilled to share an incredibly fun and fulfilling project that is sure to delight both kids and adults alike: a DIY Mason Jar Aquarium. As an experienced crafter, I’ve enjoyed creating these whimsical underwater worlds, and I can’t wait to guide you through the process. This charming aquarium makes for a wonderful decorative piece, a unique gift, or even a delightful project for home-schooling sessions. Plus, it brings a slice of nature indoors, brightening up any space!
Why Mason Jar Aquariums Are So Popular
Mason jar aquariums have gained a foothold in the crafting community due to their compact size, affordability, and versatility. They can be tailored to fit any room decor and can serve many purposes—displaying plants, housing small aquatic creatures, or simply adding a pop of color to your space. Plus, who doesn’t love a project that is eco-friendly and allows you to repurpose items you might already have on hand?
Now, let’s dive into the steps for creating your very own Mason jar aquarium, including tips and tricks I’ve learned along the way!
—
Materials You Will Need
Before we begin, gather the following materials:
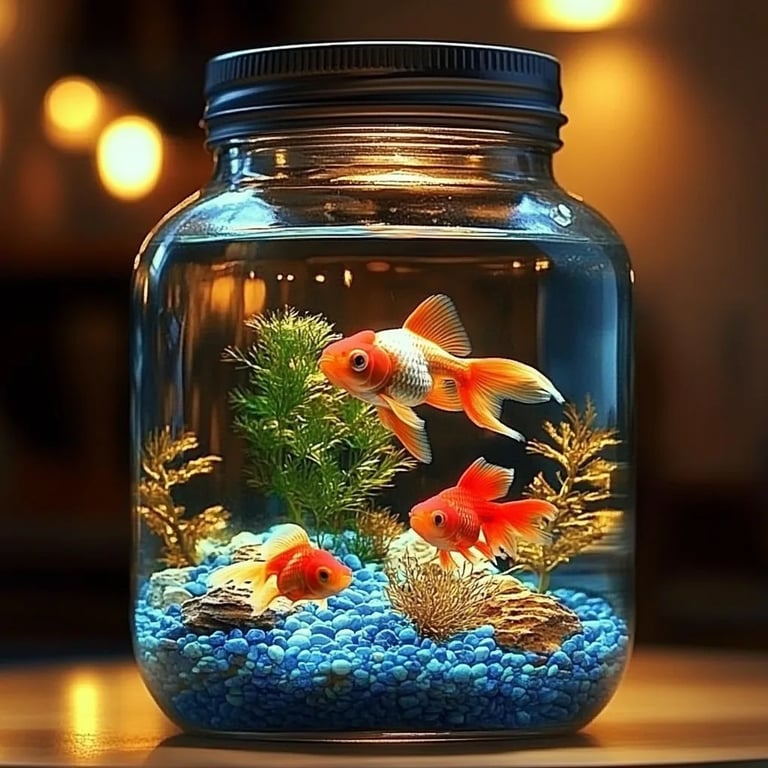
- Mason Jar (16 oz or larger): A wide-mouth jar works best for easy access.
- Aquatic Plants: Look for low-maintenance options like Java Fern, Anubias, or Marimo Moss Balls.
- Small Fish (optional): Betta fish or guppies are popular choices for beginners. Ensure the fish are small enough to thrive in a small space.
- Gravel or Pebbles: A layer of gravel enhances the aesthetic and provides a substrate for plants.
- Water Conditioner: Essential to treat tap water before adding it to the jar for fish health.
- Decorative Items: Small rocks, driftwood, or decorative pebbles contribute to the underwater scene.
- Filter & Air Pump (optional): For long-term projects, these can help maintain water quality.
- Plant Fertilizer: If you intend to include plants, fertilizer will help them thrive in the confined space.
- Water Test Kit: Optional but useful to monitor water chemistry when keeping fish.
Step 1: Prepare Your Mason Jar
First things first—clean your Mason jar thoroughly. I usually wash mine with warm, soapy water and rinse it well. This ensures no contaminants affect the plants or fish. If you’re using a jar that has been previously used for food, be extra diligent to remove any residue.
Tip: Avoid using soap on the lid and rings to prevent any residual chemicals from getting into the water.
Step 2: Create the Aquatic Landscape
Now, it’s time to add a touch of life! Start by placing a one-inch layer of gravel or pebbles at the bottom of your jar. If you’re creating a land-to-water transition, you might consider a terrarium-style display with layers of different materials (like activated charcoal, soil, and gravel) to create height and texture.
As you work, think about the arrangement of your plants. I like to place taller plants in the back and shorter ones in the front to create an illusion of depth.
What Could Go Wrong: Overcrowding can lead to poor air circulation for the fish. If you want to add more plants later, leave some space!
Step 3: Add Plants and Decorations
Place your aquatic plants into the gravel, making sure their roots are well covered. You can also add decorative items or toy creatures to lend character to your aquarium. It’s essential to choose items that are aquarium-safe; avoid plastic or painted materials that may leach toxins.
Personal Experience: I once used a decorative plastic toy as a piece in my aquarium—only to find the paint peeling off after a few weeks. Lesson learned—stick to natural materials when possible!
Step 4: Fill with Water
Carefully fill the jar with the water of your choice. If using tap water, it’s best to treat it with a water conditioner to remove harmful chemicals like chlorine or chloramine. Pour steadily to avoid disturbing your carefully arranged plants and gravel.
Safety Warning: Always allow the treated water to sit for at least 24 hours prior to introducing fish to ensure any residual chemicals dissipate.
Step 5: Introduce the Fish (Optional)
If you’re ready to add small fish, do so gradually. A common approach is to let fish acclimate to their new home gradually. Place the fish in a separate container with the water they were in and float this container in your aquarium for 15-30 minutes. This allows them to adapt to the water temperature.
Tip: Always check that the species is compatible with your decorative environment—some fish need more space than others!
Step 6: Maintain Your Aquarium
You want to take care of your aquarium to keep everything thriving! Here are some general maintenance tips:
- Change Water: Replace about 25% of the water every week to keep it fresh.
- Water Testing: Monitor the water conditions with a test kit if you add fish.
- Trimming Plants: Occasionally trim dead leaves or overgrown plants to maintain a healthy ecosystem.
What Could Go Wrong: Overfeeding fish can lead to poor water quality. Stick to small portions, and remember to observe your fish’s feeding habits!
Step 7: Enjoy Your Creation!
Step back and admire your handiwork. Your DIY Mason Jar Aquarium is not just a project; it’s a piece of art! Feel free to share it on social media or with friends and family—people love to see creativity and craftsmanship in action.
—
Creative Variations: Making It Your Own
Feeling adventurous? Here are some fun variations and additions:
- Themed Aquariums: Create specific themes like a ‘Mermaid Cove’ with mini mermaid figurines or a ‘Coral Reef’ with vibrant decorations.
- Eco-Friendly Option: Consider turning it into a small terrarium with air plants if you prefer not to keep fish.
- Lighting: Adding LED lights above your aquarium can showcase your creation beautifully, especially in the evening.
—
Conclusion
And there you have it—a step-by-step guide to creating your very own Mason Jar Aquarium! Not only have you crafted a lovely, low-maintenance display, but you’ve also created a habitat for life (if you decided to go with fish). I hope this guide has inspired you to take on this delightful DIY project and leave you with a lasting sense of accomplishment.
Remember, crafting is about enjoying the process and experimenting with your ideas. Each aquarium will be unique, filled with your creativity and style. I can’t wait to hear about your experiences and any improvements you make along the way, so feel free to share in the comments below!
Happy crafting, and may your miniature underwater world flourish!