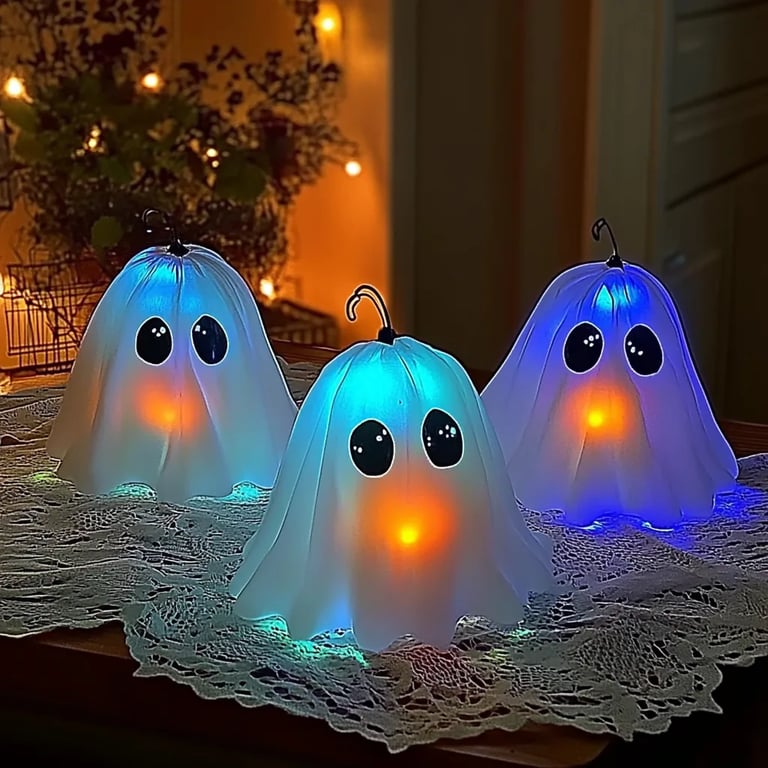
DIY Friendly Glowing Bottle Ghosts: A Step-by-Step Guide for Spooktacular Decor
Hello, fellow crafters! As a passionate DIY enthusiast and lover of all things haunted, I’m absolutely thrilled to share with you my step-by-step tutorial for creating Friendly Glowing Bottle Ghosts. These enchanting decorations not only light up your home with a whimsical glow but also bring that delightful spookiness to your Halloween festivities. Whether you're preparing for a Halloween party, decorating your porch, or just looking to add some charm to your autumn decor, these friendly little ghosts are the perfect addition!
Why Make Friendly Glowing Bottle Ghosts?
You may be wondering why these glowing bottle ghosts have become so popular over the years. First off, they’re incredibly easy to make, requiring just a handful of materials. Secondly, they’re versatile and can be used both inside and outside your home for various occasions. Imagine them lighting up your walkway on Halloween night, creating an inviting yet eerie ambiance for trick-or-treaters!
I love making these ghosts because they embody the spirit of Halloween without being too scary. Plus, it’s a wonderful craft to do with kids or a fun activity with friends. So, let’s gather our supplies and dive into this rewarding project!
What You'll Need
- Plastic or glass bottles (I prefer using clear plastic bottles for safety and ease.)
- White cheesecloth or muslin fabric (This gives the ghosts their ethereal appearance.)
- LED tea lights or glow sticks (For the glowing effect—safety first!)
- Black and white marker (To create the ghostly faces.)
- Scissors
- Glue or double-sided tape (Optional, for securing the cheesecloth.)
- Washi tape or string (For added detail and decoration.)
- Optional embellishments: Craft foam shapes, stickers, or any other items to personalize your ghost.
Step 1: Prepare Your Bottles
Why This Step Matters: Starting with a clean canvas ensures a smooth crafting experience. Plus, if you’re using glass, you’ll want to handle it carefully.
- Start by cleaning your bottles thoroughly. If they have labels, remove them by soaking in warm soapy water. This will take a few minutes, but taking the time here will ensure your ghosts are pristine.
- If you're using glass bottles, be cautious—always handle them with care. Plastic bottles are lightweight and much less hazardous. Choose the size based on where you want your ghost to be—smaller bottles for table settings and larger ones for yard decoration.
Step 2: Create the Ghostly Form
Tip: If you’re using cheesecloth, it can be a bit tricky to shape, but I promise it’s worth it!
- Cut a generous piece of cheesecloth or muslin—around 24” by 24” works great, depending on the size of your bottle.
- Drape the cheesecloth over the bottle. Allow it to gather and flow gently, forming the body of the ghost. I usually drape it and then adjust until it looks like it’s floating.
- If desired, use a dab of glue or a small piece of double-sided tape to secure the cheesecloth to the base of the bottle. This way, it won’t shift when you move it.
Step 3: Add the Glowing Element
Safety Warning: Avoid using regular candles inside the bottles, as they pose a fire hazard. Choose LED tea lights instead.
- Place an LED tea light at the bottom of the bottle, or if you're opting for glow sticks, bend them to activate and drop them inside.
- For a more eerie effect, you might consider using several glow sticks for a richer glow, especially if you’re using larger bottles.
Step 4: Face Your Ghost
Why This Step Matters: Adding a face brings your ghost to life and adds a personal touch.
- Using a black marker, draw cute faces on your cheesecloth. I suggest simple eyes and a smile—avoid adding anything too scary to keep the “friendly” vibe intact!
- If you prefer, you can also cut out eyes from black craft foam and glue them onto the cheesecloth for a more 3D effect. This could also be a fun opportunity for kids to express their creativity!
Step 5: Final Touches and Display
- To enhance the ghostly appearance, consider wrapping washi tape around the base of the bottle or tying a string around the neck. You can use fall-themed colors or patterns for a festive touch.
- Once your ghosts are ready, place them in your desired location. If you're using them outside, make sure to position them away from direct wind or rain to maintain their integrity.
- Don’t hesitate to create a whole family of ghostly friends! Vary their heights and expressions to create a delightful and unique scene.
Troubleshooting Tips
If your cheesecloth keeps slipping, consider using a bit more adhesive or securing it with a rubber band temporarily until you are satisfied with its position. If the glow isn’t bright enough, try repositioning the LED or adding more glow sticks. If you’re not happy with the face, remember—paint over it! It’s all part of the fun.
Creative Variations
Feel free to get creative! You can paint the bottles with glow-in-the-dark paint before adding cheesecloth for an even more striking effect. You could use colored lights inside your bottles for a non-traditional ghostly look—think green for a witchy vibe or orange for classic Halloween.
The Satisfying Conclusion
And there you have it! Your Friendly Glowing Bottle Ghosts are complete and ready to charm your home. Every time I set these ghosts up, I can’t help but smile. They spark joy and bring a touch of whimsy to the autumn evenings. Plus, these little spirits become conversation starters during gatherings.
I hope this guide has inspired you to create your own glowing bottle ghosts. Remember, the most important thing about crafting is to enjoy the process. So, gather your materials, invite some friends or family, and start creating a little magic of your own. Happy crafting, and may your ghosts glow brightly!