DIY Firework Salt Painting: A Sparkling Adventure in Creativity
Hello fellow crafters! Today, I'm excited to share with you a delightful and mesmerizing crafting project that I'm absolutely enamored with—DIY Firework Salt Painting. This vibrant art form combines colors, textures, and the whimsical charm of fireworks, all while incorporating a relaxing and meditative aspect to your creative process.
What is Firework Salt Painting?
Firework salt painting is a fun and easy way to create beautiful, textured art pieces that mimic fireworks lighting up the night sky. Utilizing salt, watercolor, and a few household items, this technique is not only perfect for artists of all ages but also formulates a terrific hands-on activity for kids. Whether you’re gearing up for the Fourth of July, hosting a birthday party, or just looking for enrichening weekend activities, this craft is sure to spark joy and creativity.
Why it’s Popular
The popularity of salt paintings stems from their vibrant colors, engaging process, and the robust results achievable with minimal supplies. Not only do these paintings provide a sensory experience, but they also offer a wonderful lesson in science as you watch the colors blend and spread on the salt surface. This project is great for educators, parents, or anyone looking to unwind and indulge in a little joy-filled messy play.
What You'll Need
You’ll be pleased to know that you don’t need much to embark on this creative journey! Here’s a comprehensive list of materials you’ll need to get started:
Materials:
- Watercolor Paper: A sturdy, textured paper that will withstand moisture.
- Table Salt: Regular table salt works best; it allows the colors to spread and bloom beautifully.
- Liquid Watercolors or Food Coloring: Either will work perfectly—liquid watercolors are more vibrant, but food coloring is a convenient substitute.
- Small Bowls: For mixing watercolors and food coloring.
- Paintbrushes: A variety of sizes is helpful, but a larger brush and a fine detail brush will work wonders.
- Water: For mixing colors and rinsing your brushes.
- Pipettes or Droppers: Optional but very handy for controlled application of the color.
- Paper Towels: For cleanup and drying your brushes.
- A tray or box: To contain the mess!
Step-by-Step Guide to Creating Firework Salt Paintings
Now that we have all our supplies ready, let’s dive into the exhilarating step-by-step process!
Step 1: Prepare Your Canvas
I often advise starting with a clean workspace. Lay down old newspapers or a plastic tablecloth to catch any spills. Cut your watercolor paper to your desired size—larger pieces allow more space for colorful explosions, while smaller ones are perfect for quick creations.
Step 2: Sketch the Fireworks
With a pencil, lightly sketch the shapes of fireworks exploding on your paper. Don’t worry about this being perfect! The beauty of this process is its spontaneity. You can also opt to freestyle without sketches and let your imagination flow.
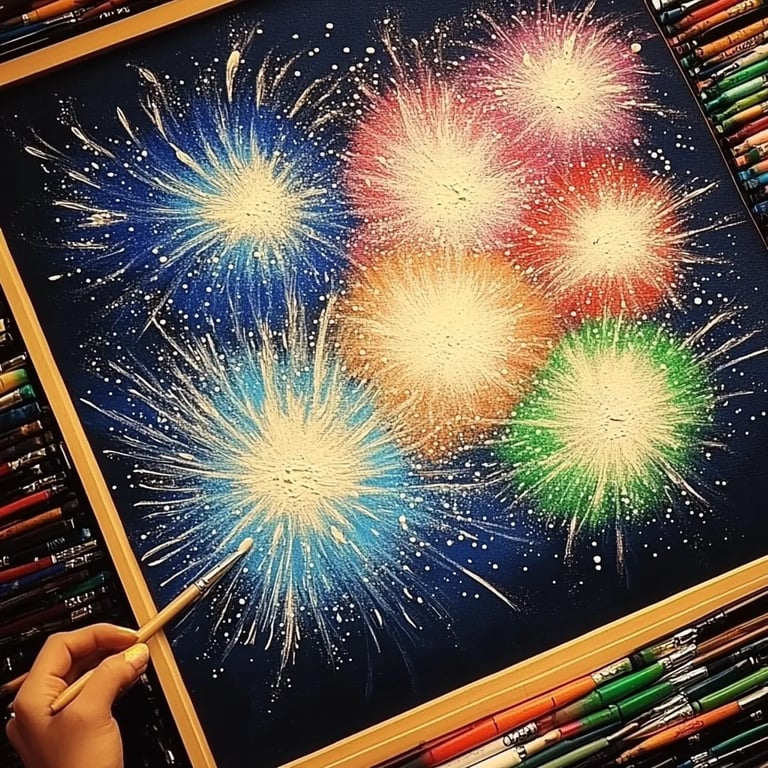
Step 3: Apply the Salt
Here’s where the magic truly begins! Use your brush to apply a thin layer of clean water over the areas you want your “fireworks” to shimmer. Quickly, while the paper is wet, sprinkle table salt over the areas where you've applied moisture. The salt will absorb water and create beautiful textures, which is where the captivating effects come from. It’s easy to put on too much salt, so aim for a light, even layer—think of it as covering your favorite dish with a seasoning, not drowning it in salt.
What to Watch Out For
It's vital to be careful not to oversaturate the paper with water; you want enough to activate the salt, but too much can cause your paper to warp or tear. If this happens, simply let it dry flat and try again on a new piece.
Step 4: Mix Your Colors
In small bowls, mix your liquid watercolors or food coloring with water to create vibrant pigments. I often stick to bold colors like red, blue, and gold for that fireworks theme, but don’t be shy to experiment with neon shades or metallics for extra flair!
Personal Tip: If you’re using food coloring, remember that it’s highly concentrated. You will only need a few drops to achieve impactful colors.
Step 5: Apply the Colors
Now, the fun part! Use your brush, pipettes, or droppers to apply colors onto the salt. Watch in awe as the colors spread and bloom, creating beautiful fireworks across your canvas. The salt acts like a sponge, absorbing some of the water and making the colors run in beautiful, unpredictable ways.
Things to Keep in Mind
If the colors aren't spreading as much as you'd like, it might be due to insufficient moisture. In that case, use a clean brush to dab a little more water around the colors—the beauty of salt painting is often in its happy accidents!
Step 6: Drying Time
Once you’re satisfied with your artwork, it’s time to let it dry. This usually takes a few hours, but for best results, I recommend leaving it overnight. The salt will continue to absorb the color and create captivating textures as it dries.
Alternative Methods & Tips
If you have young kids involved, consider using epoxy glue instead of salt for less mess. You can allow the glue to dry before painting, or if you're feeling adventurous, they can sprinkle salt directly on the glue before it dries.
For a glow-in-the-dark effect, mix some glowing powder (often available at art supply stores) with your watercolors for a fantastic twist at nighttime.
Safety Warnings
As with any crafting endeavor, safety first! Ensure not to ingest any materials, keep them away from your eyes, and work in a well-ventilated area, particularly when using vibrant colors that might stain. Always supervise young ones to avoid any mishaps!
Personal Reflections
I remember my first experience with firework salt paintings—it was such a mesmerizing process to see those colors collide and dance on the salt. Every time I create these pieces, I feel a childlike excitement—and I hope you do, too!
Creative Variations
After mastering the basic technique, consider experimenting with different themes:
- Seasonal Variations: For winter, you could mimic fireworks using icy blues and whites.
- Themed Pieces: Use the same technique for holidays, and use colors that represent those occasions.
- Mixed Media: Incorporate other techniques such as using metallic paints or glitter for added sparkle.
Conclusion
I hope this guide has ignited your creative spirit and provided you with all the knowledge you need to rock your own DIY firework salt paintings! The most important part of crafting is to enjoy the process and not worry about the end product being “perfect.” Each creation holds its own beauty in the journey you've taken to make it.
So grab your supplies, gather your family or friends, and let each sprinkle of salt and stroke of paint create delightful surprises. I’d love to hear about your experiences and see your creations, so don’t forget to share them!
Happy crafting, friends! ✨🎉