Creating Beautiful Bioplastic Suncatchers: A Crafting Journey
Hello, fellow crafting enthusiasts! Today, I’m thrilled to guide you through an enchanting project that combines creativity and eco-friendliness: making bioplastic suncatchers. These vibrant, translucent pieces not only brighten up any space but also serve as a wonderful reminder of our commitment to sustainability. Imagine sunlight streaming through beautiful colors, illuminating your windows—it's truly a joyful sight!
Bioplastic is gaining popularity for its environmental benefits compared to traditional plastic. By crafting biodegradable materials, we’re not only expressing our creativity but also contributing to a greener planet. Whether you want to decorate your home, create gifts for friends, or host a crafting session with kids, these bioplastic suncatchers are the perfect project. Let’s dive into this delightful journey of colors and shapes!
Why You Should Make Bioplastic Suncatchers
- Eco-Friendly: Bioplastic is made from renewable resources and reduces dependency on fossil fuels.
- Engaging Activity: The crafting process is enjoyable for both kids and adults, providing a creative outlet.
- Customizable: You can choose your colors, shapes, and designs, allowing for a unique production every time.
- Gorgeous Decor: Once completed, these suncatchers add an artistic touch to any window and can be used year-round.
Materials Needed
Before we roll up our sleeves, let's prepare everything we need. Here’s a list of accessible materials you’ll need:
- Cornstarch (1 cup)
- Water (3 cups)
- Glycerin (1 tablespoon, available at pharmacies or online)
- Food coloring or natural dyes (for the coloring, optional)
- A medium-sized saucepan
- Stirring spoon
- Cookie sheet or flexible silicone mat (for shaping)
- Parchment paper (for easy removal)
- Cookie cutters or any shaped molds
- Paintbrushes (optional, for adding detail)
- Straws (if you want to hang your suncatchers)
Step-by-Step Tutorial
Step 1: Preparing the Bioplastic Mixture
In a medium-sized saucepan, combine 1 cup of cornstarch with 3 cups of water. Add the glycerin—this is crucial for pliability and durability. Mixing these ingredients over low heat helps prevent any lumps.
Why This Step Matters:
Heating the mixture allows the cornstarch to dissolve and create a gel-like substance. It's also where you can decide on the thickness of your suncatcher.
Common Issues:
If the mixture becomes too thick, simply add a bit more water. Conversely, if it’s too thin, continue heating and stirring until it thickens to your desired consistency.
Step 2: Adding Colors
Once your mixture has thickened, it’s time to add color! If you’re using food coloring, start with a few drops and gradually mix until you reach your desired hue. For natural dyes, you can experiment with ingredients like beet juice (for red), turmeric (for yellow), or spirulina (for green).
Creative Variation:
You can create layered suncatchers by dividing your mixture and coloring each layer differently before pouring them into your molds.
Step 3: Pouring and Shaping
Pour the colored bioplastic into cookie cutters placed on your cookie sheet or silicone mat. Aim for around a quarter-inch thick for a sturdier suncatcher. If you want to hang your creation, remember to make a small hole at the top using a straw before the mixture sets.
Tip:
Spraying a light coat of cooking oil in the molds can help in easily removing the suncatchers once they’re set.
Step 4: Allow to Dry
Let your creations dry at room temperature for 24-48 hours. The drying time depends on how thick your pieces are. You’ll know they’re ready when they feel firm to the touch and have a slightly translucent effect.
Warning:
Do not attempt to speed up the drying process with a heat gun or oven as this can lead to cracking.
Step 5: Finishing Touches
Once your suncatchers are dry, gently remove them from the molds. You can beautify them with additional details by using paint or attaching small beads and embellishments for added texture and visuals.
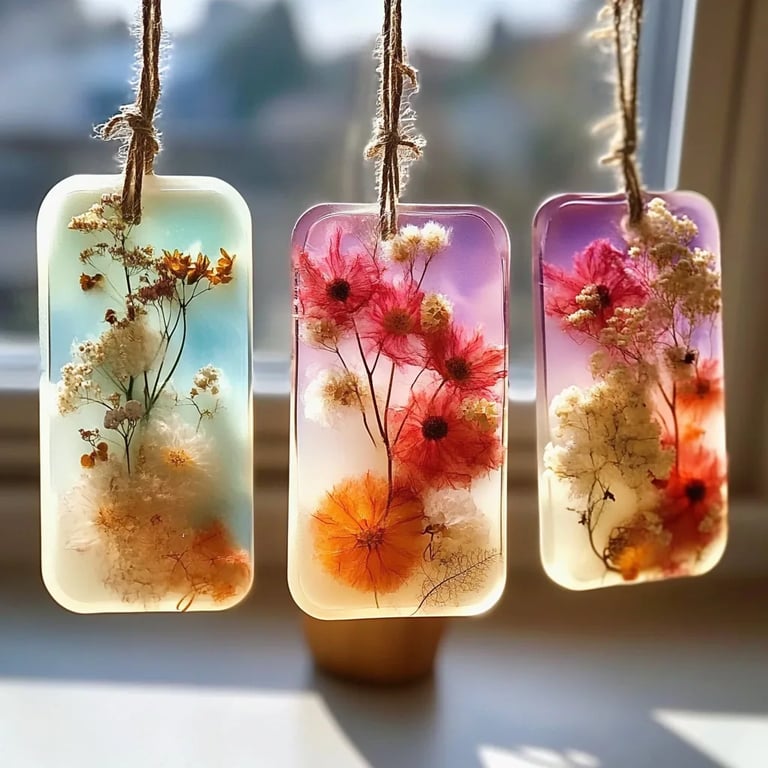
Personal Anecdote:
I once adorned a few suncatchers with pressed flowers, and they turned out incredibly beautiful! Nature truly adds a unique touch that artificial materials can't replicate.
Step 6: Displaying Your Art
Now the fun begins! Hang your suncatchers in windows where they'll catch the sunlight. You can use twine, fishing line, or string depending on your desired aesthetic. Experiment with different hanging heights to find a visually pleasing arrangement.
Safety Considerations
- Ensure proper ventilation while crafting.
- Keep all materials out of reach of young children or pets.
- If using natural dyes, patch test on skin if you have sensitivities.
Alternative Methods & Ingredient Substitutions
- If cornstarch is unavailable, look for tapioca starch as a substitute.
- For a sturdier version, consider adding a teaspoon of vinegar to your bioplastic mixture.
Final Thoughts
Crafting bioplastic suncatchers has been such a rewarding experience for me, and I’m confident you’ll find joy in this project, too. The vibrant colors and shimmering effects can uplift your mood and the ambiance of your home, all while embodying sustainability.
I encourage you to collect your materials and dive in! As you explore, don't hesitate to experiment with techniques and colors; the only limits are your imagination. And remember, each suncatcher is a reflection of your unique artistic touch. Happy crafting!