Creating a Dinosaur Sensory Bin: A Step-by-Step Guide
Hello there, fellow crafters! If you’re searching for a fun and educational activity to engage your little ones, you’ve landed in the right spot. Today, I’m excited to share with you how to create a Dinosaur Sensory Bin – a delightful exploration of textures, colors, and imaginative play that will have your children roaring with excitement.
What is a Dinosaur Sensory Bin?
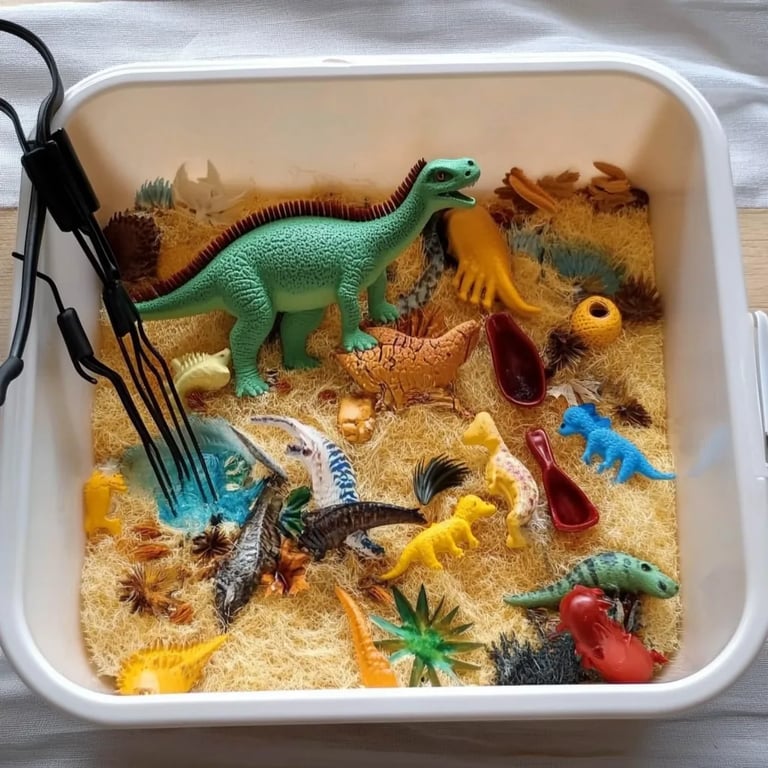
A Dinosaur Sensory Bin is a themed container filled with materials that stimulate a child’s senses while allowing them to explore their creativity. Sensory bins are hugely popular among parents and educators alike because they provide a hands-on learning experience, enhancing fine motor skills and sparking curiosity about dinosaurs and the prehistoric world. Whether you're planning a playdate, a dinosaur-themed birthday party, or simply looking for a quiet afternoon activity, a sensory bin is perfect for all occasions.
Why is it Popular?
Sensory bins are gaining traction for several compelling reasons:
- Engagement: Kids are naturally drawn to sensory experiences. The tactile nature of a sensory bin keeps them engaged longer.
- Inclusive Play: Perfect for children of various ages and developmental stages, these bins can be adapted for toddlers to older children.
- Educational Value: Each bin can incorporate learning about dinosaurs, habitats, and even basic scientific concepts like volume and texture.
Ready to dive in? Let’s gather our materials and get crafting!
Materials You'll Need
Basic Ingredients
- Bin: A large plastic container with a lid (the size is up to you – I recommend around 18 quarts).
- Base Material: This could be kinetic sand, rice, beans, or even shredded paper. I usually opt for brown rice as it resembles dirt and is visually appealing.
- Dinosaur Figures: A mix of different types of dinosaurs enhances imaginative play. You can find these at toy stores or online.
- Natural Elements: Think of rocks, sticks, pinecones, or even faux plants to create a prehistoric environment.
- Decorative Items: Optional items like mini figures of volcanoes, eggs, or even dinosaur footprints can add extra flair.
Tools
- Measuring cups or scoops
- Tongs or small shovels
- Optional: Paper and crayons for drawing the scenes they play with
Step-by-Step Tutorial
Step 1: Choosing the Base Material
The base material sets the tone for the entire sensory experience. I start by measuring about 3-5 cups of dry rice (or whatever base you choose) to fill our bin about halfway. Remember, this is a tactile experience, and kids love to dig in!
Tip: If using rice, consider coloring it. Mix it with a few drops of food coloring and a splash of vinegar, then let it dry on a baking sheet. It’ll add fun colors to your bin.
Step 2: Pouring in the Base
Carefully pour your chosen base material into the bin. As you do this, encourage your kids to help. This step creates excitement and teaches them about measurements!
What Could Go Wrong: If you spill, don’t worry. It happens! Just take a deep breath, grab a broom, and clean it up together. Consider it part of the adventure!
Step 3: Adding Natural Elements
Next, it’s time to build an environment for our dinosaurs! Add a mix of rocks, sticks, and other natural elements to simulate a prehistoric landscape. Arrange these items creatively, ensuring there’s enough space for the dinosaurs to roam.
Why This Matters: Adding these elements not only enhances the sensory experience by introducing different textures but also promotes imaginative play as children pretend they’re exploring a dinosaur habitat.
Step 4: Introducing the Dinosaurs
Now comes the fun part! Place the dinosaur figures into the bin and let the exploration begin. Encourage your kids to dig through the rice to find them, making it a treasure hunt!
Tip: You might want to display information cards about each type of dinosaur nearby, so your little ones can learn as they play.
Step 5: Additional Fun Additions
Consider adding some toys or tools for extra fun. Mini shovels, scoops, and even cups can help with transferring materials and enhance the sensory experience.
Creative Variation: Create a mini volcano using clay or cardboard to serve as a centerpiece. This can serve as an educational element discussing volcanic eruptions and dinosaur habitats.
Safety Tips
- Small Parts Warning: Always supervise young children during playtime, especially if the bin contains small dinosaur figures.
- Material Safety: Ensure that any materials used are safe and non-toxic, especially if your young ones have a habit of putting things in their mouths.
Alternatives and Substitutions
Not all sensory bins need to include the same materials:
- Base Options: If rice isn’t available, use oats, shredded paper, or dried beans.
- Dinosaur Figures: Instead of plastic toys, try using printed pictures of dinosaurs glued to cardboard for a budget-friendly activity.
Final Thoughts
Creating a Dinosaur Sensory Bin can be a fantastic bonding experience between you and your children. Watching their imaginations soar as they create their own prehistoric world is truly a joy. Remember, the beauty of crafting is that it doesn’t have to be perfect. Feel free to experiment with different materials and arrangements.
If I’ve learned anything through my crafting journey, it’s that patience is key—be open to letting your kids lead their play. With this in mind, I hope this guide has inspired you to create a Dinosaur Sensory Bin that will be fun, educational, and full of sensory delight. Happy crafting, and may your creations be filled with roars of joy!